1 Spring MVC概述
- Spring MVC是Spring为表现层提供的基于MVC设计理念的优秀的web框架,是目前最主流的MVC框架之一。
- Spring3.0后全面超越Struts2,成为最优秀的MVC框架。
- Spring MVC通过一套MVC朱姐,让POJO成为处理请求的控制器,而无须实现任何的接口。
- 支持REST风格的URL请求。
- 采用了松耦合的可插拔组件结构,比其他MVC框架更具有扩展性和灵活性。
2 Spring MVC之HelloWorld
2.1 开发步骤
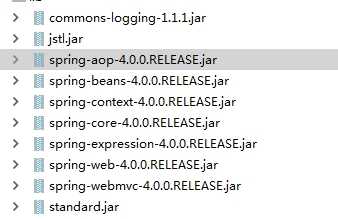
- 导入相应的jar包
- 在web.xml中配置DispatcherServlet
- 加入SpringMVC的配置文件
- 编写处理请求的处理器,并标识为处理器
- 编写视图
2.2 编码
2.2.1 导入jar包
2.2.2 在web.xml中配置前端控制器
- web.xml
<?xml version="1.0" encoding="UTF-8"?>
<web-app xmlns="http://xmlns.jcp.org/xml/ns/javaee"
         xmlns:xsi="http://www.w3.org/2001/XMLSchema-instance"
         xsi:schemaLocation="http://xmlns.jcp.org/xml/ns/javaee http://xmlns.jcp.org/xml/ns/javaee/web-app_3_1.xsd"
         version="3.1">

    <!-- 配置前端控制器 -->
    <servlet>
        <servlet-name>DispatcherServlet</servlet-name>
        <servlet-class>org.springframework.web.servlet.DispatcherServlet</servlet-class>
        <init-param>
            <param-name>contextConfigLocation</param-name>
            <param-value>classpath*:spring-mvc.xml</param-value>
        </init-param>
    </servlet>

    <servlet-mapping>
        <servlet-name>DispatcherServlet</servlet-name>
        <url-pattern>/</url-pattern>
    </servlet-mapping>


</web-app>
2.2.3 在src下新建spring-mvc.xml文件
- spring-mvc.xml
<?xml version="1.0" encoding="UTF-8"?>
<beans xmlns="http://www.springframework.org/schema/beans"
       xmlns:xsi="http://www.w3.org/2001/XMLSchema-instance"
       xmlns:context="http://www.springframework.org/schema/context"
       xmlns:mvc="http://www.springframework.org/schema/mvc"
       xsi:schemaLocation="http://www.springframework.org/schema/beans http://www.springframework.org/schema/beans/spring-beans.xsd
        http://www.springframework.org/schema/context http://www.springframework.org/schema/context/spring-context-4.0.xsd
        http://www.springframework.org/schema/mvc http://www.springframework.org/schema/mvc/spring-mvc-4.0.xsd">

    <context:component-scan base-package="com.xuweiwei.handlers"/>

    <!-- 配置视图解析器 -->
    <bean class="org.springframework.web.servlet.view.InternalResourceViewResolver">
        <property name="prefix" value="/WEB-INF/jsp/"/>
        <property name="suffix" value=".jsp"/>
    </bean>


</beans>
2.2.4 新建HelloWorld.java作为控制器
- HelloWorld.java
package com.xuweiwei.handlers;

import org.springframework.stereotype.Controller;
import org.springframework.web.bind.annotation.RequestMapping;

@Controller
public class HelloWorld {
    @RequestMapping(value = "/hello")
    public String hello(){
        System.out.println("hello");
        return "success";
    }
}
2.2.5 在WEB-INF下新建jsp目录,并在jsp目录下新建success.jsp文件
- success.jsp
<%@ page contentType="text/html;charset=UTF-8" language="java" %>
<html>
<head>
    <title>Title</title>
</head>
<body>
    成功
</body>
</html>
2.2.6 在index.jsp文件中编写如下内容
- index.jsp
<%@ page contentType="text/html;charset=UTF-8" language="java" %>
<html>
  <head>
    <title>$Title$</title>
  </head>
  <body>
    <a href="${pageContext.request.contextPath}/hello">helloworld</a>

  </body>
</html>
2.2.7 访问
- 地址:http://localhost:8080/项目名/index.jsp
3 使用@RequestMapping映射请求
3.1 @RequestMapping使用请求头映射请求
- SpringMVC 使用@RequestMapping注解为控制器制定可以处理那些URL请求。
- 在控制器的类定义和方法定义处度可以标注,这可以从其定义知道。
@Target({ElementType.METHOD, ElementType.TYPE})
@Retention(RetentionPolicy.RUNTIME)
@Documented
@Mapping
public @interface RequestMapping {
    String[] value() default {};

    RequestMethod[] method() default {};

    String[] params() default {};

    String[] headers() default {};

    String[] consumes() default {};

    String[] produces() default {};
}
-
- 类定义处:提供初步的请求映射信息。相对于WEB应用的根目录。
- 方法处:提供进一步的细分映射信息。相对于类定义处的URL。如果类定义处没有标注@RequestMapping注解,则方法处标记的URL相对于WEB应用的根目录。
- 例如:
package com.xuweiwei.handlers;

import org.springframework.stereotype.Controller;
import org.springframework.web.bind.annotation.RequestMapping;

@Controller
@RequestMapping("test")
public class HelloWorld {

    @RequestMapping(value = "/hello")
    public String hello(){
        System.out.println("hello");
        return "success";
    }
}
-
-
-
- 请求地址:http://localhost:8080/项目名/test/hello
-
-
package com.xuweiwei.handlers;

import org.springframework.stereotype.Controller;
import org.springframework.web.bind.annotation.RequestMapping;

@Controller
public class HelloWorld {

    @RequestMapping(value = "/hello")
    public String hello(){
        System.out.println("hello");
        return "success";
    }
}
-
-
-
- 请求地址:http://localhost:8080/项目名/hello
-
-
- DispatcherServlet拦截请求后,就通过控制器上的@RequestMapping提供的映射信息确定请求所对应的处理方法。
3.2 @RequestMapping使用请求方法来映射请求
- @RequestMapping不仅仅可以通过请求的URL来映射请求,还可以通过请求方法来映射请求,比如GET、POST等。
- GET请求:
    @RequestMapping(value = "/hello",method = RequestMethod.GET)
    public String testGet(){
        System.out.println("GET");
        return "success";
    }
- POST请求:
    @RequestMapping(value = "/hello",method = RequestMethod.POST)
    public String testPost(){
        System.out.println("POST");
        return "success";
    }
3.3 @RequestMapping使用请求参数来映射请求(不常用)
- @RequestMapping不仅仅可以通过请求的URL来映射请求,还可以通过请求参数来映射请求。
- 示例:
    @RequestMapping(value = "/hello",params = {"name=aaa","password=bbb"})
    public String testParams(){
        System.out.println("testParams");
        return "success";
    }
- 请求地址:http://localhost:8080/项目名/hello?name=aaa&password=bbb
3.4 @RequestMapping使用请求头来映射请求(不常用)
- 和3.3类似,只不过将params替换成headers而已。
3.5 @PathVaiable映射URL绑定的占位符
- 带占位符的URL是Spring3.0新增的功能,该功能在SpringMVC向REST目标挺进发展过程中有着里程碑的作用。
- 通过@PathVarialbe可以将URL中占位符参数绑定到控制器处理方法的形参中
- 示例:
    @RequestMapping(value = "/hello/{id}")
    public String delete(@PathVariable(value = "id") Integer id){
        return "success";
    }
- 请求地址:http://localhost:8080/项目名/hello/2
3.6 REST
- REST的介绍网上一大堆,这边不多介绍,只大概介绍一下即可。
- 在HTTP协议中,四个标识操作方式的动词:GET、POST、PUT、DELETE。其中,GET用来获取资源,POST用来新建资源,PUT用来更新资源,DELETE用来删除资源。
- REST的四种URL格式如下:
- /order/1 GET 用来获取id=1的order
- /order/1 PUT 用来更新id=2的order
- /order/1 DELETE 用来删除id=1的order
- /order POST 用来新增order
- 我们知道,HTTP协议其实,只实现了GET和POST方式,那么SpringMVC是怎么实现REST风格的URL以及方法呢?其一,REST风格的URL就是通过@PathVariable注解(可以参考3.5);其二,PUT方法和DELETE方法呢,是通过HiddenHTTPMethodFilter这个过滤器实现的。
- HiddenMethodFilter的源代码如下:
//
// Source code recreated from a .class file by IntelliJ IDEA
// (powered by Fernflower decompiler)
//

package org.springframework.web.filter;

import java.io.IOException;
import java.util.Locale;
import javax.servlet.FilterChain;
import javax.servlet.ServletException;
import javax.servlet.http.HttpServletRequest;
import javax.servlet.http.HttpServletRequestWrapper;
import javax.servlet.http.HttpServletResponse;
import org.springframework.util.Assert;
import org.springframework.util.StringUtils;

public class HiddenHttpMethodFilter extends OncePerRequestFilter {
    public static final String DEFAULT_METHOD_PARAM = "_method";
    private String methodParam = "_method";

    public HiddenHttpMethodFilter() {
    }

    public void setMethodParam(String methodParam) {
        Assert.hasText(methodParam, "‘methodParam‘ must not be empty");
        this.methodParam = methodParam;
    }

    protected void doFilterInternal(HttpServletRequest request, HttpServletResponse response, FilterChain filterChain) throws ServletException, IOException {
        String paramValue = request.getParameter(this.methodParam);
        if ("POST".equals(request.getMethod()) && StringUtils.hasLength(paramValue)) {
            String method = paramValue.toUpperCase(Locale.ENGLISH);
            HttpServletRequest wrapper = new HiddenHttpMethodFilter.HttpMethodRequestWrapper(request, method);
            filterChain.doFilter(wrapper, response);
        } else {
            filterChain.doFilter(request, response);
        }

    }

    private static class HttpMethodRequestWrapper extends HttpServletRequestWrapper {
        private final String method;

        public HttpMethodRequestWrapper(HttpServletRequest request, String method) {
            super(request);
            this.method = method;
        }

        public String getMethod() {
            return this.method;
        }
    }
}
- 通过HiddenMethodFilter的源代码,我们可以知道SpringMVC是将POST的请求包装了一下,当然你必须传递一个如{"_method":"DELETE"}这样的参数过去,当然,AJAX或传统的表单都是可以的。
- 准备工作:配置HiddenMethodFilter
<?xml version="1.0" encoding="UTF-8"?>
<web-app xmlns="http://xmlns.jcp.org/xml/ns/javaee"
         xmlns:xsi="http://www.w3.org/2001/XMLSchema-instance"
         xsi:schemaLocation="http://xmlns.jcp.org/xml/ns/javaee http://xmlns.jcp.org/xml/ns/javaee/web-app_3_1.xsd"
         version="3.1">

    <filter>
        <filter-name>HiddenHttpMethodFilter</filter-name>
        <filter-class>org.springframework.web.filter.HiddenHttpMethodFilter</filter-class>
    </filter>
    <filter-mapping>
        <filter-name>HiddenHttpMethodFilter</filter-name>
        <url-pattern>/*</url-pattern>
    </filter-mapping>

    <!-- 配置前端控制器 -->
    <servlet>
        <servlet-name>DispatcherServlet</servlet-name>
        <servlet-class>org.springframework.web.servlet.DispatcherServlet</servlet-class>
        <init-param>
            <param-name>contextConfigLocation</param-name>
            <param-value>classpath*:spring-mvc.xml</param-value>
        </init-param>
        <load-on-startup>1</load-on-startup>
    </servlet>

    <servlet-mapping>
        <servlet-name>DispatcherServlet</servlet-name>
        <url-pattern>/</url-pattern>
    </servlet-mapping>


</web-app>
- 示例:REST风格的GET方法
package com.xuweiwei.handlers;

import org.springframework.stereotype.Controller;
import org.springframework.web.bind.annotation.PathVariable;
import org.springframework.web.bind.annotation.RequestMapping;
@Controller
public class REST {
    @RequestMapping(value = "/rest/{id}")
    public String testGET(@PathVariable("id") Integer id){
        System.out.println("获取到:"+id);
        return "success";
    }

}
- 地址:http://localhost:8080/项目名/rest/2
- 示例:REST风格的POST方法
package com.xuweiwei.handlers;

import org.springframework.stereotype.Controller;
import org.springframework.web.bind.annotation.PathVariable;
import org.springframework.web.bind.annotation.RequestMapping;
@Controller
public class REST {
    @RequestMapping(value = "/rest")
    public String testPOST(){
        System.out.println("POST方法");
        return "success";
    }

}
- 表单:
<%@ page contentType="text/html;charset=UTF-8" language="java" %>
<html>
  <head>
    <title>$Title$</title>
  </head>
  <body>
    <form action="${pageContext.request.contextPath}/rest" method="post">
      <input type="submit" value="提交"/>
    </form>

  </body>
</html>
- 示例:REST风格的PUT方法
package com.xuweiwei.handlers;

import org.springframework.stereotype.Controller;
import org.springframework.web.bind.annotation.PathVariable;
import org.springframework.web.bind.annotation.RequestMapping;
import org.springframework.web.bind.annotation.RequestMethod;
import org.springframework.web.bind.annotation.ResponseBody;

@Controller
public class REST {

    @RequestMapping(value = "/rest/{id}", method = RequestMethod.PUT)
    public String testPut(@PathVariable("id") Integer id) {
        System.out.println("put方法" + id);
        return "success";
    }

}
- 表单:
<%@ page contentType="text/html;charset=UTF-8" language="java" %>
<html>
  <head>
    <title>$Title$</title>
  </head>
  <body>
    <form action="${pageContext.request.contextPath}/rest/1" method="post">
      <input type="hidden" name="_method" value="PUT"/>
      <input type="submit" value="提交"/>
    </form>

  </body>
</html>
- 这个时候,会报错405,意思就是JSP只能发送GET或POST请求,为什么会出错?
- 我们可以想一下,我们平时写代码的时候,如果是新增的话,增加完毕之后,是重定向到查询页面的,而SpringMVC返回字符串默认的是转发,所以,我们可以将返回值改为重定向到查询方法,然后由查询方法转发到jsp页面。
- 当然,在上面的代码中,我们返回的是一个字符串,SpringMVC会通过视图解析器,拼凑返回的地址,会转发到success.jsp,这个时候,Spring会认为是一个JSP接口,而JSP接口仅仅能支持GET或POST方法,所以会报错,所以,需要加上@ResponseBody强制的让Spring认为返回值就是一个字符串。
- 还有一种解决方法,就是将Tomcat8将为Tomcat7
package com.xuweiwei.handlers;

import org.springframework.stereotype.Controller;
import org.springframework.web.bind.annotation.PathVariable;
import org.springframework.web.bind.annotation.RequestMapping;
import org.springframework.web.bind.annotation.RequestMethod;
import org.springframework.web.bind.annotation.ResponseBody;

@Controller
public class REST {

    @RequestMapping(value = "/rest/{id}", method = RequestMethod.PUT)
    @ResponseBody
    public String testPut(@PathVariable("id") Integer id) {
        System.out.println("put方法" + id);
        return "success";
    }

}
- 示例:REST风格的DELETE方法
package com.xuweiwei.handlers;

import org.springframework.stereotype.Controller;
import org.springframework.web.bind.annotation.PathVariable;
import org.springframework.web.bind.annotation.RequestMapping;
import org.springframework.web.bind.annotation.RequestMethod;
import org.springframework.web.bind.annotation.ResponseBody;

@Controller
public class REST {

    @RequestMapping(value = "/rest/{id}", method = RequestMethod.DELETE)
    @ResponseBody
    public String testDelete(@PathVariable("id") Integer id) {
        System.out.println("delete方法" + id);
        return "success";
    }

}
- 表单:
   <form action="${pageContext.request.contextPath}/rest/1" method="post">
      <input type="hidden" name="_method" value="DELETE"/>
      <input type="submit" value="提交"/>
    </form>
4 请求处理方法的签名
4.1 @RequestParam
- 在处理方法形参中使用@RequestParam可以将请求参数传递给请求方法
- value:参数 名
- required:是否必须,默认为true,表示请求参数中欧必须包含对应的参数,如果不存在,就抛出异常
- defaultValue:默认值
- 示例:
package com.xuweiwei.handlers;

import org.springframework.stereotype.Controller;
import org.springframework.web.bind.annotation.RequestMapping;
import org.springframework.web.bind.annotation.RequestParam;

@Controller
public class RequestParamTest {

    @RequestMapping(value = "/testRequestParam")
    public String testRequestParam(@RequestParam("username") String username){
        System.out.println("username:"+username);
        return "success";
    }

}
- 地址:http://localhost:8080/项目名/testRequestParam?username=xuweiwei
- 示例:
package com.xuweiwei.handlers;

import org.springframework.stereotype.Controller;
import org.springframework.web.bind.annotation.RequestMapping;
import org.springframework.web.bind.annotation.RequestParam;

@Controller
public class RequestParamTest {

    @RequestMapping(value = "/testRequestParam")
    public String testRequestParam(@RequestParam("username") String username,
                                   @RequestParam(value = "age",required = false,defaultValue = "0") Integer age){
        System.out.println("username:"+username);
        System.out.println(age);
        return "success";
    }

}
- 地址:http://localhost:8080/项目名/testRequestParam?username=xuweiwei
4.2 使用POJO对象绑定请求参数值
- SpringMVC会按请求参数名和POJO属性名进行自动匹配,自动为该对象填充属性值,支持级联属性。
- 示例:
package com.xuweiwei.handlers;

public class User {
    private String username;
    private String password;
    private Dept dept;

    public String getUsername() {
        return username;
    }

    public void setUsername(String username) {
        this.username = username;
    }

    public String getPassword() {
        return password;
    }

    public void setPassword(String password) {
        this.password = password;
    }

    public Dept getDept() {
        return dept;
    }

    public void setDept(Dept dept) {
        this.dept = dept;
    }

    @Override
    public String toString() {
        return "User{" +
                "username=‘" + username + ‘\‘‘ +
                ", password=‘" + password + ‘\‘‘ +
                ", dept=" + dept +
                ‘}‘;
    }
}
package com.xuweiwei.handlers;

public class Dept {
    private String name;

    public String getName() {
        return name;
    }

    public void setName(String name) {
        this.name = name;
    }

    @Override
    public String toString() {
        return "Dept{" +
                "name=‘" + name + ‘\‘‘ +
                ‘}‘;
    }
}
package com.xuweiwei.handlers;

import org.springframework.stereotype.Controller;
import org.springframework.web.bind.annotation.RequestMapping;

@Controller
public class POJO {
    @RequestMapping("/pojo")
    public String handler(User user){
        System.out.println(user);
        return "success";
    }
}
- 表单:
<%@ page contentType="text/html;charset=UTF-8" language="java" %>
<html>
  <head>
    <title>$Title$</title>
  </head>
  <body>

  <form action="${pageContext.request.contextPath}/pojo" method="post">
    username:<input type="text" name="username"/><br/>
    password:<input type="password" name="password"/><br/>
    deptName:<input type="text" name="dept.name"/><br/>
    <input type="submit" value="新增"/>
  </form>


  </body>
</html>
4.3 使用Servlet API作为参数
- 在SpringMVC中的方法可以接受如下的Servlet API类型的参数。
- HttpServletRequest
- HttpServletResponse
- HttpSession
- java.security.Principal
- Locale
- InputStream
- OutputStream
- Reader
- Writer
- 示例:
package com.xuweiwei.handlers;

import org.springframework.stereotype.Controller;
import org.springframework.web.bind.annotation.RequestMapping;

import javax.servlet.http.HttpServletRequest;

@Controller
public class HttpServletRequestHandler {

    @RequestMapping(value = "/testHttpServletRequest")
    public String testHttpServletRequest(HttpServletRequest request){
        String username = request.getParameter("username");
        System.out.println(username);
        return "success";
    }
}
- 地址:http://localhost:8080/项目名/testHttpServletRequest?username=abc
5 处理模型数据
- SpringMVC提供了如下的途径输出模型数据:
- ModelAndView:处理方法返回值类型为ModelAndView时,方法体就可以通过该对象添加模型数据。
- Map或Model:入参为org.springframework.ui.Model、org.springframework.ui.ModelMap或java.util.Map时,处理方法返回时,Map中的数据会自动添加到模型中。
- @SessionAttributes:将模型中的某个属性暂时存放到HttpSession中,以便多个请求之间可以共享这个属性。
- @ModelAttribute:方法入参标注该注解,入参对象就会放到数据模型中。
- ModelAndView
- 控制器处理方法的返回值如果为ModelAndView,则既要包含视图信息。也包含模型数据信息。
- 添加模型数据的方法如下:
public ModelAndView addObject(String attributeName, Object attributeValue) {}
public ModelAndView addAllObjects(Map<String, ?> modelMap) {}
-
- 设置视图的方法
public void setView(View view){}
public void setViewName(String viewName) {}
-
- 返回ModelAndView对象
public ModelAndView(String viewName, Map<String, ?> model) {}
-
- 示例:
package com.xuweiwei.handlers;

public class User {
    private String username;
    private String password;

    public String getUsername() {
        return username;
    }

    public void setUsername(String username) {
        this.username = username;
    }

    public String getPassword() {
        return password;
    }

    public void setPassword(String password) {
        this.password = password;
    }

    @Override
    public String toString() {
        return "User{" +
                "username=‘" + username + ‘\‘‘ +
                ", password=‘" + password + ‘\‘‘ +
                ‘}‘;
    }
}
package com.xuweiwei.handlers;

import org.springframework.stereotype.Controller;
import org.springframework.web.bind.annotation.RequestMapping;
import org.springframework.web.servlet.ModelAndView;

@Controller
public class ModelAndViewHandler {

    @RequestMapping(value = "/testModelAndView")
    public ModelAndView testModelAndView(){
        ModelAndView modelAndView = new ModelAndView();

        User user = new User();
        user.setUsername("abc");
        user.setPassword("123456");

        modelAndView.addObject("user",user);

        modelAndView.setViewName("success");

        return modelAndView;
    }

}
<%@ page contentType="text/html;charset=UTF-8" language="java" %>
<html>
<head>
    <title>Title</title>
</head>
<body>
${user.username}<br/>
${user.password}
</body>
</html>
-
- 地址:http://localhost:8080/项目名/testModelAndView
- Model及ModelMap
- SpringMVC在内部会使用一个org.springframework.ui.Model接口存储模型数据
- 示例:
package com.xuweiwei.handlers;

import org.springframework.stereotype.Controller;
import org.springframework.ui.ModelMap;
import org.springframework.web.bind.annotation.RequestMapping;
import org.springframework.web.servlet.ModelAndView;

@Controller
public class ModelAndViewHandler {

    @RequestMapping(value = "/testModelAndView")
    public String testModelAndView(ModelMap model){

        User user = new User();
        user.setUsername("abc");
        user.setPassword("123456");

        model.addAttribute("user",user);

        return "success";
    }

}
6 视图
- SpringMVC会按照如下的步骤去解析视图
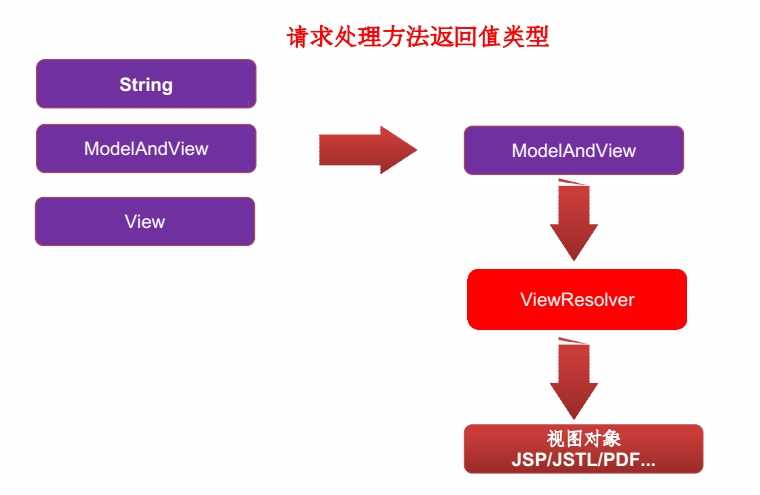
- 视图和视图解析器
- 请求处理方法执行完成后,最终返回一个ModelAndView对象,对于那些返回String、View或ModelMap等类型的处理方法,SpringMVC也会在内部将它们装配成一个ModelAndView对象,它包含了逻辑视图名和模型对象的视图。
- SpringMVC借助视图解析器(ViewResolver)得到最终的视图对象(View),最终的视图可以是JSP,也可以是Excel或JFreeChar等各种形式的视图。
- 对于最终究竟采取何种视图对象对模型数据进行渲染,处理器并不关系,处理器的工作重点在生产模型数据的工作上,从而实现MVC的充分解耦。
- 视图
- 视图的作用是渲染视图,将模型中的数据以某种形式呈现给用户。
- 为了实现视图模型和具体实现技术的解耦,Spring定义了一个高度抽象的View接口,详细代码如下:
//
// Source code recreated from a .class file by IntelliJ IDEA
// (powered by Fernflower decompiler)
//

package org.springframework.web.servlet;

import java.util.Map;
import javax.servlet.http.HttpServletRequest;
import javax.servlet.http.HttpServletResponse;

public interface View {
    String RESPONSE_STATUS_ATTRIBUTE = View.class.getName() + ".responseStatus";
    String PATH_VARIABLES = View.class.getName() + ".pathVariables";
    String SELECTED_CONTENT_TYPE = View.class.getName() + ".selectedContentType";

    String getContentType();

    void render(Map<String, ?> var1, HttpServletRequest var2, HttpServletResponse var3) throws Exception;
}
-
- 视图对象由视图解析器负责示例化,由于视图是无状态的,所以是线程安全的。
- 视图解析器
- SpringMVC为逻辑视图名的解析提供了不同的策略,可以在SpringMVC中配置一种或多种解析策略,并且制定它们之间的顺序。每一种映射策略对应一个具体的视图解析器实现类。
- 视图解析器的作用比较单一,将逻辑视图解析为一个具体的视图对象。
- 所有的视图解析器必须实现ViewResolver接口,详细代码如下:
//
// Source code recreated from a .class file by IntelliJ IDEA
// (powered by Fernflower decompiler)
//

package org.springframework.web.servlet;

import java.util.Locale;

public interface ViewResolver {
    View resolveViewName(String var1, Locale var2) throws Exception;
}
- 【温馨小提示】如果不希望通过handler转发到WEB-INF目录下的jsp页面,可以在spring-mvc.xml文件中配置如下信息
<?xml version="1.0" encoding="UTF-8"?>
<beans xmlns="http://www.springframework.org/schema/beans"
       xmlns:xsi="http://www.w3.org/2001/XMLSchema-instance"
       xmlns:context="http://www.springframework.org/schema/context"
       xmlns:mvc="http://www.springframework.org/schema/mvc"
       xsi:schemaLocation="http://www.springframework.org/schema/beans http://www.springframework.org/schema/beans/spring-beans.xsd
        http://www.springframework.org/schema/context http://www.springframework.org/schema/context/spring-context-4.0.xsd
        http://www.springframework.org/schema/mvc http://www.springframework.org/schema/mvc/spring-mvc-4.0.xsd">

    <context:component-scan base-package="com.xuweiwei.handlers"/>

    <!-- 配置视图解析器 -->
    <bean class="org.springframework.web.servlet.view.InternalResourceViewResolver" >
        <property name="prefix" value="/WEB-INF/jsp/"/>
        <property name="suffix" value=".jsp"/>
    </bean>

    <mvc:view-controller path="/index" view-name="index"/>

    <mvc:annotation-driven />


</beans>
- 重定向
- 一般情况下,控制器方法返回的字符串类型的值会被当成逻辑视图名处理。
- 如果返回的字符串中带有forward:或redirect:前缀的时候,SpringMVC会对它们进行特殊处理,将forward:和redirect:当成指示符,其后的字符串作为URL来处理。
- 例如:
- redirect:success.jsp 会完成一个到success.jsp的重定向的操作
- forward:success.jsp 会完成一个到success.jsp的转发的操作
7 处理静态资源
- 如果DispactherServlet请求映射配置为/,则SpringMVC将捕获web容器的所有请求,包括静态爱资源的请求,SpringMVC会将它们当成一个普通请求处理,因找不到对应的处理器而报错。
- 所以,需要在SpringMVC的配置文件中,配置一个<mvc:default-servlet-handler/>的方式解决静态资源的问题。
<?xml version="1.0" encoding="UTF-8"?>
<beans xmlns="http://www.springframework.org/schema/beans"
       xmlns:xsi="http://www.w3.org/2001/XMLSchema-instance"
       xmlns:context="http://www.springframework.org/schema/context"
       xmlns:mvc="http://www.springframework.org/schema/mvc"
       xsi:schemaLocation="http://www.springframework.org/schema/beans http://www.springframework.org/schema/beans/spring-beans.xsd
        http://www.springframework.org/schema/context http://www.springframework.org/schema/context/spring-context-4.0.xsd
        http://www.springframework.org/schema/mvc http://www.springframework.org/schema/mvc/spring-mvc-4.0.xsd">

    <context:component-scan base-package="com.xuweiwei.handlers"/>

    <!-- 配置视图解析器 -->
    <bean class="org.springframework.web.servlet.view.InternalResourceViewResolver" >
        <property name="prefix" value="/WEB-INF/jsp/"/>
        <property name="suffix" value=".jsp"/>
    </bean>

    <mvc:view-controller path="/index" view-name="index"/>

    <mvc:default-servlet-handler/>

    <mvc:annotation-driven />


</beans>
- <mvc:default-servlet-handler/>的详解
- 该注解将在SpringMVC的上下文定义一个DefaultServletHttpRequestHandler,它会对进入DispatcherServlet的请求进行过滤,如果发现没有经过映射的请求,就将该请求交由WEB服务器默认的Servlet处理,如果不是静态资源的请求,就由SpringMVC默认的前端控制器继续处理。
- 一般web服务器默认的Servlet的名称都是default,如果使用web服务器默认的Servlet的名称不是default,则需要通过default-servlet-name显示配置。
2.2.2