ASP.NET MVC内置的认证特性
AuthorizeAttribute特性(System.Web.Mvc)(身份过滤器)
禁止匿名用户的访问
[Authorize]
public ActionResult Buy(int albumId)
{
//……
}
禁止非指定用户、角色的访问
[Authorize(Users = "sam,leo,korn")] //指定哪些用户可以访问
[Authorize(Roles = "Admin,GenderMen", Users = "sam,leo,korn")]
注册身份验证的全局过滤器
可以将Authorize身份过滤器注册为全局过滤器,这样可以免去在手动将Authorize引用在控制器或Action方法上。具体做法是打开App_Start目录下的FilterConfig.cs文件,在RegisterGlobalFilters方法中将一个Authorize实例添加到过滤器集合中。
{
public static void RegisterGlobalFilters(GlobalFilterCollection filters)
{
//……
filters.Add(new AuthorizeAttribute());
}
}
AllowAnonymousAttribute特性(System.Web.Mvc)(跳过认证)
此特性将允许应用了Authorize的控制器或Action方法跳过Authorize的机制,主要是针对将Authorize注册到全局过滤器中后,应用程序的所有控制器都将禁止匿名用户的访问,这当然包括了处理登录的控制器,而应用了AllowAnonymous的控制器或Action方法可以忽略Authorize进而可以被访问。对于自定义的身份过滤器,AllowAnonymous将变得失效,除非进行重写。
public ActionResult Login(string returnUrl)
{
//……
}
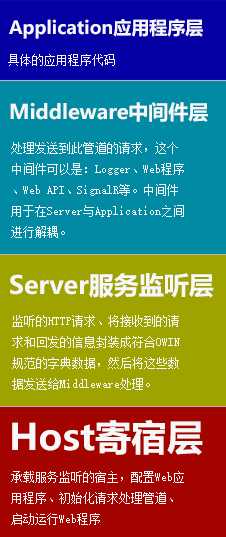
什么是OWIN(OWIN(Open Web Interface for .NET)(.NET开放式Web接口) )
通常,Web应用程序总是部署在windows的IIS上,但IIS有以下几点不足
1.难以实现跨平台。
2.IIS与Web应用程序(其核心就是System.Web.dll程序集)之间紧密的结合很难实现轻量级的业务。比如现在的Web移动服务,我只需要服务端返回简单的Json数据,但是IIS复杂的asp.net生命周期和请求处理的管道却过于复杂臃肿,IIS的反应速度不够理想,而我们需要的仅仅是简单、轻量、高效、快速、易于修改的处理程序。
OWIN的出现解决了以上问题,OWIN是一套规范,它解耦了Web应用程序与IIS的关系。它是一个将Web应用程序从托管它的环境中独立出来的抽象层,这个独立出来的抽象层能够使Web应用程序的宿主具备更好的灵活度、使ASP.NET的技术更易于创新。
OWIN规范
OWIN定义了四个层,通过OWIN提供的接口在这四个管道之间进行通信。
ASP.NET Katana Project
微软的Katana是OWIN规范的具体实现,它的作用如下:
1.提供N种方式支持Web应用程序的寄宿
* IIS 将你的应用程序寄宿到IIS上,继续使用System.Web那套东西。
* Custom Host :干掉System.Web的那一套臃肿的处理请求的逻辑,彻底将你的应用程序从IIS中独立出来,找一个窝,自立门户。将你的应用程序寄宿到Windows Service、控制台应用程序(CUI)、Winform上。
* OwinHost :干掉System.Web的那一套臃肿的处理请求的逻辑,彻底将你的应用程序从IIS中独立出来,找一个窝,自立门户。将你的应用程序寄宿到命令行工具OwinHost.exe上。
2.提供N种方式支持对请求的监听服务
* System.Web:利用System.Web作为监听服务,Katana会在System.Web中将自身注册为HttpModule和HttpHandler,它将请求的数据封装成字典再传递给Middleware
* HttpListener:宿主为Custom Host或OwinHost时,使用HttpListener作为监听服务
* WebListener:暂时无法在Katana中使用
3.提供API支持Web应用程序所需的功能
* Katana支持System.Web.dll提供的API,但它也提供轻量级的API来帮助我们开发Web应用程序。
ASP.NET Identity(管理用户数据、执行认证和授权的API)
在.NET Framework 4.5 之前,Web应用程序的用户管理和授权的功能一直由Membership提供支持,但Membership的数据结构难以扩展和维护,已经严重过时,为此微软根基OWIN规范重新设计了用户管理模式,推出了ASP.NET Identity,它是Katana的一个中间件(ASP.NET组件),可以在任何ASP.NET程序中使用。
配置OWIN
使用前需要从NuGet获取三个程序包:
Microsoft.AspNet.Identity.EntityFramework.zh-Hans //中文语言包
Microsoft.AspNet.Identity.Owin
Microsoft.AspNet.Identity.Owin.zh-Hans
Microsoft.Owin.Host.SystemWeb
Microsoft.Owin.Host.SystemWeb.zh-Hans
首先需要知道OWIN环境是如何启动
//此特性描述了Microsoft.Owin.Host.SystemWeb程序集,它指示当应用程序运行前应调用PreApplicationStart类的Initialize方法
//Initialize方法内部通过HttpApplication的RegisterModule方法将OWIN注册为一个名叫OwinHttpModule的Http模块
然后需要了解几个类型
//用户管理基类,内建了诸如角色、用户名、密码、Emai等基础的属性
UserManager<T>;
//用户管理器基类
IUserStore<T>;
//用户存储器接口
UserStore<T>;
//用户存储器
IOwinContext;
//类似于我们熟悉的HttpContext,表示OWIN环境中的Http请求上下文对象
IAppBuilder;
//提供应用程序所需中间件的设置,所有的中间件应通过接口提供的CreatePerOwinContext方法进行注册
ASP.NET Identity使用Entity Framework的Code First方式创建与用户有关的数据库,接下来我们要创建自定义的用户类、用户管理器类和ASP.NET Identity基于EF的数据库操作上下文类
AppUserManager;//用户管理器
AppIdentityDbContext;//ASP.NET Identity基于EF的数据库上下文
定义用户类


namespace Users.Models
{
//IdentityUser:ASP.NET Identity已经内建了表示用户的基类
//自定义的用户类应从IdentityUser派生,以便得到IdentityUser的一些默认的属性
public class AppUser : IdentityUser
{
}
}
IdentityUser是ASP.NET Identity内建的类型,因为没有源码而无法为其应用模型验证,而从IdentityUser派生的自定义类型AppUser的N多关于用户信息的属性是从继承得来,所以也无法应用模型验证,而最佳解决方法就是新建一个类型专门用来表示呈现给客户端的可浏览、可编辑的用户模型,插入数据的时候再提取这个类型的数据映射给AppUser即可。
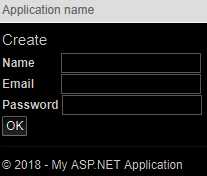
namespace Users.Models
{
public class UserView
{
public string Id { get; set; }
[Required]
public string Name { get; set; }
[Required]
public string Email { get; set; }
[Required]
[MaxLength(6,ErrorMessage ="字符太长")]
public string Password { get; set; }
}
}
定义ASP.NET Identity基于EF的数据库上下文
这个数据库上下文注册在启动类中被实例化,我们不直接调用这个类型来操作数据,而是依靠ASP.NET Identity暴露的API去执行插入删除和更新,而这些API方法跟下面定义的ASP.NET Identity基于EF的数据库上下文已经关联在了一起。
using Microsoft.AspNet.Identity.EntityFramework;
using Users.Models;
namespace Users.Infrastructure
{
//EF数据库上下文
public class AppIdentityDbContext:IdentityDbContext<AppUser>
{
//基类构造函数接收一个数据库名称以便创建出EF数据库上下文对象
public AppIdentityDbContext() : base("IdentityDb") { }
//利用静态构造函数,在代码块里使用System.Data.Entity.DataBase类初始化数据库,通过DbInit指定数据库的创建模式
static AppIdentityDbContext()
{
Database.SetInitializer(new DbInit());
}
//获取一个EF数据库上下文对象
public static AppIdentityDbContext Create()
{
return new AppIdentityDbContext();
}
}
//为了在创建数据库的同时能插入一些数据,创建了一个DbInit从DropCreateDatabaseIfModelChanges派生
public class DbInit:DropCreateDatabaseIfModelChanges<AppIdentityDbContext>
{
private void InsertData(AppIdentityDbContext cotext)
{
}
//向数据库插入数据
protected override void Seed(AppIdentityDbContext context)
{
InsertData(context);
base.Seed(context);
}
}
}
<add name="IdentityDb" providerName="System.Data.SqlClient" connectionString="Data Source=.; Initial Catalog=IdentityDb; Integrated Security=True; Connect Timeout=15; Encrypt=False;TrustServerCertificate=False; MultipleActiveResultSets=True" />
</connectionStrings>
定义用户管理器
using Microsoft.AspNet.Identity.EntityFramework;
using Microsoft.AspNet.Identity.Owin;
using Microsoft.Owin;
using Users.Models;
namespace Users.Infrastructure
{
//UserManager<T>:ASP.NET Identity已经内建了表示管理用户的基类
//自定义的用户管理类应从UserManager<T>派生,以便得到UserManager<T>提供的方法
public class AppUserManager : UserManager<AppUser>
{
//用户管理器基类需要一个用户存储器以便提供管理用户的API方法,要实例化自定义的用户管理器则必须向户管理器基类传递一个用户存储器
public AppUserManager(IUserStore<AppUser> store) : base(store) { }
//获取一个用户管理器
public static AppUserManager Create(IdentityFactoryOptions<AppUserManager> options, IOwinContext context)
{
AppIdentityDbContext db = context.Get<AppIdentityDbContext>();//获取已经注册在owin环境下的ASP.NET Identity基于EF的数据库操作上下文对象
AppUserManager manager = new AppUserManager(new UserStore<AppUser>(db));//创建用户管理类的实例
return manager;
}
}
}
定义启动类
默认这个类的名称应该是StartUp,应用程序启动后会查找应用程序的app_start目录下的应用了[assembly: OwinStartup(typeof(Users.StartUp))]特性的类型,然后调用这个类的Configuration方法将中间件(处理业务的类型)创建出来。
using Microsoft.Owin;
using Microsoft.Owin.Security.Cookies;
using Owin;
using Users.Infrastructure;
using Users.Models;
[assembly: OwinStartup(typeof(Users.StartUp))]
namespace Users
{
//启动类
public class StartUp
{
public void Configuration(IAppBuilder appBuilder)
{
appBuilder.CreatePerOwinContext< AppIdentityDbContext>(AppIdentityDbContext.Create);
appBuilder.CreatePerOwinContext<AppUserManager>(AppUserManager.Create);
//指示ASP.NET Identity如何用Cookie去标识已认证的用户
appBuilder.UseCookieAuthentication(new CookieAuthenticationOptions
{
AuthenticationType = DefaultAuthenticationTypes.ApplicationCookie,
//未认证用户发起请求时应重定向的地址
LoginPath = new PathString("/Account/Login"),
});
}
}
}
IdentityUser(Microsoft.AspNet.Identity.EntityFramework)
存储用户信息
//获取用户的声明(Claims)集合
//获取用户的E-mail地址
Id
//获取用户的唯一ID
Logins
//获取用户的登录集合
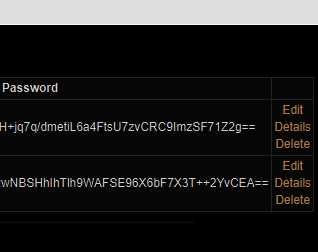
PasswordHash
//获取哈希格式的用户密码
Roles
//获取用户所属的角色集合
PhoneNumber
//获取用户的电话号码
SecurityStamp
//获取变更用户标识时被修改的值,例如被密码修改的值
UserName
//获取用户名
UserManager<T>类(Microsoft.AspNet.Identity)
用户管理器
//获取用户集合
ChangePasswordAsync(id, oldPwd, newPwd)
//为指定用户修改密码,返回一个Task<IdentityResult>
CreateAsync(user)
//创建一个不含密码的新用户,返回一个Task<IdentityResult>
CreateAsync(user, pass)
//创建一个带有指定密码的新用户,返回一个Task<IdentityResult>
DeleteAsync(user)
//删除指定用户,返回一个Task<IdentityResult>
FindAsync(user, pass)
//根据用户名和密码查询用户,返回一个Task<T>,T是用户类
FindByIdAsync(id)
//根据ID查询用户,,返回一个Task<T>,T是用户类
FindByNameAsync(name)
//查找与指定名称相关联的用户,返回一个Task<T>,T是用户类
UpdateAsync(user)
//更新用户数据,返回一个Task<IdentityResult>
PasswordValidator类(Microsoft.AspNet.Identity)
提供密码规则,应在自定义的用户管理器的Create方法中注册密码规则,下面的示例演示了如何创建密码规则,当然,也可以不使用PasswordValidator,直接在用户模型上应用模型验证也行。
//指定密码的最小长度
RequireNonLetterOrDigit
//密码是否必须含有非字母和数字的字符
RequireDigit
//密码是否必须含有数字
RequireLowercase
//密码是否必须含有小写字母
RequireUppercase
//密码是否必须含有大写字母
{
public class AppUserManager : UserManager<AppUser>
{
public AppUserManager(IUserStore<AppUser> store) : base(store) { }
//获取一个用户管理器
public static AppUserManager Create(IdentityFactoryOptions<AppUserManager> options, IOwinContext context)
{
AppIdentityDbContext db = context.Get<AppIdentityDbContext>();
//密码规则
PasswordValidator pwdValidator = new Microsoft.AspNet.Identity.PasswordValidator
{
RequireDigit = true,
RequiredLength = 6,
RequireLowercase = true,
RequireNonLetterOrDigit = true,
RequireUppercase = true
};
AppUserManager manager = new AppUserManager(new UserStore<AppUser>(db));
//附加到用户管理器中
manager.PasswordValidator = pwdValidator;
return manager;
}
}
}
IdentityResult类(Microsoft.AspNet.Identity)
执行管理用户的操作后返回的结果类
//是否没有发生错误
Errors
//错误信息集合,一个IEnumerable<string>
使用ASP.NET Identity管理用户(增删改查)
配置owin完成后,现在可以对用户进行增删改查了,因为我们不直接使用EF数据库上下文而是使用Identity提供的API方法,同时暴露给客户端的模型式一个UserView的类型,通过UserView映射AppUser用户类,所以使用代码生成器创建控制器时不要选择使用Entityframework。
using System.Collections.Generic;
using System.Linq;
using System.Web;
using System.Web.Mvc;
using Users.Models;
using Microsoft.Owin;
using Users.Infrastructure;
using System.Threading.Tasks;
using Microsoft.AspNet.Identity;
using Microsoft.AspNet.Identity.Owin;
using Microsoft.AspNet.Identity.EntityFramework;
namespace Users.Controllers
{
public class AdminController : Controller
{
//获取一个用户管理器的实例
private AppUserManager UserManager
{
get
{
//HttpContext是System.Web.Mvc提供的表示Http请求的上下文对象
//而Microsoft.Owin.Host.SystemWeb为HttpContext扩展了一个叫做GetOwinContext的方法
//GetOwinContext方法作用是:当Http请求到达后,获取Http请求的owin执行环境的上下文对象,
//我们会经常用到IOwinContext,因为它直接替代了HttpContext的工作
IOwinContext owinContext = HttpContext.GetOwinContext();
//利用owin执行环境的上下文对象的GetUserManager方法获取用户管理器
AppUserManager userManager = owinContext.GetUserManager<AppUserManager>();
return userManager;
}
}
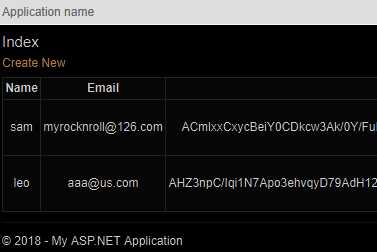
//显示用户列表
public ActionResult Index()
{
List<UserView> users = new List<UserView>();
foreach (AppUser user in UserManager.Users)
{
users.Add(new UserView { Id = user.Id, Name = user.UserName, Email = user.Email, Password = user.PasswordHash });
}
return View(users);
}
//添加新用户
public ActionResult Create()
{
return View();
}
[HttpPost]
public async Task<ActionResult> Create(UserView user)
{
if (!ModelState.IsValid) return View(user);
AppUser appUser = new AppUser
{
UserName = user.Name,
Email = user.Email
};
IdentityResult result = await UserManager.CreateAsync(appUser, user.Password);
if (!result.Succeeded)
{
AddErrorsIntoModelState(result);
return View(user);
}
return RedirectToAction("index");
}
//删除用户
public async Task<ActionResult> Delete(string id)
{
if (id != null)
{
AppUser user = await UserManager.FindByIdAsync(id);
if (user != null)
{
IdentityResult result = await UserManager.DeleteAsync(user);
if (!result.Succeeded)
{
AddErrorsIntoModelState(result);
}
}
}
return RedirectToAction("index");
}
//编辑用户
public async Task<ActionResult> Edit(string id)
{
if (id != null)
{
AppUser user = await UserManager.FindByIdAsync(id);
if (user == null) return RedirectToAction("index");
UserView userView = new UserView
{
Name = user.UserName,
Email = user.Email,
Password = user.PasswordHash
};
return View(userView);
}
return RedirectToAction("index");
}
[HttpPost]
public async Task<ActionResult> Edit(UserView userView)
{
if (!ModelState.IsValid) return View();
AppUser user = await UserManager.FindByNameAsync(userView.Name);
if (user == null)
{
ModelState.AddModelError("", "无此用户,无法修改");
}
else
{
user.Email = userView.Email;
user.PasswordHash = UserManager.PasswordHasher.HashPassword(userView.Password);//转换密码为哈希码
IdentityResult result = await UserManager.UpdateAsync(user);
if (!result.Succeeded) AddErrorsIntoModelState(result);
}
return RedirectToAction("index");
}
//执行增删改查任务出现错误后,调用此方法将错误信息写入ModelSate
private void AddErrorsIntoModelState(IdentityResult result)
{
foreach (string error in result.Errors)
{
ModelState.AddModelError("", error);
}
}
}
}
对用户进行认证