Residual Networks
Welcome to the second assignment of this week! You will learn how to build very deep convolutional networks, using Residual Networks (ResNets). In theory, very deep networks can represent very complex functions; but in practice, they are hard to train. Residual Networks, introduced by He et al., allow you to train much deeper networks than were previously practically feasible.
In this assignment, you will:
- Implement the basic building blocks of ResNets.
- Put together these building blocks to implement and train a state-of-the-art neural network for image classification.
This assignment will be done in Keras.
【中文翻译】
- 实现 ResNets 的基本构件。
- 把这些构件放在一起, 实现并训练一种state-of-the-art 神经网络进行图像分类。
Before jumping into the problem, let‘s run the cell below to load the required packages.
【code】
import numpy as np
from keras import layers
from keras.layers import Input, Add, Dense, Activation, ZeroPadding2D, BatchNormalization, Flatten, Conv2D, AveragePooling2D, MaxPooling2D, GlobalMaxPooling2D
from keras.models import Model, load_model
from keras.preprocessing import image
from keras.utils import layer_utils
from keras.utils.data_utils import get_file
from keras.applications.imagenet_utils import preprocess_input
import pydot
from IPython.display import SVG
from keras.utils.vis_utils import model_to_dot
from keras.utils import plot_model
from resnets_utils import *
from keras.initializers import glorot_uniform
import scipy.misc
from matplotlib.pyplot import imshow
%matplotlib inline

import keras.backend as K
K.set_image_data_format(‘channels_last‘)
K.set_learning_phase(1)
1 - The problem of very deep neural networks
Last week, you built your first convolutional neural network. In recent years, neural networks have become deeper, with state-of-the-art networks going from just a few layers (e.g., AlexNet) to over a hundred layers.
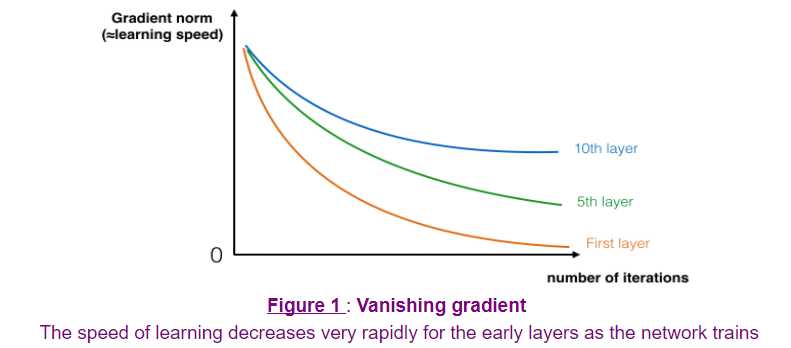
The main benefit of a very deep network is that it can represent very complex functions. It can also learn features at many different levels of abstraction, from edges (at the lower layers) to very complex features (at the deeper layers). However, using a deeper network doesn‘t always help. A huge barrier to training them is vanishing gradients: very deep networks often have a gradient signal that goes to zero quickly, thus making gradient descent unbearably slow. More specifically, during gradient descent, as you backprop from the final layer back to the first layer, you are multiplying by the weight matrix on each step, and thus the gradient can decrease exponentially quickly to zero (or, in rare cases, grow exponentially quickly and "explode" to take very large values).
During training, you might therefore see the magnitude (or norm) of the gradient for the earlier layers descrease to zero very rapidly as training proceeds:
You are now going to solve this problem by building a Residual Network!
【中文翻译】
图片见英文部分
你现在要通过建立一个 Residual网络来解决这个问题!
2 - Building a Residual Network
In ResNets, a "shortcut" or a "skip connection" allows the gradient to be directly backpropagated to earlier layers:
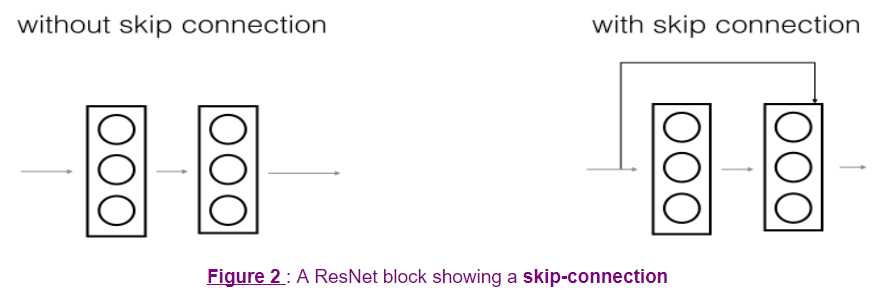
The image on the left shows the "main path" through the network. The image on the right adds a shortcut to the main path. By stacking these ResNet blocks on top of each other, you can form a very deep network.
We also saw in lecture that having ResNet blocks with the shortcut also makes it very easy for one of the blocks to learn an identity function. This means that you can stack on additional ResNet blocks with little risk of harming training set performance. (There is also some evidence that the ease of learning an identity function--even more than skip connections helping with vanishing gradients--accounts for ResNets‘ remarkable performance.)
Two main types of blocks are used in a ResNet, depending mainly on whether the input/output dimensions are same or different. You are going to implement both of them.
【中文翻译】
在 ResNets 中, "捷径" 或 "跳跃连接" 允许将梯度直接 反向传播到更早的层:
图片见英文部分

2.1 - The identity block
The identity block is the standard block used in ResNets, and corresponds to the case where the input activation (say a[l]) has the same dimension as the output activation (say a[l+2]). To flesh out the different steps of what happens in a ResNet‘s identity block, here is an alternative diagram showing the individual steps:
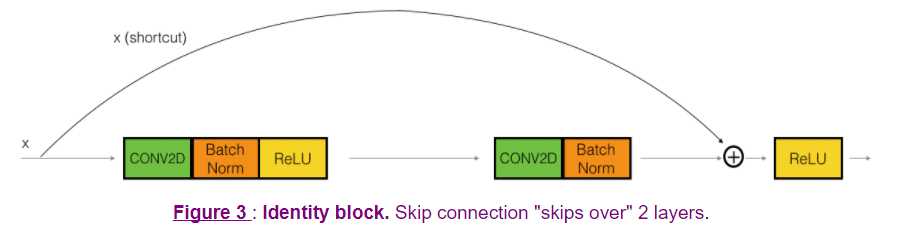
The upper path is the "shortcut path." The lower path is the "main path." In this diagram, we have also made explicit the CONV2D and ReLU steps in each layer. To speed up training we have also added a BatchNorm step. Don‘t worry about this being complicated to implement--you‘ll see that BatchNorm is just one line of code in Keras!
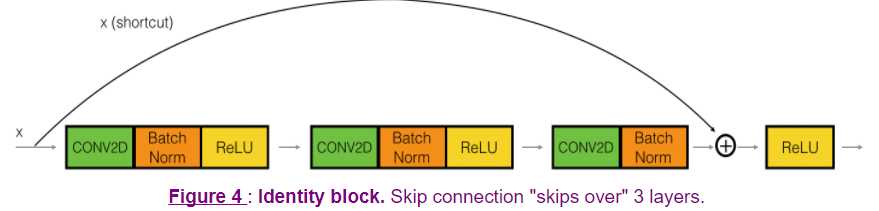
In this exercise, you‘ll actually implement a slightly more powerful version of this identity block, in which the skip connection "skips over" 3 hidden layers rather than 2 layers. It looks like this:

Here‘re the individual steps.
First component of main path:
- The first CONV2D has F1 filters of shape (1,1) and a stride of (1,1). Its padding is "valid" and its name should be
conv_name_base + ‘2a‘. Use 0 as the seed for the random initialization. - The first BatchNorm is normalizing the channels axis. Its name should be
bn_name_base + ‘2a‘. - Then apply the ReLU activation function. This has no name and no hyperparameters.
Second component of main path:
- The second CONV2D has F2F2 filters of shape (f,f)(f,f) and a stride of (1,1). Its padding is "same" and its name should be
conv_name_base + ‘2b‘. Use 0 as the seed for the random initialization. - The second BatchNorm is normalizing the channels axis. Its name should be
bn_name_base + ‘2b‘. - Then apply the ReLU activation function. This has no name and no hyperparameters.
Third component of main path:
- The third CONV2D has F3F3 filters of shape (1,1) and a stride of (1,1). Its padding is "valid" and its name should be
conv_name_base + ‘2c‘. Use 0 as the seed for the random initialization. - The third BatchNorm is normalizing the channels axis. Its name should be
bn_name_base + ‘2c‘. Note that there is no ReLU activation function in this component.
Final step:
- The shortcut and the input are added together.
- Then apply the ReLU activation function. This has no name and no hyperparameters.
【中文翻译】
2.1 - 恒等模块
恒等模块是 ResNets 中使用的标准块, 对应于输入激活 (例如, a [l]) 与输出激活具有相同维度的情况 (例如, a [l + 2])。为了使 ResNet 的恒等模块中的不同步骤更加明显, 这里是一个可选的图表, 显示各个步骤:
上面的路径是 "捷径"。下面的路径是 "主路径"。在这个图中, 我们还明确了每个层中的 CONV2D 和 ReLU 步骤。为了加快训练, 我们也增加了一个 BatchNorm 的步骤。不要担心这是复杂的实现-你会看到, 在 Keras中,BatchNorm 只是一行代码!
在本练习中, 您将实际实现这个恒等模块的一个稍微更强大的版本, 其中跳跃连接 "跳过" 3 隐藏层, 而不是2层。它看起来像这样:
- 第一 CONV2D 有 F1 个滤波器,形状为 (1,1) 和步幅为 (1,1)。其填充为 "valid", 其名称应为 conv_name_base + "2a"。使用0作为随机初始化的种子。
- 第一个 BatchNorm 是对通道轴进行规范化。它的名字应该是 bn_name_base + "2a"。
- 然后应用 ReLU 激活函数。没有名字也没有参数
- 第二 CONV2D 有 F2个滤波器, 形状为(f,f) 和步幅 (1,1)。它的填充方式是 "same", 其名称应该是 conv_name_base + "2b"。使用0作为随机初始化的种子。
- 第二个 BatchNorm 是对通道轴进行规范化。它的名字应该是 bn_name_base + "2b"。
- 然后应用 ReLU 激活函数。没有名字也没有参数
- 第三 CONV2D 有 F3个滤波器 ,形状为(1,1) 和步幅 (1,1)。其填充为 "same", 其名称应为 conv_name_base + "2c"。使用0作为随机初始化的种子。
- 第三个 BatchNorm 对通道轴进行规范化。它的名字应该是 bn_name_base + "2c"。请注意, 此组件中没有 ReLU 激活函数。
- 捷径和输入一起添加。
- 然后应用 ReLU 激活函数。没有名字也没有参数
Exercise: Implement the ResNet identity block. We have implemented the first component of the main path. Please read over this carefully to make sure you understand what it is doing. You should implement the rest.
- To implement the Conv2D step: See reference
- To implement BatchNorm: See reference (axis: Integer, the axis that should be normalized (typically the channels axis))
- For the activation, use:
Activation(‘relu‘)(X) - To add the value passed forward by the shortcut: See reference
【中文翻译】
- 实现 Conv2D 步骤: 请参阅参考
- 要实现 BatchNorm: 请参见参考 (轴: 整数, 应规范化的轴 (通常为通道轴))
- 对于激活, 使用:
Activation(‘relu‘)(X) - 要添加由捷径向前传递的值: 请参阅参考
【code】
-------------------------------------------------------