码迷,mamicode.com
首页 > 编程语言 > 详细

一步步完成Maven+SpringMVC+SpringFox+Swagger整合示例

时间:2018-02-06 12:58:40      阅读:237      评论:0      收藏:0      [点我收藏+]

标签:tps   div   javaee   ram   href   site   .com   nec   dao   

本文给出一个整合Maven+SpringMVC+SpringFOX+Swagger的示例,并且一步步给出完成步骤。

本人在做实例时发现 http://blog.csdn.net/zth1002/article/details/46927187 中,Spring必须是4.0以上版本。

目标

在做项目的时候,有时候需要提供其它平台(如业务平台)相关的HTTP接口,业务平台则通过开放的HTTP接口获取相关的内容,并完成自身业务~

提供对外开放HTTP API接口,比较常用的是采用Spring MVC来完成。

本文的目标是先搭建一个简单的Spring MVC应用,然后为Spring MVC整合SpringFox-Swagger以及SpringFox-Swagger-UI,最终,达到Spring MVC对外开放接口API文档化。

如下图所示:
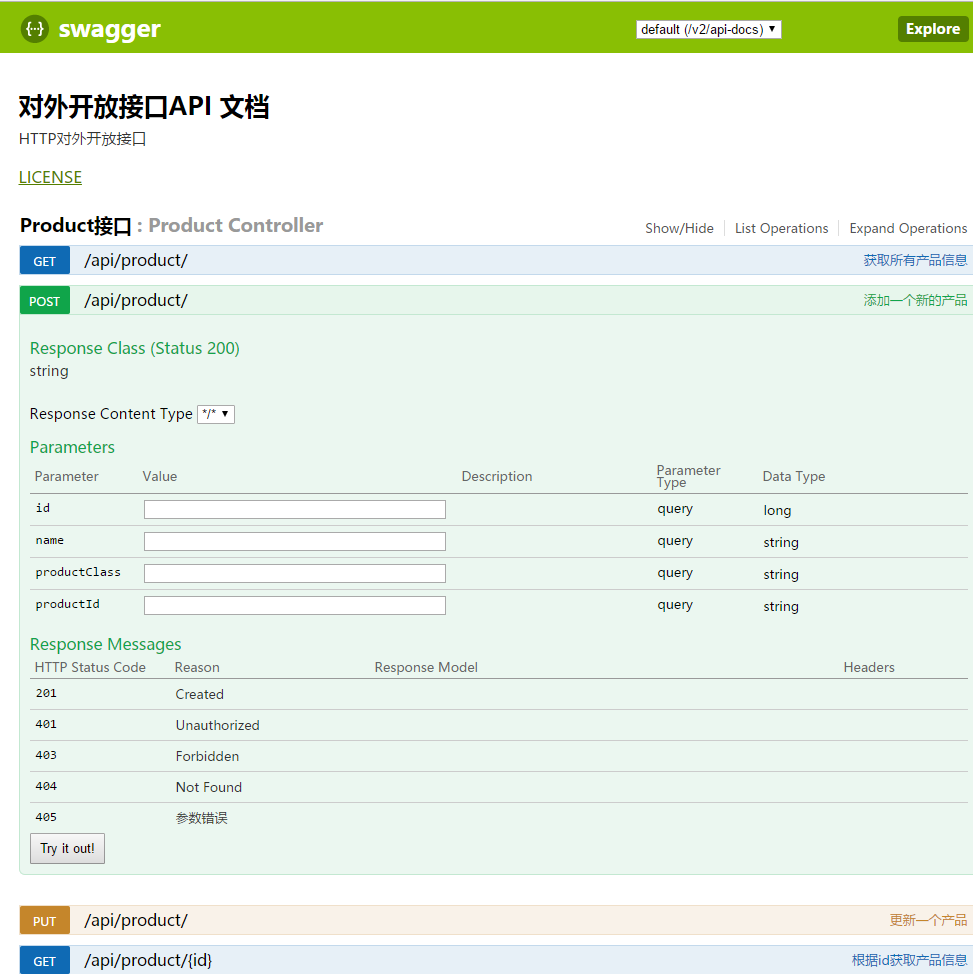
技术分享图片

搭建SpringMVC工程

新建Maven工程

Eclipse中,File --> New --> Maven Project, 
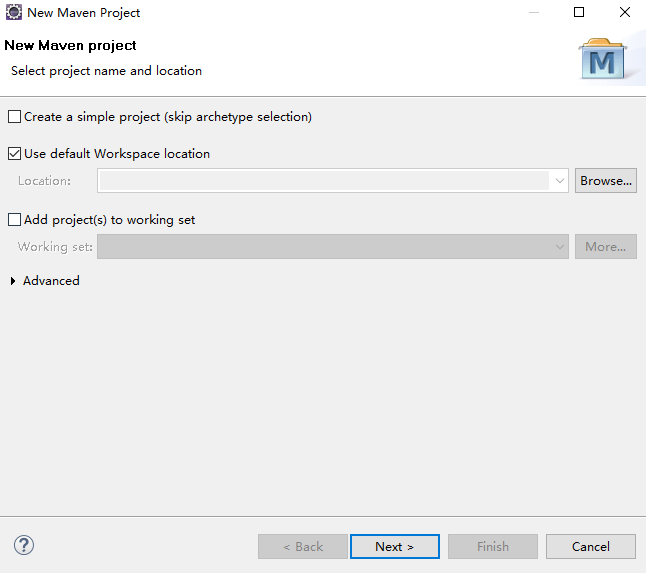
技术分享图片

点击“Next”按钮, 然后选择 “maven-archetype-webapp”,
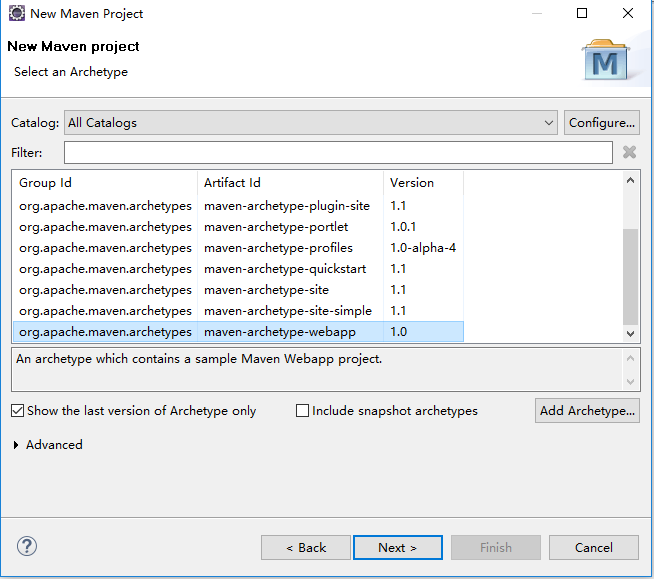
技术分享图片

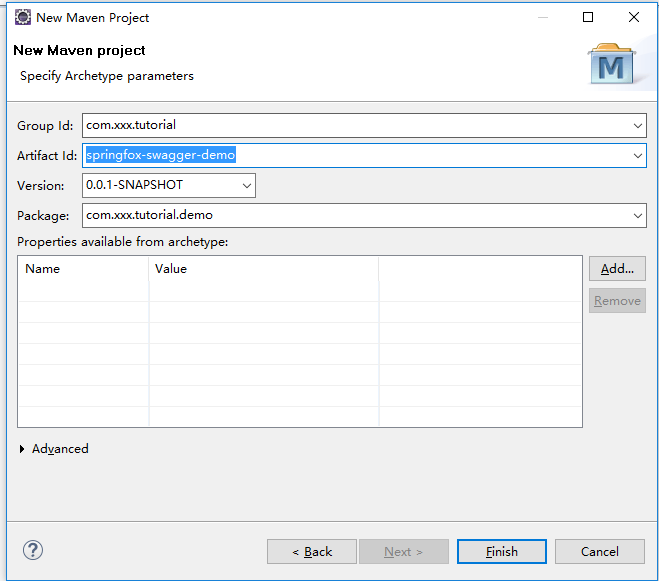
继续点击“Next”按钮,然后指定

技术分享图片

点击“Finish” 按钮结束~ 就这样,一个简单的Web工程就建好了~

技术分享图片

但是,

默认是使用J2SE-1.5, 配置一下Build Path,使用本地机器上安装的JDK

(本文中使用的是JDK 1.7),工程默认字体是GBK,将其改成UTF-8

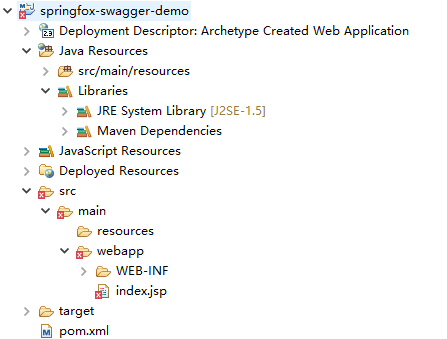
完成后,Maven工程的结构如下图所示:
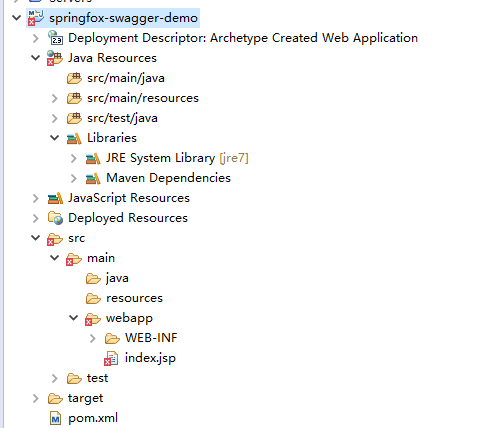
技术分享图片

引入Spring依赖包

在本示例中,因为简单,所以只要引入如下几个jar包就好了~

	<dependencies>
		<!--引入Spring依赖包 -->
		<dependency>
			<groupId>org.springframework</groupId>
			<artifactId>spring-core</artifactId>
			<version>${spring.framework.version}</version>
		</dependency>
		<dependency>
			<groupId>org.springframework</groupId>
			<artifactId>spring-context</artifactId>
			<version>${spring.framework.version}</version>
		</dependency>
		<dependency>
			<groupId>org.springframework</groupId>
			<artifactId>spring-webmvc</artifactId>
			<version>${spring.framework.version}</version>
		</dependency>
	</dependencies>

完整的pom.xml文件内容如下:

<project xmlns="http://maven.apache.org/POM/4.0.0" xmlns:xsi="http://www.w3.org/2001/XMLSchema-instance"
	xsi:schemaLocation="http://maven.apache.org/POM/4.0.0 http://maven.apache.org/maven-v4_0_0.xsd">
	<modelVersion>4.0.0</modelVersion>
	<groupId>com.xxx.tutorial</groupId>
	<artifactId>springfox-swagger-demo</artifactId>
	<packaging>war</packaging>
	<version>0.0.1-SNAPSHOT</version>
	<name>springfox-swagger-demo Maven Webapp</name>
	<url>http://maven.apache.org</url>

	<properties>
		<project.build.sourceEncoding>UTF-8</project.build.sourceEncoding>
		<spring.framework.version>4.3.6.RELEASE</spring.framework.version>
	</properties>

	<dependencies>
		<!--引入Spring依赖包 -->
		<dependency>
			<groupId>org.springframework</groupId>
			<artifactId>spring-core</artifactId>
			<version>${spring.framework.version}</version>
		</dependency>
		<dependency>
			<groupId>org.springframework</groupId>
			<artifactId>spring-context</artifactId>
			<version>${spring.framework.version}</version>
		</dependency>
		<dependency>
			<groupId>org.springframework</groupId>
			<artifactId>spring-webmvc</artifactId>
			<version>${spring.framework.version}</version>
		</dependency>
	</dependencies><build><finalName>springfox-swagger-demo</finalName></build></project>

编写spring-mvc.xml文件

<?xml version="1.0" encoding="UTF-8"?>
<beans xmlns="http://www.springframework.org/schema/beans"
	xmlns:xsi="http://www.w3.org/2001/XMLSchema-instance" xmlns:context="http://www.springframework.org/schema/context"
	xmlns:mvc="http://www.springframework.org/schema/mvc" xmlns:p="http://www.springframework.org/schema/p"
	xsi:schemaLocation="http://www.springframework.org/schema/beans http://www.springframework.org/schema/beans/spring-beans-4.0.xsd
		http://www.springframework.org/schema/context http://www.springframework.org/schema/context/spring-context-4.0.xsd
		http://www.springframework.org/schema/mvc http://www.springframework.org/schema/mvc/spring-mvc-4.0.xsd">

	<!-- 默认的注解映射的支持 ,它会自动注册DefaultAnnotationHandlerMapping 与AnnotationMethodHandlerAdapter -->
	<mvc:annotation-driven />

	<!-- enable autowire 向容器自动注册 -->
	<context:annotation-config />

	<!-- 设置使用注解的类所在的jar包 -->
	<context:component-scan base-package="com.xxx.tutorial" />
	<bean
		class="org.springframework.web.servlet.mvc.annotation.AnnotationMethodHandlerAdapter" />

</beans>

配置web.xml

<?xml version="1.0" encoding="UTF-8"?>
<web-app xmlns:xsi="http://www.w3.org/2001/XMLSchema-instance"
	xmlns="http://java.sun.com/xml/ns/javaee"
	xsi:schemaLocation="http://java.sun.com/xml/ns/javaee http://java.sun.com/xml/ns/javaee/web-app_3_0.xsd"
	id="WebApp_ID" metadata-complete="true" version="3.0">
	<display-name>Spring MVC</display-name>
	<servlet>
		<servlet-name>spring-mvc</servlet-name>
		<servlet-class>org.springframework.web.servlet.DispatcherServlet</servlet-class>
		<init-param>
			<param-name>contextConfigLocation</param-name>
			<param-value>classpath:spring-mvc.xml</param-value>
		</init-param>
		<load-on-startup>1</load-on-startup>
		<async-supported>true</async-supported>
	</servlet>
	<servlet-mapping>
		<servlet-name>spring-mvc</servlet-name>
		<url-pattern>/</url-pattern>
	</servlet-mapping>
	<filter>
		<filter-name>encodingFilter</filter-name>
		<filter-class>org.springframework.web.filter.CharacterEncodingFilter</filter-class>
		<init-param>
			<param-name>encoding</param-name>
			<param-value>UTF-8</param-value>
		</init-param>
		<init-param>
			<param-name>forceEncoding</param-name>
			<param-value>true</param-value>
		</init-param>
	</filter>
	<filter-mapping>
		<filter-name>encodingFilter</filter-name>
		<url-pattern>/*</url-pattern>
	</filter-mapping>
</web-app>

编写Controller并测试

配置好spring-mvc.xml以及web.xml文件之后,咱们继续往下走~

因为,本文Spring MVC示例的作用主要用来暴露对外HTTP API接口,先写一个简单的ProductController,其包含一个按照id查询的方法。

Product.java和ProductController.java的内容如下:

Product.java

package com.xxx.tutorial.model;

import java.io.Serializable;

/**
 * 
 * @author wangmengjun
 *
 */
public class Product implements Serializable {

	private static final long serialVersionUID = 1L;

	/**ID*/
	private Long id;

	/**产品名称*/
	private String name;

	/**产品型号*/
	private String productClass;

	/**产品ID*/
	private String productId;

	/**
	 * @return the id
	 */
	public Long getId() {
		return id;
	}

	/**
	 * @param id
	 *            the id to set
	 */
	public void setId(Long id) {
		this.id = id;
	}

	/**
	 * @return the name
	 */
	public String getName() {
		return name;
	}

	/**
	 * @param name
	 *            the name to set
	 */
	public void setName(String name) {
		this.name = name;
	}

	/**
	 * @return the productClass
	 */
	public String getProductClass() {
		return productClass;
	}

	/**
	 * @param productClass
	 *            the productClass to set
	 */
	public void setProductClass(String productClass) {
		this.productClass = productClass;
	}

	/**
	 * @return the productId
	 */
	public String getProductId() {
		return productId;
	}

	/**
	 * @param productId
	 *            the productId to set
	 */
	public void setProductId(String productId) {
		this.productId = productId;
	}

	/*
	 * (non-Javadoc)
	 * 
	 * @see java.lang.Object#toString()
	 */
	@Override
	public String toString() {
		return "Product [id=" + id + ", name=" + name + ", productClass=" + productClass + ", productId=" + productId
				+ "]";
	}

}

ProductController.java

package com.xxx.tutorial.controller;

import org.springframework.http.ResponseEntity;
import org.springframework.web.bind.annotation.PathVariable;
import org.springframework.web.bind.annotation.RequestMapping;
import org.springframework.web.bind.annotation.RequestMethod;
import org.springframework.web.bind.annotation.RestController;

import com.xxx.tutorial.model.Product;

@RestController
@RequestMapping(value = { "/api/product/"})
public class ProductController {

	@RequestMapping(value = "/{id}", method = RequestMethod.GET)
	public ResponseEntity<Product> get(@PathVariable Long id) {
		Product product = new Product();
		product.setName("七级滤芯净水器");
		product.setId(1L);
		product.setProductClass("seven_filters");
		product.setProductId("T12345");
		return ResponseEntity.ok(product);
	}
}

注:

鉴于是一个demo示例,所以没有写ProductService以及相关DAO, 直接在方法中返回固定的Product信息~

验证Spring MVC是否ok

完成Controller的代码,运行Spring MVC项目,然后,看一下Spring MVC是否运行ok,访问URL地址

http://localhost:8888/springfox-swagger-demo/api/product/1

  • 出现错误

技术分享图片

详细的错误信息如下:

五月 23, 2017 3:00:55 下午 org.apache.catalina.core.StandardWrapperValve invoke
严重: Servlet.service() for servlet [spring-mvc] in context with path [/springfox-swagger-demo] threw exception [Request processing failed; nested exception is java.lang.IllegalArgumentException: No converter found for return value of type: class com.xxx.tutorial.model.Product] with root cause
java.lang.IllegalArgumentException: No converter found for return value of type: class com.xxx.tutorial.model.Product
	at org.springframework.web.servlet.mvc.method.annotation.AbstractMessageConverterMethodProcessor.writeWithMessageConverters(AbstractMessageConverterMethodProcessor.java:187)
	at org.springframework.web.servlet.mvc.method.annotation.HttpEntityMethodProcessor.handleReturnValue(HttpEntityMethodProcessor.java:203)
	at org.springframework.web.method.support.HandlerMethodReturnValueHandlerComposite.handleReturnValue(HandlerMethodReturnValueHandlerComposite.java:81)
	at org.springframework.web.servlet.mvc.method.annotation.ServletInvocableHandlerMethod.invokeAndHandle(ServletInvocableHandlerMethod.java:132)
	at org.springframework.web.servlet.mvc.method.annotation.RequestMappingHandlerAdapter.invokeHandlerMethod(RequestMappingHandlerAdapter.java:827)
	at org.springframework.web.servlet.mvc.method.annotation.RequestMappingHandlerAdapter.handleInternal(RequestMappingHandlerAdapter.java:738)
	at org.springframework.web.servlet.mvc.method.AbstractHandlerMethodAdapter.handle(AbstractHandlerMethodAdapter.java:85)
	at org.springframework.web.servlet.DispatcherServlet.doDispatch(DispatcherServlet.java:963)
	at org.springframework.web.servlet.DispatcherServlet.doService(DispatcherServlet.java:897)
	at org.springframework.web.servlet.FrameworkServlet.processRequest(FrameworkServlet.java:970)
	at org.springframework.web.servlet.FrameworkServlet.doGet(FrameworkServlet.java:861)
	at javax.servlet.http.HttpServlet.service(HttpServlet.java:624)
	at org.springframework.web.servlet.FrameworkServlet.service(FrameworkServlet.java:846)
	at javax.servlet.http.HttpServlet.service(HttpServlet.java:731)
	at org.apache.catalina.core.ApplicationFilterChain.internalDoFilter(ApplicationFilterChain.java:303)
	at org.apache.catalina.core.ApplicationFilterChain.doFilter(ApplicationFilterChain.java:208)
	at org.apache.tomcat.websocket.server.WsFilter.doFilter(WsFilter.java:52)
	at org.apache.catalina.core.ApplicationFilterChain.internalDoFilter(ApplicationFilterChain.java:241)
	at org.apache.catalina.core.ApplicationFilterChain.doFilter(ApplicationFilterChain.java:208)
	at org.springframework.web.filter.CharacterEncodingFilter.doFilterInternal(CharacterEncodingFilter.java:197)
	at org.springframework.web.filter.OncePerRequestFilter.doFilter(OncePerRequestFilter.java:107)
	at org.apache.catalina.core.ApplicationFilterChain.internalDoFilter(ApplicationFilterChain.java:241)
	at org.apache.catalina.core.ApplicationFilterChain.doFilter(ApplicationFilterChain.java:208)
	at org.apache.catalina.core.StandardWrapperValve.invoke(StandardWrapperValve.java:220)
	at org.apache.catalina.core.StandardContextValve.invoke(StandardContextValve.java:122)
	at org.apache.catalina.core.StandardHostValve.invoke(StandardHostValve.java:170)
	at org.apache.catalina.valves.ErrorReportValve.invoke(ErrorReportValve.java:103)
	at org.apache.catalina.valves.AccessLogValve.invoke(AccessLogValve.java:957)
	at org.apache.catalina.core.StandardEngineValve.invoke(StandardEngineValve.java:116)
	at org.apache.catalina.connector.CoyoteAdapter.service(CoyoteAdapter.java:423)
	at org.apache.coyote.http11.AbstractHttp11Processor.process(AbstractHttp11Processor.java:1079)
	at org.apache.coyote.AbstractProtocol$AbstractConnectionHandler.process(AbstractProtocol.java:620)
	at org.apache.tomcat.util.net.JIoEndpoint$SocketProcessor.run(JIoEndpoint.java:316)
	at java.util.concurrent.ThreadPoolExecutor.runWorker(Unknown Source)
	at java.util.concurrent.ThreadPoolExecutor$Worker.run(Unknown Source)
	at org.apache.tomcat.util.threads.TaskThread$WrappingRunnable.run(TaskThread.java:61)
	at java.lang.Thread.run(Unknown Source)

解决方法,添加jackson-databind依赖包即可~

		<dependency>
			<groupId>com.fasterxml.jackson.core</groupId>
			<artifactId>jackson-databind</artifactId>
			<version>2.6.6</version>
		</dependency>

重新启动,运行一下,成功返回信息~

技术分享图片

为了看的更加清楚,可以使用postman来完成~, 如~

技术分享图片

至此,一个简单的基于SpringMVC的Web项目已经创建,并能对外提供API接口~ 

技术分享图片

接下来,我们要整合SpringFox和SwaggerUI到该SpringMVC项目中去,使其对外接口文档化

整合SpringFox-Swagger

SpringFox【SpringFox链接】已经可以代替Swagger-SpringMVC, 目前SpringFox同时支持Swagger 1.2 和 2.0.

在SpringMVC项目中整合SpringFox-Swagger只要如下几步即可~

  • 添加SpringFox-Swagger依赖
  • 添加SwaggerConfig

添加依赖

		<dependency>
			<groupId>io.springfox</groupId>
			<artifactId>springfox-swagger2</artifactId>
			<version>2.7.0</version>
		</dependency>

添加SwaggerConfig

package com.xxx.tutorial.config;

import org.springframework.context.annotation.Bean;
import org.springframework.context.annotation.Configuration;

import springfox.documentation.builders.ApiInfoBuilder;
import springfox.documentation.builders.RequestHandlerSelectors;
import springfox.documentation.service.ApiInfo;
import springfox.documentation.spi.DocumentationType;
import springfox.documentation.spring.web.plugins.Docket;
import springfox.documentation.swagger2.annotations.EnableSwagger2;

@Configuration
@EnableSwagger2
public class SwaggerConfig {

	@Bean
	public Docket api() {
		return new Docket(DocumentationType.SWAGGER_2)
				.select()
				.apis(RequestHandlerSelectors.any())
				.build()
				.apiInfo(apiInfo());
	}
	
	private ApiInfo apiInfo() {
		return new ApiInfoBuilder()
				.title("对外开放接口API 文档")
				.description("HTTP对外开放接口")
				.version("1.0.0")
				.termsOfServiceUrl("http://xxx.xxx.com")
				.license("LICENSE")
				.licenseUrl("http://xxx.xxx.com")
				.build();
	}

}

整合SpringFox-Swagger-UI

在SpringMVC项目中整合SpringFox-Swagger-UI也只要如下两个步骤即可~

  • 添加SpringFox-Swagger-UI依赖
  • 添加配置

添加依赖

		<dependency>
			<groupId>io.springfox</groupId>
			<artifactId>springfox-swagger-ui</artifactId>
			<version>2.7.0</version>
		</dependency>

添加配置

在添加配置之前,一起来看一下swagger-ui中使用的静态资源文件(如swagger-ui.html )放在那里~

spingfox-swagger-ui-2.7.0.jar中的/META-INF/resources/下~ 如下图所示:

技术分享图片


为了访问swagger-ui.html,我们配置对这些静态资源的访问~ 如:

package com.xxx.tutorial.config;

import org.springframework.context.annotation.Configuration;
import org.springframework.web.servlet.config.annotation.EnableWebMvc;
import org.springframework.web.servlet.config.annotation.ResourceHandlerRegistry;
import org.springframework.web.servlet.config.annotation.WebMvcConfigurerAdapter;

@Configuration
@EnableWebMvc
public class WebAppConfig extends WebMvcConfigurerAdapter {

    @Override 
    public void addResourceHandlers(ResourceHandlerRegistry registry) {
        registry.addResourceHandler("swagger-ui.html").addResourceLocations("classpath:/META-INF/resources/");
        registry.addResourceHandler("/webjars/**").addResourceLocations("classpath:/META-INF/resources/webjars/");
    }

}

该配置代码的效果和如下代码等价~

	<mvc:resources mapping="swagger-ui.html" location="classpath:/META-INF/resources/" />
	<mvc:resources mapping="/webjars/**"
		location="classpath:/META-INF/resources/webjars/" />

在本文中,可以将其配置在spring-mvc.xml中,

<?xml version="1.0" encoding="UTF-8"?>
<beans xmlns="http://www.springframework.org/schema/beans"
	xmlns:xsi="http://www.w3.org/2001/XMLSchema-instance" xmlns:context="http://www.springframework.org/schema/context"
	xmlns:mvc="http://www.springframework.org/schema/mvc" xmlns:p="http://www.springframework.org/schema/p"
	xsi:schemaLocation="http://www.springframework.org/schema/beans http://www.springframework.org/schema/beans/spring-beans-4.0.xsd
		http://www.springframework.org/schema/context http://www.springframework.org/schema/context/spring-context-4.0.xsd
		http://www.springframework.org/schema/mvc http://www.springframework.org/schema/mvc/spring-mvc-4.0.xsd">

	<!-- 默认的注解映射的支持 ,它会自动注册DefaultAnnotationHandlerMapping 与AnnotationMethodHandlerAdapter -->
	<mvc:annotation-driven />

	<!-- enable autowire 向容器自动注册 -->
	<context:annotation-config />

	<!-- 设置使用注解的类所在的jar包 -->
	<context:component-scan base-package="com.xxx.tutorial" />

	<bean
		class="org.springframework.web.servlet.mvc.annotation.AnnotationMethodHandlerAdapter" />

	<mvc:resources mapping="swagger-ui.html" location="classpath:/META-INF/resources/" />
	<mvc:resources mapping="/webjars/**"
		location="classpath:/META-INF/resources/webjars/" />
</beans>


API接口说明代码添加并测试

经过上述几个步骤之后,之前写的ProductController的接口,就可以实现文档化了,如本文通过如下的访问地址访问:

http://localhost:8888/springfox-swagger-demo/swagger-ui.html

技术分享图片

这个接口API雏形出来了,但是还缺少点东西,比如:接口方法的描述等都没有~

修改一下,ProductController.java内容,如:

package com.xxx.tutorial.controller;

import org.springframework.http.ResponseEntity;
import org.springframework.web.bind.annotation.PathVariable;
import org.springframework.web.bind.annotation.RequestMapping;
import org.springframework.web.bind.annotation.RequestMethod;
import org.springframework.web.bind.annotation.RestController;

import com.xxx.tutorial.model.Product;

import io.swagger.annotations.Api;
import io.swagger.annotations.ApiOperation;

@RestController
@RequestMapping(value = { "/api/product/" })
@Api(value = "/product", tags = "Product接口")
public class ProductController {

	@RequestMapping(value = "/{id}", method = RequestMethod.GET)
	@ApiOperation(value = "根据id获取产品信息", notes = "根据id获取产品信息", httpMethod = "GET", response = Product.class)
	public ResponseEntity<Product> get(@PathVariable Long id) {
		Product product = new Product();
		product.setName("七级滤芯净水器");
		product.setId(1L);
		product.setProductClass("seven_filters");
		product.setProductId("T12345");
		return ResponseEntity.ok(product);
	}
}

重新访问,接口已经出现多个我们指定的描述信息~

技术分享图片 

在参数id栏中输入1,然后点击“try it out”按钮~ 可以查看接口调用结果~

技术分享图片

至此一个简单的示例就完成了~

稍微增加几个接口

修改ProductController

package com.xxx.tutorial.controller;

import java.util.Arrays;
import java.util.List;

import org.springframework.http.ResponseEntity;
import org.springframework.web.bind.annotation.PathVariable;
import org.springframework.web.bind.annotation.RequestMapping;
import org.springframework.web.bind.annotation.RequestMethod;
import org.springframework.web.bind.annotation.RestController;

import com.xxx.tutorial.model.Product;

import io.swagger.annotations.Api;
import io.swagger.annotations.ApiOperation;
import io.swagger.annotations.ApiResponse;
import io.swagger.annotations.ApiResponses;

@RestController
@RequestMapping(value = { "/api/product/" })
@Api(value = "/product", tags = "Product接口")
public class ProductController {

	@RequestMapping(value = "/{id}", method = RequestMethod.GET)
	@ApiOperation(value = "根据id获取产品信息", notes = "根据id获取产品信息", httpMethod = "GET", response = Product.class)
	public ResponseEntity<Product> get(@PathVariable Long id) {
		Product product = new Product();
		product.setName("七级滤芯净水器");
		product.setId(1L);
		product.setProductClass("seven_filters");
		product.setProductId("T12345");
		return ResponseEntity.ok(product);
	}

	@RequestMapping(method = RequestMethod.POST)
	@ApiOperation(value = "添加一个新的产品")
	@ApiResponses(value = { @ApiResponse(code = 405, message = "参数错误") })
	public ResponseEntity<String> add(Product product) {
		return ResponseEntity.ok("SUCCESS");
	}

	@RequestMapping(method = RequestMethod.PUT)
	@ApiOperation(value = "更新一个产品")
	@ApiResponses(value = { @ApiResponse(code = 400, message = "参数错误") })
	public ResponseEntity<String> update(Product product) {
		return ResponseEntity.ok("SUCCESS");
	}

	@RequestMapping(method = RequestMethod.GET)
	@ApiOperation(value = "获取所有产品信息", notes = "获取所有产品信息", httpMethod = "GET", response = Product.class, responseContainer = "List")
	public ResponseEntity<List<Product>> getAllProducts() {
		Product product = new Product();
		product.setName("七级滤芯净水器");
		product.setId(1L);
		product.setProductClass("seven_filters");
		product.setProductId("T12345");
		return ResponseEntity.ok(Arrays.asList(product, product));
	}
}

swagger-ui展示

技术分享图片

由上图可以看出,不同的method(GET / PUT / POST等)都会以不同的颜色展示出来~

Swagger-ui的添加,可以帮助他人查看接口信息,并在页面上进行输入参数来调用接口~

Maven工程的目录如下:

技术分享图片

本文只是一个简单的整合示例,大家只要操作一下就能出来结果。

更加详细的文档,有兴趣的小伙伴可以访问swagger-ui的官网查看~

http://blog.csdn.net/u011277123/article/details/76643284

一步步完成Maven+SpringMVC+SpringFox+Swagger整合示例

标签:tps   div   javaee   ram   href   site   .com   nec   dao   

原文地址:https://www.cnblogs.com/hyl8218/p/8421442.html

(0)
(0)
   
举报
评论 一句话评论(0
登录后才能评论!
© 2014 mamicode.com 版权所有  联系我们:gaon5@hotmail.com
迷上了代码!