Python模块包含的类创建(下)
- 类的方法表创建
直接上代码
 static PyMethodDef VCam_MethodMembers[] =      //类的所有成员函数结构列表同样是以全NULL结构结束
{
    { "set_fill", (PyCFunction)VCam_SetFill, METH_VARARGS, "Set video resize method (0: Aspect fit, 1: Aspect fill, 2: Stretch), used when input frame size differs from VCam output size." },
    { "mirror", (PyCFunction)VCam_Mirror, METH_VARARGS, "Mirror the output video (0: no mirror, others: mirror), non-persistent." },
    { "rotate", (PyCFunction)VCam_Rotate, METH_VARARGS, "Rotate the input video 90 degree (0: no rotate, others: rotate), non-persistent." },
    { "flip", (PyCFunction)VCam_Flip, METH_VARARGS, "Vertical flip the output video(0: no flip, others : flip), non - persistent." },
    { "set_difault_image", (PyCFunction)VCam_SetDefaultImage, METH_VARARGS, "Set a 24bits bitmap file as VCam default idle image, which will be displayed when nothing is being played.\nCall it with NULL parameter or an empty string will reset it to the default one.\n The image will be resized(aspect fit) only if it‘s bigger than VCam output size." },
    { "set_name", (PyCFunction)VCam_SetFriendlyName, METH_VARARGS, " The device‘s name is \"Virtual Camera\" by default, and you can use it to set a different name." },
    { "set_license", (PyCFunction)VCam_SetLicenseCode, METH_VARARGS, "You can set license code here if you‘ve purchased VCam SDK. The water mark (TRIAL) will be removed with a valid license, and call it with a wrong one will show the watermark again." },
    { "set_output_format", (PyCFunction)VCam_Format, METH_VARARGS, "set display format (width,height,fps) ." },
    { "send_image", (PyCFunction)VCam_SendImg, METH_VARARGS, "Display a image( path) to vCam." },
    { "capture_screen", (PyCFunction)VCam_CaptureScreen, METH_VARARGS, "Capture region of screen and set it as VCam output." },
    { "get_output_format", (PyCFunction)VCam_GetOutputFormat, METH_NOARGS, "Get VCam output video size (640x480 by default), and frame rate (25 by default)." },
    { NULL, NULL, NULL, NULL }
};
PyMethondDef 结构的定义
struct PyMethodDef { const char *ml_name; /* The name of the built-in function/method */ PyCFunction ml_meth; /* The C function that <isindex></isindex>mplements it */ int ml_flags; /* Combination of METH_xxx flags, which mostly describe the args expected by the C func */ const char *ml_doc; /* The __doc__ attribute, or NULL */ }; typedef struct PyMethodDef PyMethodDef; #define PyCFunction_New(ML, SELF) PyCFunction_NewEx((ML), (SELF), NULL) PyAPI_FUNC(PyObject *) PyCFunction_NewEx(PyMethodDef *, PyObject *, PyObject *); /* Flag passed to newmethodobject */ /* #define METH_OLDARGS 0x0000 -- unsupported now */ #define METH_VARARGS 0x0001 #define METH_KEYWORDS 0x0002 /* METH_NOARGS and METH_O must not be combined with the flags above. */ #define METH_NOARGS 0x0004 #define METH_O 0x0008 /* METH_CLASS and METH_STATIC are a little different; these control the construction of methods for a class. These cannot be used for functions in modules. */ #define METH_CLASS 0x0010 #define METH_STATIC 0x0020 /* METH_COEXIST allows a method to be entered even though a slot has already filled the entry. When defined, the flag allows a separate method, "__contains__" for example, to coexist with a defined slot like sq_contains. */ #define METH_COEXIST 0x0040- 其他没啥好说的结构定义已经很明白了,就是第三个元素ml_falg 需要根据函数时机传入参数要求进行调整 就说几个常用的flag 其他见手册
- METH_NOARGS 表示没有参数传入,
- METH_KEYWORDS 表示传入keyword参数
- METH_VARARGS 表示传入位置参数
- 部分flag可以组合传入如 METH_VARARGS|METH_KEYWORDS
- 注意METH_NOARGS 不能与 前面两个flag组合使用
- 写类的内置属性信息表说明PyTypeObject实例VCam_ClassInfo
直接上代码,代码中包含了PyTypeObject结构体 大部分元素,具体见object.h 头文件定义
static PyTypeObject VCam_ClassInfo =
{
    PyVarObject_HEAD_INIT(NULL, 0)
    "PyVcam.VCam",            //可以通过__class__获得这个字符串. CPP可以用类.__name__获取.   const char *
    sizeof(VCam),                 // tp_basicsize 类/结构的长度.调用PyObject_New时需要知道其大小.  Py_ssize_t
    0,                              //tp_itemsize  Py_ssize_t
    (destructor)VCam_Destruct,    //类的析构函数.      destructor
    0,                            //类的print 函数      printfunc
    0,                               //类的getattr 函数  getattrfunc
    0,                              //类的setattr 函数   setattrfunc
    0,                              //formerly known as tp_compare(Python 2) or tp_reserved (Python 3)  PyAsyncMethods *
    0,          //tp_repr 内置函数调用。    reprfunc
    0,                              //tp_as_number   指针   PyNumberMethods *
    0,                              //tp_as_sequence 指针   PySequenceMethods *
    0,                              // tp_as_mapping 指针  PyMappingMethods *
    0,                              // tp_hash   hashfunc
    0,                              //tp_call     ternaryfunc
    0,          //tp_str/print内置函数调用.   reprfunc
    0,                          //tp_getattro    getattrofunc
    0,                          //tp_setattro     setattrofunc
    0,                          //tp_as_buffer 指针 Functions to access object as input/output buffer   PyBufferProcs
    Py_TPFLAGS_DEFAULT | Py_TPFLAGS_BASETYPE,                 //tp_flags    如果没有提供方法的话,为Py_TPFLAGS_DEFAULE     unsigned long
    "VCam Module write by C++!",                   // tp_doc  __doc__,类/结构的DocString.  const char *
    0,                                                   //tp_traverse    call function for all accessible objects    traverseproc
    0,                                                      // tp_clear   delete references to contained objects    inquiry
    0,                                                      //  tp_richcompare   richcmpfunc
    0,                                                      //tp_weaklistoffset  Py_ssize_t
    0,                                                      // tp_iter  getiterfunc
    0,                                          //tp_iternext    iternextfunc


    /* Attribute descriptor and subclassing stuff */

    VCam_MethodMembers,        //类的所有方法集合.   PyMethodDef *
    VCam_DataMembers,          //类的所有数据成员集合.  PyMemberDef *
    0,                                              // tp_getset   PyGetSetDef *
    0,                                              //  tp_base   _typeobject *
    0,                                              //  tp_dict     PyObject *
    0,                                              // tp_descr_get   descrgetfunc
    0,                                                          //tp_descr_set   descrsetfunc
    0,                                              //tp_dictoffset   Py_ssize_t
    (initproc)VCam_init,      //类的构造函数.tp_init       initproc
    0,                      //tp_alloc  allocfunc
    0,                          //tp_new   newfunc
    0,                        // tp_free    freefunc
    0,                      //  tp_is_gc     inquiry
};
VCam_ClassInfo 中把前面所创建的 init函数、析构函数、方法表、成员表等加入类信息表
模块创建和初始化
- 创建模块信息
直接上代码
   static PyModuleDef ModuleInfo =
    {
    PyModuleDef_HEAD_INIT,
    "PyVcam",               //模块的内置名--__name__.
    NULL,                 //模块的DocString.__doc__
    -1,
    NULL, NULL, NULL, NULL, NULL
    };
PyModuleDef 结构题定义
typedef struct PyModuleDef{
  PyModuleDef_Base m_base;
  const char* m_name;
  const char* m_doc;
  Py_ssize_t m_size;
  PyMethodDef *m_methods;
  struct PyModuleDef_Slot* m_slots;
  traverseproc m_traverse;
  inquiry m_clear;
  freefunc m_free;
} PyModuleDef;
- 初始化模块
先上代码
PyMODINIT_FUNC PyInit_PyVcam(void) //模块外部名称为--PyVcam { Gdiplus::GdiplusStartupInput StartupInput; GdiplusStartup(&m_gdiplusToken, &StartupInput, NULL); PyObject* pReturn = 0; VCam_ClassInfo.tp_new = PyType_GenericNew; //此类的new内置函数—建立对象. if (PyType_Ready(&VCam_ClassInfo) < 0) return NULL; pReturn = PyModule_Create(&ModuleInfo); if (pReturn == NULL) return NULL; Py_INCREF(&VCam_ClassInfo); PyModule_AddObject(pReturn, "VCam", (PyObject*)&VCam_ClassInfo); //将这个类加入到模块的Dictionary中. return pReturn; }- 代码解释:
- Python模块必须要导出一个返回值为PyObject*名为PyInit_XXX的函数用来初始化模块信息,Python加载模块时候回去直接调用此函数来初始化。
- PyMODINIT_FUNC 宏其实就是以下语句: __declspec(dllexport) PyObject*
- VCam_ClassInfo.tp_new = PyType_GenericNew; 这条语句其实可以不用写直接在前面VCam_Classinfo里面对应位置加入PyType_GenericNew 即可,想想找到对应那个置要找到眼花 干脆直接以这种形式写出来;反之前面整个VCam_Classinfo 后面的结构其实可以不写,直接以VCam_Classinfo.xxx =xxx的形式写出
- 调用一个PyType_Ready (&VCam_ClassInfo)来完成类的定义
- 然后用PyModule_Create(&ModuleInfo) 创建Module
- 调用PyModule_AddObject将 Vcam类加入到Module 中 同时别忘了增加类体引用计数
- 将模块返回给Python 大功告成
PythonC扩展的执行效率问题(GIL)
1.GIL问题
* GIL锁原理
    for (;;) {
        if (--ticker < 0) {   //这是之前版本的GIL锁原理 执行check_interval条数指令 放一次GIL 貌似现在版本不再按照指令条数来放锁了而是按照时间间隔
            ticker = check_interval;
            /* Give another thread a chance */
            PyThread_release_lock(interpreter_lock);   //释放 GIL
            /* Other threads may run now */
            PyThread_acquire_lock(interpreter_lock, 1); //立马重新申请GIL 一放一抢 其他线程就有机会
        }
        bytecode = *next_instr++;  //这里读入python指令
        switch (bytecode) {
            /* execute the next instruction ... */  //执行指令
        }
    }

* 由于CPython GIL存在在进行多线程任务时 python指令在执行时会一直占着GIL导致其他线程一直在等着抢锁 于是多线程就编程了单线程,无论你开多少个线程貌似都只能同时有一个线程在运行- GIL锁问题的解决
在纯Python环境下CPython的GIL貌似无解了,但是GIL真的无解了么?- 大家都知道IO密集型场景利用多线程能显著提高执行效率,也就是说IO任务执行过程中释放了GIL 显然这个释放肯定不是在ticker<0时释放的, IO任务到底是怎么释放GIL的呢
IO任务释放原理如下
/* s.connect((host, port)) method */ static PyObject * sock_connect(PySocketSockObject *s, PyObject *addro) { sock_addr_t addrbuf; int addrlen; int res; /* convert (host, port) tuple to C address */ getsockaddrarg(s, addro, SAS2SA(&addrbuf), &addrlen); Py_BEGIN_ALLOW_THREADS res = connect(s->sock_fd, addr, addrlen); Py_END_ALLOW_THREADS /* error handling and so on .... */ }- 上面是部分socket代码,可以看到在执行 connect之前 调用了一个宏 Py_BEGIN_ALLOW_THREADS 这个宏就是用来释放GIL的 成功connect后又调用 Py_END_ALLOW_THREADS重新申请GIL
GIL问题迎刃而解
- 谁说计算密集型不能用多线程,似乎利用C++写一个模块来处理计算任务多线程照样能达到并行效果
- 下面就开始写代码验证这个问题
在c++模块中写了两个计算密集型函数,函数计算返回之类的算法都没有区别唯一区别就是: 期中一个函数在高密度计算前释放了GIL计算完成后重新申请锁
 static PyObject* Gil_free(GilTest* self,PyObject* args){
    LONGLONG num;
    if (!PyArg_ParseTuple(args, "L", &num))return NULL;

    LONGLONG rst;
    Py_BEGIN_ALLOW_THREADS
        for (LONGLONG i = 1; i <= num * 100; i++)
        {
            for (LONGLONG j = 1; j <= num * 100; j++)
            {
                rst = i*j;
            }
        }
    Py_END_ALLOW_THREADS
        return Py_BuildValue("i", rst);
}
static PyObject* Gil_lock(GilTest* self, PyObject* args){
    LONGLONG num;
    if (!PyArg_ParseTuple(args, "L", &num))return NULL;
    LONGLONG rst;
    for (LONGLONG i = 1; i <= num * 100; i++)
        {
            for (LONGLONG j = 1; j <= num * 100; j++)
            {
                 rst = i*j;
            }
        }
    return Py_BuildValue("i", rst);
}
将函数封装到一个python模块中调用模块 写一个脚本开多线程执行
from GilTest import GilTest
import time
from threading import Thread


def foo(num, i, start):
    obj = GilTest()
    obj.compute_with_gil(num)   # 调用的函数计算时没有释放GIL
    print("foo %s is over" % i, time.time() - start)


def bar(num, i, start):
    obj = GilTest()
    obj.compute_without_gil(num)   # 调用的函数计算时释放GIL
    print("bar %s is over" % i, time.time() - start)


def run():
    print("stat foo")
    start = time.time()  # 开foo线程开始计时
    thread_list1 = []
    for i in range(10):
        thread_list1.append(Thread(target=foo, args=(1000, i, start)))
    for i in thread_list1:
        i.start()
    for i in thread_list1:
        i.join()
    print("stat bar")
    time.sleep(1)
    start = time.time()   # 开bar线程开始计时
    thread_list2 = []
    for i in range(10):
        thread_list2.append(Thread(target=bar, args=(1000, i, start)))
    for i in thread_list2:
        i.start()
    for i in thread_list2:
        i.join()


if __name__ == ‘__main__‘:

    run()
输出执行结果
stat foo foo 0 is over 2.2932560443878174 foo 1 is over 4.577575445175171 foo 2 is over 6.859208583831787 foo 3 is over 9.145148277282715 foo 4 is over 11.43115520477295 foo 5 is over 13.71883225440979 foo 6 is over 15.999829292297363 foo 7 is over 18.281397581100464 foo 8 is over 20.57776975631714 foo 9 is over 22.851707935333252 stat bar bar 3 is over 4.594241380691528 bar 6 is over 4.594241380691528 bar 7 is over 4.609868288040161 bar 2 is over 4.63910174369812 bar 8 is over 5.750362157821655 bar 4 is over 5.765988826751709 bar 5 is over 5.859748840332031 bar 0 is over 5.859748840332031 bar 1 is over 5.859748840332031 bar 9 is over 5.937881946563721 Process finished with exit code 0- 可以发现foo线程完全像是在运行单线程,每个线程执行完成时间比上一个线程大约多2.3秒看;而bar线程是真正的多线程 ,线程完成计算时间差别很小,而且完成先后顺序是乱序的,因为CPU是四核的所以线程之间还是会存在抢cpu情况,每个线程运行时间较foo要长一点(foo每个线程的运算几乎是独占运行)
再来看看CPU占用
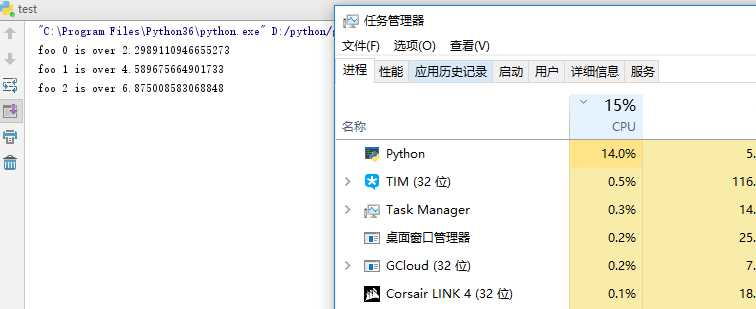
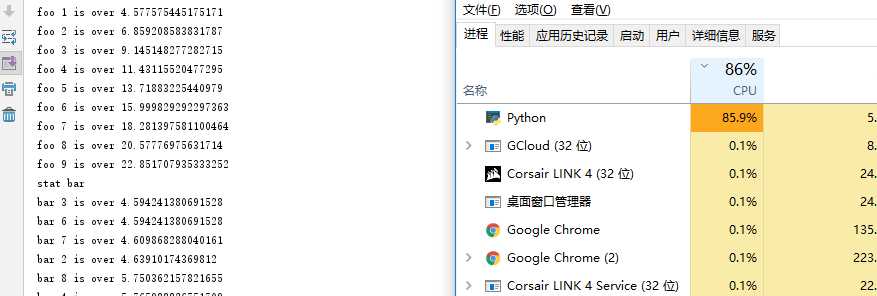
在执行foo时python进程占用CPU约15%作用,当程序执行到bar线程时可以看到python进程cpu占用直线上飙到接近100%的占用,这也说明了此时python的线程是并行的。
- 大家都知道IO密集型场景利用多线程能显著提高执行效率,也就是说IO任务执行过程中释放了GIL 显然这个释放肯定不是在ticker<0时释放的, IO任务到底是怎么释放GIL的呢