0.引言
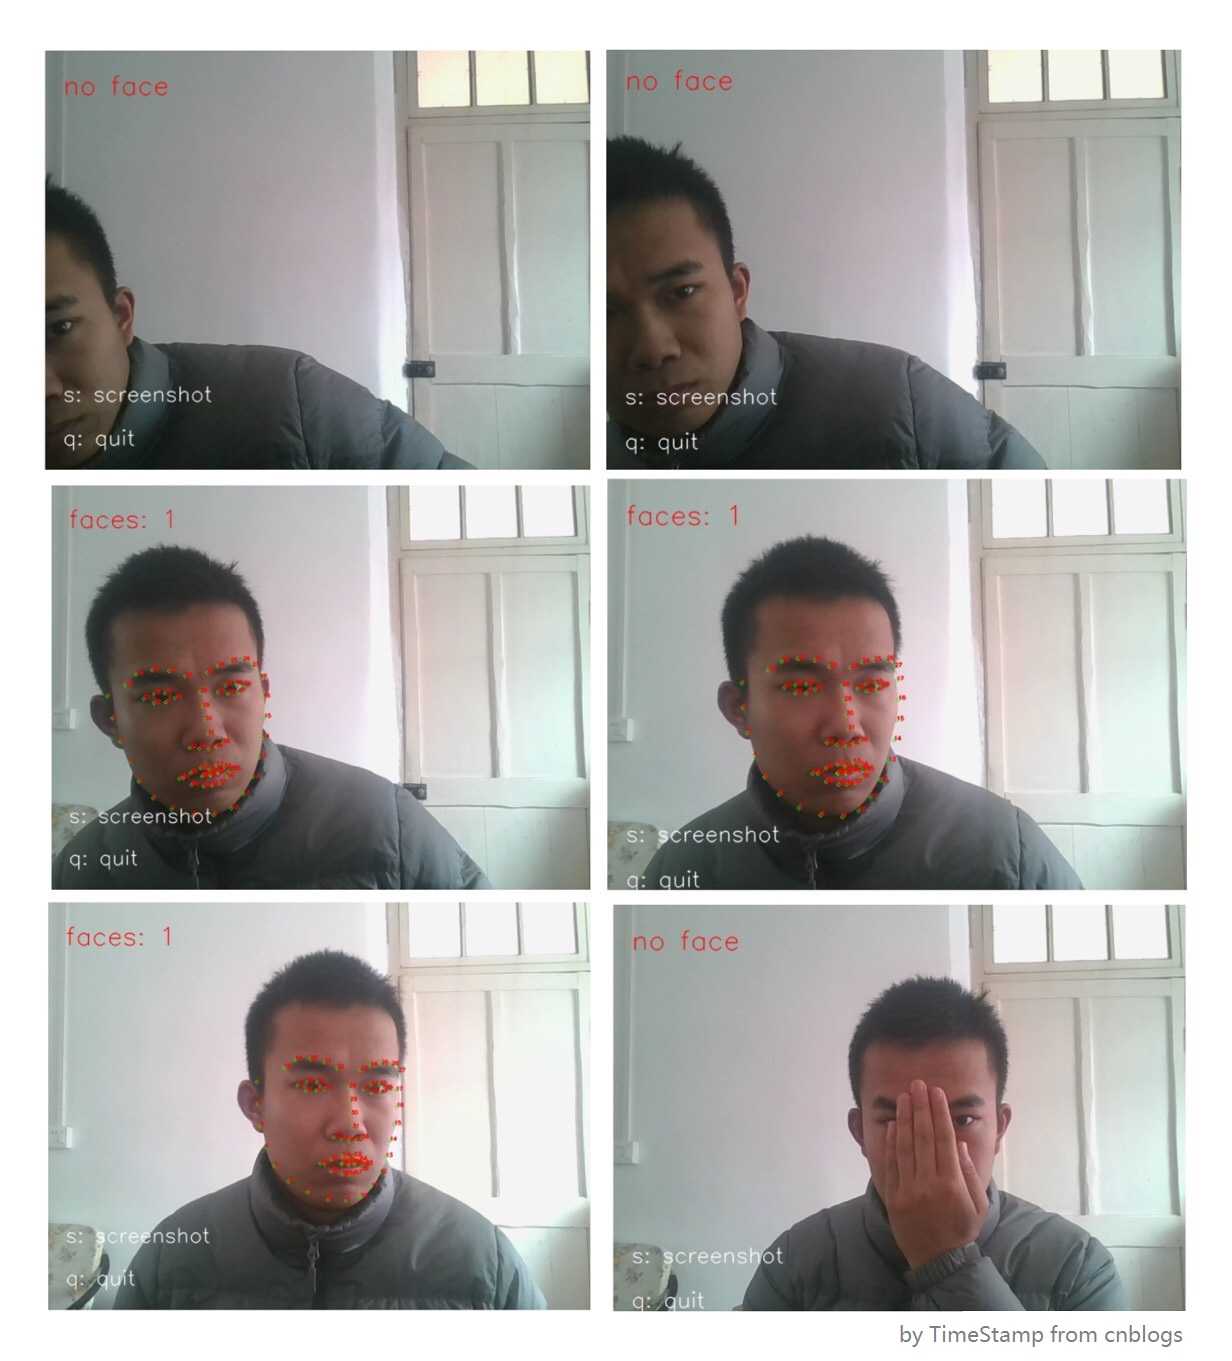
利用python开发,借助Dlib库捕获摄像头中的人脸,进行实时特征点标定;

图1 工程效果示例(gif)

图2 工程效果示例(静态图片)
(实现比较简单,代码量也比较少,适合入门或者兴趣学习。)
1.开发环境
python: 3.6.3
dlib: 19.7
OpenCv, numpy
1 import dlib         # 人脸识别的库dlib
2 import numpy as np  # 数据处理的库numpy
3 import cv2          # 图像处理的库OpenCv
2.源码介绍
其实实现很简单,主要分为两个部分:摄像头调用+人脸特征点标定
2.1 摄像头调用
介绍下opencv中摄像头的调用方法;
利用 cap = cv2.VideoCapture(0) 创建一个对象;
(具体可以参考官方文档:https://docs.opencv.org/2.4/modules/highgui/doc/reading_and_writing_images_and_video.html)
 1 # 2018-2-26
 2 # By TimeStamp
 3 # cnblogs: http://www.cnblogs.com/AdaminXie
 4
 5 """
 6 cv2.VideoCapture(), 创建cv2摄像头对象/ open the default camera
 7
 8     Python: cv2.VideoCapture() → <VideoCapture object>
 9
10     Python: cv2.VideoCapture(filename) → <VideoCapture object>
11     filename – name of the opened video file (eg. video.avi) or image sequence (eg. img_%02d.jpg, which will read samples like img_00.jpg, img_01.jpg, img_02.jpg, ...)
12
13     Python: cv2.VideoCapture(device) → <VideoCapture object>
14     device – id of the opened video capturing device (i.e. a camera index). If there is a single camera connected, just pass 0.
15
16 """
17 cap = cv2.VideoCapture(0)
18
19
20 """
21 cv2.VideoCapture.set(propId, value),设置视频参数;
22
23     propId:
24     CV_CAP_PROP_POS_MSEC Current position of the video file in milliseconds.
25     CV_CAP_PROP_POS_FRAMES 0-based index of the frame to be decoded/captured next.
26     CV_CAP_PROP_POS_AVI_RATIO Relative position of the video file: 0 - start of the film, 1 - end of the film.
27     CV_CAP_PROP_FRAME_WIDTH Width of the frames in the video stream.
28     CV_CAP_PROP_FRAME_HEIGHT Height of the frames in the video stream.
29     CV_CAP_PROP_FPS Frame rate.
30     CV_CAP_PROP_FOURCC 4-character code of codec.
31     CV_CAP_PROP_FRAME_COUNT Number of frames in the video file.
32     CV_CAP_PROP_FORMAT Format of the Mat objects returned by retrieve() .
33     CV_CAP_PROP_MODE Backend-specific value indicating the current capture mode.
34     CV_CAP_PROP_BRIGHTNESS Brightness of the image (only for cameras).
35     CV_CAP_PROP_CONTRAST Contrast of the image (only for cameras).
36     CV_CAP_PROP_SATURATION Saturation of the image (only for cameras).
37     CV_CAP_PROP_HUE Hue of the image (only for cameras).
38     CV_CAP_PROP_GAIN Gain of the image (only for cameras).
39     CV_CAP_PROP_EXPOSURE Exposure (only for cameras).
40     CV_CAP_PROP_CONVERT_RGB Boolean flags indicating whether images should be converted to RGB.
41     CV_CAP_PROP_WHITE_BALANCE_U The U value of the whitebalance setting (note: only supported by DC1394 v 2.x backend currently)
42     CV_CAP_PROP_WHITE_BALANCE_V The V value of the whitebalance setting (note: only supported by DC1394 v 2.x backend currently)
43     CV_CAP_PROP_RECTIFICATION Rectification flag for stereo cameras (note: only supported by DC1394 v 2.x backend currently)
44     CV_CAP_PROP_ISO_SPEED The ISO speed of the camera (note: only supported by DC1394 v 2.x backend currently)
45     CV_CAP_PROP_BUFFERSIZE Amount of frames stored in internal buffer memory (note: only supported by DC1394 v 2.x backend currently)
46
47     value: 设置的参数值/ Value of the property
48 """
49 cap.set(3, 480)
50
51 """
52 cv2.VideoCapture.isOpened(), 检查摄像头初始化是否成功 / check if we succeeded
53 返回true或false
54 """
55 cap.isOpened()
56
57 """
58 cv2.VideoCapture.read([imgage]) -> retval,image, 读取视频 / Grabs, decodes and returns the next video frame
59 返回两个值:
60     一个是布尔值true/false,用来判断读取视频是否成功/是否到视频末尾
61     图像对象,图像的三维矩阵
62 """
63 flag, im_rd = cap.read()
2.2 人脸特征点标定
调用预测器“shape_predictor_68_face_landmarks.dat”进行68点标定,这是dlib训练好的模型,可以直接调用进行人脸68个人脸特征点的标定;
具体可以参考我的另一篇博客(http://www.cnblogs.com/AdaminXie/p/8137580.html);
2.3 源码
实现的方法比较简单:
利用 cv2.VideoCapture() 创建摄像头对象,然后利用 flag, im_rd = cv2.VideoCapture.read() 读取摄像头视频,im_rd就是视频中的一帧帧图像;
然后就类似于单张图像进行人脸检测,对这一帧帧的图像im_rd利用dlib进行特征点标定,然后绘制特征点;
你可以按下s键来获取当前截图,或者按下q键来退出摄像头;
 1 # 2018-2-26
 2 # By TimeStamp
 3 # cnblogs: http://www.cnblogs.com/AdaminXie
 4 # github: https://github.com/coneypo/Dlib_face_detection_from_camera
 5
 6 import dlib                     #人脸识别的库dlib
 7 import numpy as np              #数据处理的库numpy
 8 import cv2                      #图像处理的库OpenCv
 9
10 # dlib预测器
11 detector = dlib.get_frontal_face_detector()
12 predictor = dlib.shape_predictor(‘shape_predictor_68_face_landmarks.dat‘)
13
14 # 创建cv2摄像头对象
15 cap = cv2.VideoCapture(0)
16
17 # cap.set(propId, value)
18 # 设置视频参数,propId设置的视频参数,value设置的参数值
19 cap.set(3, 480)
20
21 # 截图screenshoot的计数器
22 cnt = 0
23
24 # cap.isOpened() 返回true/false 检查初始化是否成功
25 while(cap.isOpened()):
26
27     # cap.read()
28     # 返回两个值:
29     #    一个布尔值true/false,用来判断读取视频是否成功/是否到视频末尾
30     #    图像对象,图像的三维矩阵
31     flag, im_rd = cap.read()
32
33     # 每帧数据延时1ms,延时为0读取的是静态帧
34     k = cv2.waitKey(1)
35
36     # 取灰度
37     img_gray = cv2.cvtColor(im_rd, cv2.COLOR_RGB2GRAY)
38
39     # 人脸数rects
40     rects = detector(img_gray, 0)
41
42     #print(len(rects))
43
44     # 待会要写的字体
45     font = cv2.FONT_HERSHEY_SIMPLEX
46
47     # 标68个点
48     if(len(rects)!=0):
49         # 检测到人脸
50         for i in range(len(rects)):
51             landmarks = np.matrix([[p.x, p.y] for p in predictor(im_rd, rects[i]).parts()])
52
53             for idx, point in enumerate(landmarks):
54                 # 68点的坐标
55                 pos = (point[0, 0], point[0, 1])
56
57                 # 利用cv2.circle给每个特征点画一个圈,共68个
58                 cv2.circle(im_rd, pos, 2, color=(0, 255, 0))
59
60                 # 利用cv2.putText输出1-68
61                 cv2.putText(im_rd, str(idx + 1), pos, font, 0.2, (0, 0, 255), 1, cv2.LINE_AA)
62         cv2.putText(im_rd, "faces: "+str(len(rects)), (20,50), font, 1, (0, 0, 255), 1, cv2.LINE_AA)
63     else:
64         # 没有检测到人脸
65         cv2.putText(im_rd, "no face", (20, 50), font, 1, (0, 0, 255), 1, cv2.LINE_AA)
66
67     # 添加说明
68     im_rd = cv2.putText(im_rd, "s: screenshot", (20, 400), font, 0.8, (255, 255, 255), 1, cv2.LINE_AA)
69     im_rd = cv2.putText(im_rd, "q: quit", (20, 450), font, 0.8, (255, 255, 255), 1, cv2.LINE_AA)
70
71     # 按下s键保存
72     if (k == ord(‘s‘)):
73         cnt+=1
74         cv2.imwrite("screenshoot"+str(cnt)+".jpg", im_rd)
75
76     # 按下q键退出
77     if(k==ord(‘q‘)):
78         break
79
80     # 窗口显示
81     cv2.imshow("camera", im_rd)
82
83 # 释放摄像头
84 cap.release()
85
86 # 删除建立的窗口
87 cv2.destroyAllWindows()
# 请尊重他人劳动成果,转载或者使用源码请注明出处:http://www.cnblogs.com/AdaminXie
# 如果对您有帮助,欢迎在GitHub上star本项目: https://github.com/coneypo/Dlib_face_detection_from_camera
