参照博文Spring入门一,以理解注解的含义。
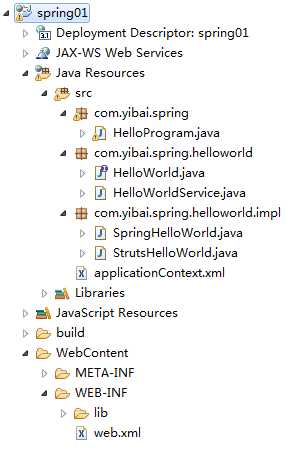
项目结构:
实现类:SpringHelloWorld
package com.yibai.spring.helloworld.impl;

import org.springframework.stereotype.Component;

import com.yibai.spring.helloworld.HelloWorld;

@Component
public class SpringHelloWorld implements HelloWorld{

    @Override
    public void sayHello() {
        System.out.println("spring hello world");

    }

}
实现类:strutsHelloWorld
package com.yibai.spring.helloworld.impl;

import org.springframework.stereotype.Component;

import com.yibai.spring.helloworld.HelloWorld;

@Component
public class StrutsHelloWorld implements HelloWorld{

    @Override
    public void sayHello() {
        System.out.println("struts hello world");
    }

}
service类:
package com.yibai.spring.helloworld;

import javax.annotation.Resource;
import org.springframework.stereotype.Service;
import com.yibai.spring.helloworld.impl.SpringHelloWorld;
import com.yibai.spring.helloworld.impl.StrutsHelloWorld;

@Service
public class HelloWorldService {

    @Resource
    private SpringHelloWorld helloWorld;

    @Resource
    private StrutsHelloWorld helloWorld2;

    public HelloWorldService(){

    }

    public void show(){
        helloWorld.sayHello();
        helloWorld2.sayHello();
    }


}
主方法类:
package com.yibai.spring;

import org.springframework.context.ApplicationContext;
import org.springframework.context.support.ClassPathXmlApplicationContext;
import com.yibai.spring.helloworld.HelloWorldService;

public class HelloProgram {

    public static void main(String[] args) {

        // 创建上下文对象
        ApplicationContext context = new ClassPathXmlApplicationContext("applicationContext.xml");

        HelloWorldService service = (HelloWorldService) context.getBean("helloWorldService");

        service.show();

    }
}
配置类:web.xml不变,spring配置applocationContext.xml改为支持注解
<?xml version="1.0" encoding="UTF-8"?>
<!-- <beans xmlns="http://www.springframework.org/schema/beans"
    xmlns:xsi="http://www.w3.org/2001/XMLSchema-instance" xmlns:p="http://www.springframework.org/schema/p"
    xsi:schemaLocation="http://www.springframework.org/schema/beans http://www.springframework.org/schema/beans/spring-beans-3.1.xsd">
 -->
<beans xmlns="http://www.springframework.org/schema/beans"
    xmlns:xsi="http://www.w3.org/2001/XMLSchema-instance"
    xmlns:context="http://www.springframework.org/schema/context"
    xsi:schemaLocation="http://www.springframework.org/schema/beans
    http://www.springframework.org/schema/beans/spring-beans-2.5.xsd
    http://www.springframework.org/schema/context
    http://www.springframework.org/schema/context/spring-context-2.5.xsd">

    <context:component-scan base-package="com.yibai.spring"/>


</beans>
service中,通过@resource注解需要注入的bean,实现类通过@Component完成spring配置,service类通过@Service完成spring配置。
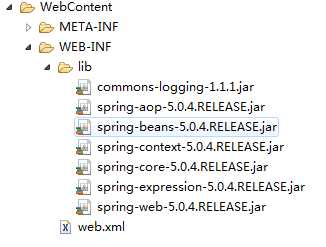
附包名:多了一个aop包
补充:
有四种类型的组件自动扫描注释类型
@Component 指示自动扫描组件,这四种注解最终都被注解为Component,故可以用这个注解代替所有的组件扫描注解
@Repository 表示在持久层DAO组件
@Service 表示在业务层服务组件
@Controller 表示在表示层控制器组件