对于 32 位 Python 的 C 扩展,以前用过 mingW32 编译,
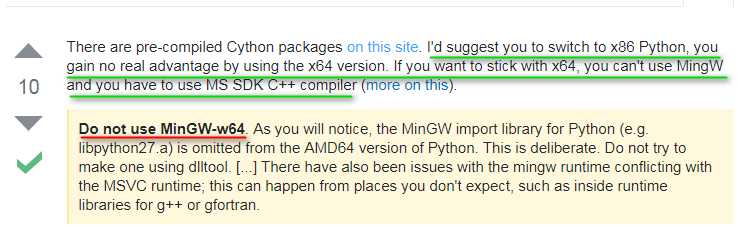
但是 mingW32 不支持 64 位 Python 的 C 扩展编译,详情可见 stackoverflow,这位前辈的大意如下,
以下介绍 Visual Studio 2013 编译 64 位 Python 的 C 扩展步骤:
1)准备 C 文件和包装文件,
ExtDemo.c
// Purpose: C code, for wrappered.

#include <stdio.h>
#include <stdlib.h>
#include <string.h>

int fact(int n)
{
    if(n < 2)
        return 1;
    return n * fact(n - 1);
}

char * reverse(char * s)
{
    char t;
    char *p = s;
    char *q = (s + (strlen(s) - 1));

    while(p < q)
    {
        t = *p;
        *p++ = *q;
        *q-- = t;
    }

    return s;
}

// just for unit test, for the two function above
int unit_test(void)
{
    // test fact()
    printf("4! = %d\n", fact(4));
    printf("8! = %d\n", fact(8));
    printf("12! = %d\n", fact(12));

    // test reverse
    char s[10] = "abcdef";
    printf("reversing ‘abcdef‘, we get ‘%s‘\n", reverse(s));
    char s2[10] = "madam";
    printf("reversing ‘madam‘, we get ‘%s‘\n", reverse(s2));

    return 0;
}
包装代码 ExtDemo_Wrapper.c
// Purpose: According to the C code, write the Wrapper.

#include "Python.h"

// function declaration

int fact(int n);
char * reverse(char * s);
int unit_test(void);


static PyObject * ED_fact(PyObject * self, PyObject * args)
{
    int num;
    if(!PyArg_ParseTuple(args, "i", &num))
        return NULL;
    return (PyObject *)Py_BuildValue("i", fact(num));
}


static PyObject * ED_reverse(PyObject * self, PyObject * args)
{
    char * orig_str;
    if (!PyArg_ParseTuple(args, "s", &orig_str))
        return NULL;
    return (PyObject *)Py_BuildValue("s", reverse(orig_str));
}

static PyObject * ED_unit_test(PyObject * self, PyObject * args)
{
    unit_test();
    return (PyObject *)Py_BuildValue("");
}

//////////////////////////////////////////////////////////////////////////////

static PyMethodDef EDMethods[] = {
    {"fact", ED_fact, METH_VARARGS},
    {"reverse", ED_reverse, METH_VARARGS},
    {"unit_test", ED_unit_test, METH_VARARGS},
    {NULL, NULL},
};

//////////////////////////////////////////////////////////////////////////////

void initED()
{
    Py_InitModule("ED", EDMethods);
}
setup.py
#!/usr/bin/env python

from distutils.core import setup, Extension

MOD = ‘ED‘
setup(name=MOD, ext_modules=[
    Extension(MOD, sources=[‘ExtDemo.c‘, "ExtDemo_Wrapper.c"])])
2) Visual Studio 2013 工具准备及编译
开始菜单打开 Visual Studio Tools 文件夹,
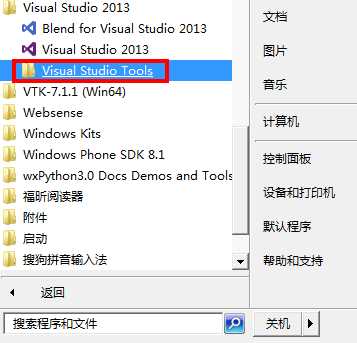
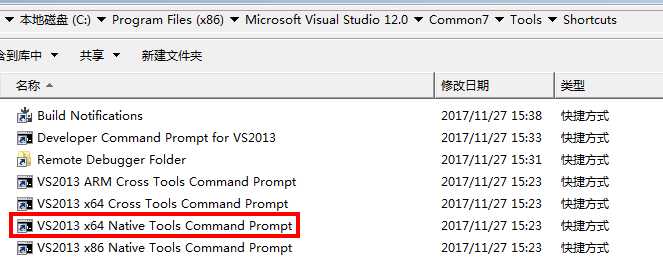
选择 64bit Native Tools,双击打开,
设置编译环境,如下, 关于这两个参数的含义请参考 distutils.core 官方 help 文档,
set DISTUTILS_USE_SDK=1
set MSSdk=1

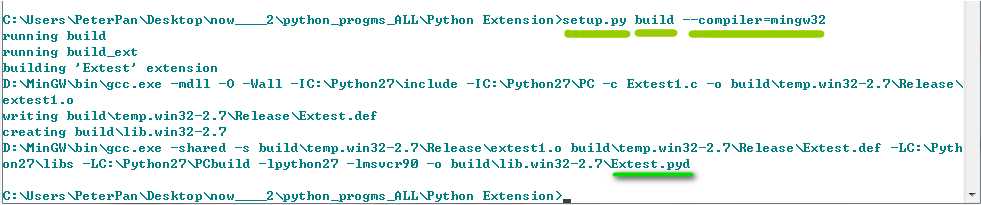
切换到工程目录,编译,
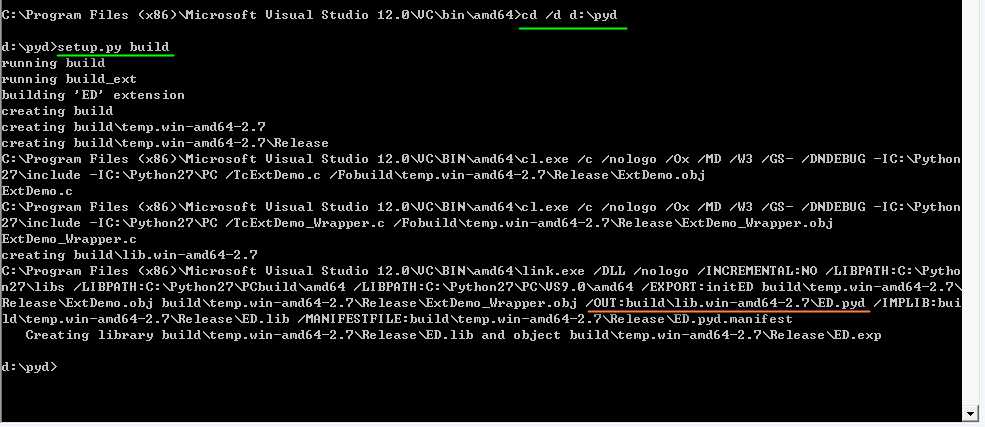
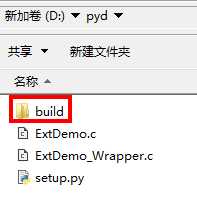
编译完成后,在工程目录下生成 build 文件夹,
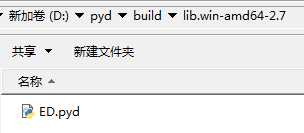
在其中 \build\lib.win-amd64-2.7 下得到编译生成的 pyd 文件,本例为 ED.pyd
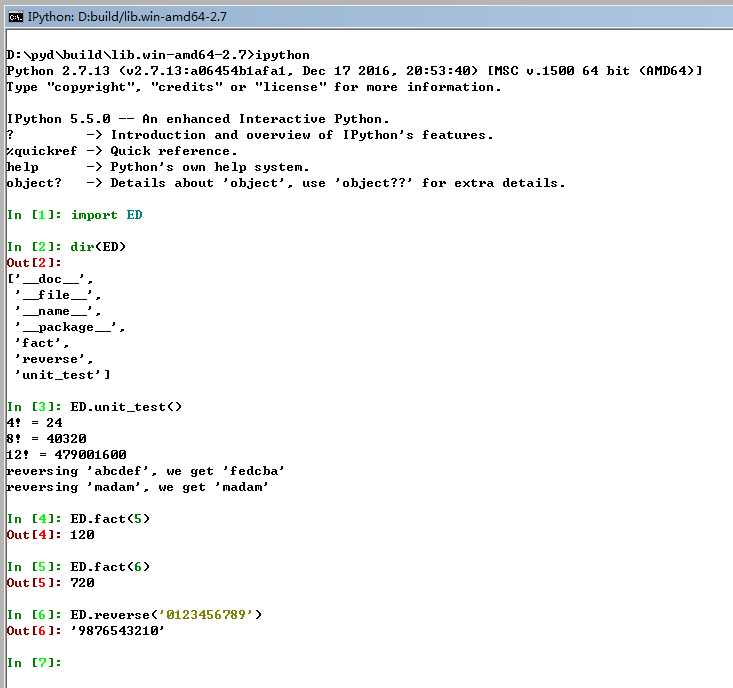
3) 验证
完。