此文学习来源为:http://study.163.com/course/introduction/1002858003.htm
此工程文件实现功能:
1、UIButton的控件基本概念
2、UIButton的创建方法
3、UIButton的类型
4、可显示图片的UIButton
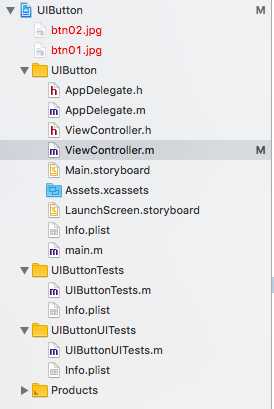
可将准备好的图片直接拖到工程名字UIButton下

===========================ViewController.m脚本==============================
//创建普通按钮函数
-(void)CreateUIRectButton
{
//创建一个btn对象,根据类型来创建btn
//圆角类型
//通过类方法来创建buttonWithType:类名 + 方法名
UIButton* btn = [UIButton buttonWithType:UIButtonTypeRoundedRect];//自己管理内存
//设置button按钮的位置
btn.frame = CGRectMake(100, 100, 100, 40);
//设置按钮的文字内容
//@parameter
//P1:字符串类型,显示到按钮上的文字
//P2:设置文字显示的状态类型:UIControlStateNormal,正常状态
[btn setTitle:@"按钮01" forState:UIControlStateNormal];
//P1:显示的文字
//P2:显示文字的状态:UIControlStateHighlighted,按下状态
[btn setTitle:@"按钮按下" forState:UIControlStateHighlighted];
//灰色背景颜色
btn.backgroundColor = [UIColor grayColor];
//设置文字显示的颜色
//P1:颜色
//P2:状态
//[btn setTitleColor:[UIColor redColor] forState:UIControlStateNormal];
[btn setTitleColor:[UIColor orangeColor] forState:UIControlStateHighlighted];
//设置按钮的风格颜色
[btn setTintColor:[UIColor whiteColor]];
//titleLabel:UILabel控件
btn.titleLabel.font = [UIFont systemFontOfSize:24];
//添加到视图中并显示
[self.view addSubview:btn];
}
-(void)createImageBtn
{
//创建一个自定义类型的btn
UIButton* btnImage = [UIButton buttonWithType:UIButtonTypeCustom];
btnImage.frame = CGRectMake(100, 200, 100, 100);
UIImage* icon01 = [UIImage imageNamed:@"btn01.jpg"];
UIImage* icon02 = [UIImage imageNamed:@"btn02.jpg"];
//设置按钮图片
//P1:显示的图片对象
//P2:控件的状态
[btnImage setImage:icon01 forState:UIControlStateNormal];
[btnImage setImage:icon02 forState:UIControlStateHighlighted];
[self.view addSubview:btnImage];
}
- (void)viewDidLoad {
[super viewDidLoad];
// Do any additional setup after loading the view, typically from a nib.
[self CreateUIRectButton];
[self createImageBtn];
}
学习总结:
- 重点:UIButton的属性用法
- 难点:UIButton显示图片
源码链接地址:https://pan.baidu.com/s/1yrOLXZZeu9MiOWtMq5-EGA 密码:7t1l
