本次 Windows Developer Day,最值得期待的莫过于 Windows AI Platform 了,可以说是千呼万唤始出来。观看直播的开发者们,留言最多的也是 Windows AI Platform。
下面结合微软提供的展示过程,文档和 Git Sample 来详细分析一下。
基础概念
基础认知
众所周知,目前 AI(Artificial Intelligence)的主要实现方式就是机器学习(Machine Learning),而 Windows AI Platform 对应的就是 Windows Machine Learning。
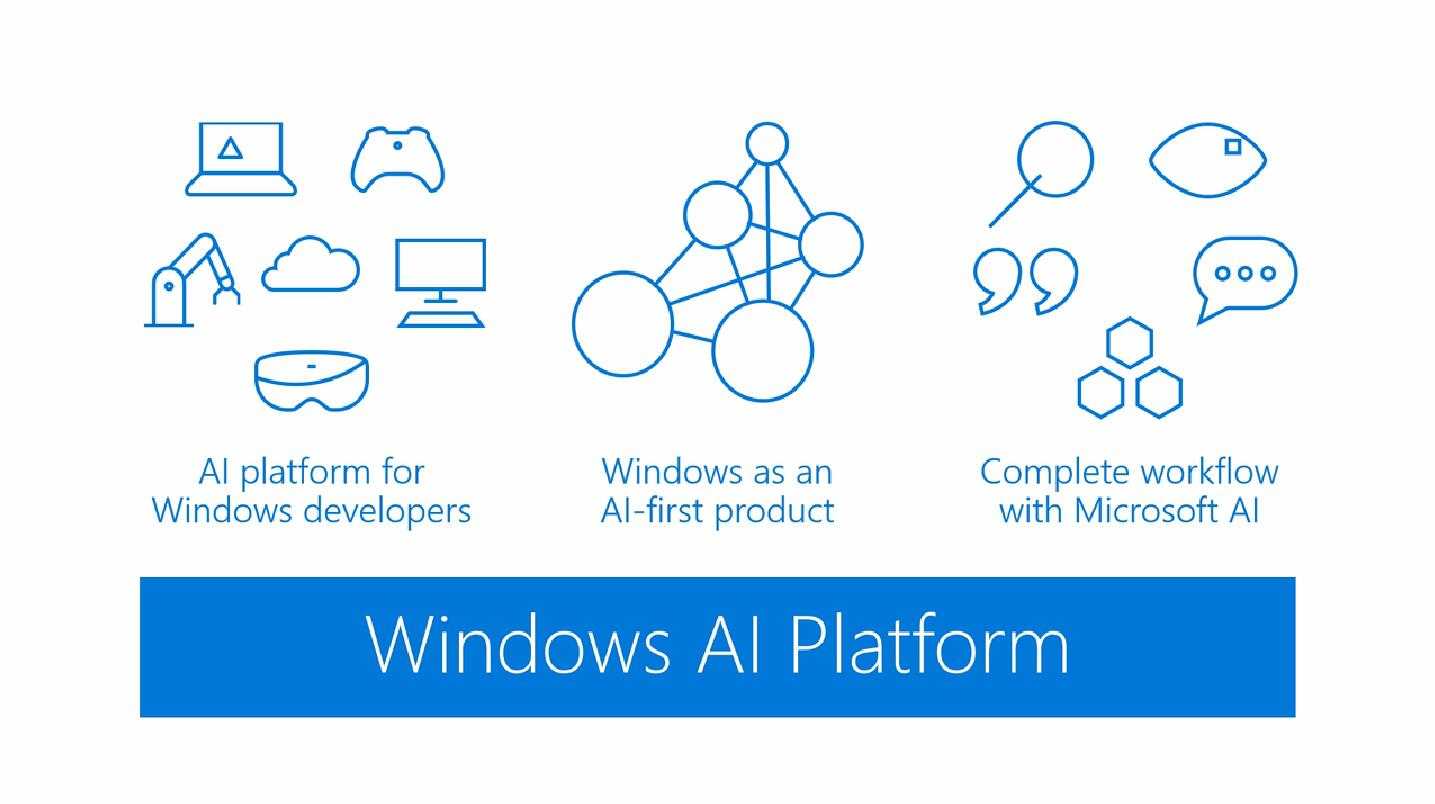
微软官方对于它的描述如下:
Windows Machine Learning (ML) evaluates trained machine learning models locally on Windows 10 devices, allowing developers to use pre-trained models within their applications. The platform provides hardware-accelerated performance by leveraging the device‘s CPU or GPU to compute evaluations for both classical Machine Learning algorithms and Deep Learning.
结合这一描述,我们可以简单总结出 Windows ML 的几个特点:
- 硬件加速 在支持 DirectX12 的硬件设备上,Windows ML 可以利用 GPU 对模型的评估实现加速。
- 本地评估 Windows ML 可以利用本地硬件进行模型评估,减少了模型上传到云端造成的服务端流量成本和服务端压力。可以更快速便捷的得到结果。
- 图像处理 在机器视觉场景,Windows ML 简化并优化了图像、视频文件和视频流的处理,对输入源做预处理和摄像头管道处理。
模型格式
Windows ML 的模型格式是 ONNX,Open Neural Network Exchange,是 Microsoft 和 Facebook、Amazon 等公司制定的机器学习模型文件格式标准。在目前很多主流模型训练框架中,都有 ONNX 的原生支持,或者可以支持其他格式转换为 ONNX 格式。 这里是 ONNX 的 Git 主页,大家可以详细了解:GitHub Open Neural Network Exchange
另外大家可以通过 WinMLTools 来把其他格式的模型文件转换为 ONNX 格式,这里是 WinMLTools 地址:Python WinMLTools 0.1.0.5072. 可以转换的格式有 Core ML/Scikit-Learn/XGBoost/LibSVM。
另外 ONNX 支持超过 100 种运算符,针对 CPU 或 GPU 有不同的运算符支持,这里是运算符列表:https://github.com/onnx/onnx/blob/rel-1.0/docs/Operators.md
技术架构
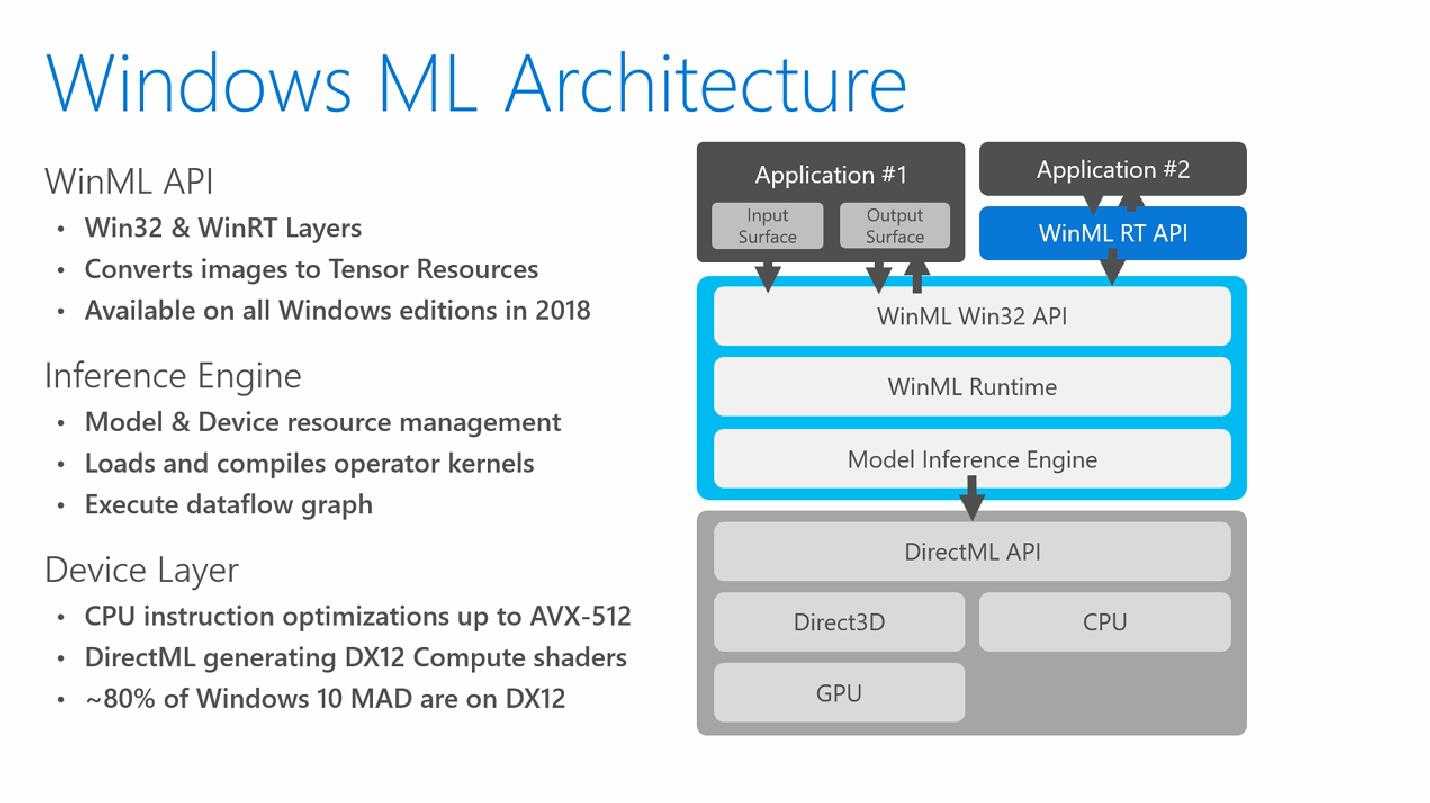
从这张架构图来看:
- 底层是 Direct 层的 DirectML API/Direct3D/CPU/GPU,DirectX 的版本支持是 DX12
- 上面一层是推断引擎,包括了 Win32 和 WinRT 部分,主要负责模型和设备资源管理,负责加载和编辑核心操作符,执行数据流图
- 最上层是应用程序层,同样包括了 Win32 和 WinRT 部分;令人欣喜的是,它在所有 2018 年的 Windows 版本上都可用
开发过程
概述
目前 Windows AI Platform 还是预览版内容,所以需要预览版的 Windows OS 和 WIndows 10 SDK,下面是下载地址:
Windows Insider Preview Downloads
其中 Visual Studio 的版本要求是 Community、Professional 或 Enterprise,Community 版本的获取最为简单,建议实验性需求时使用这个版本。
先来看一张发布会的展示图:
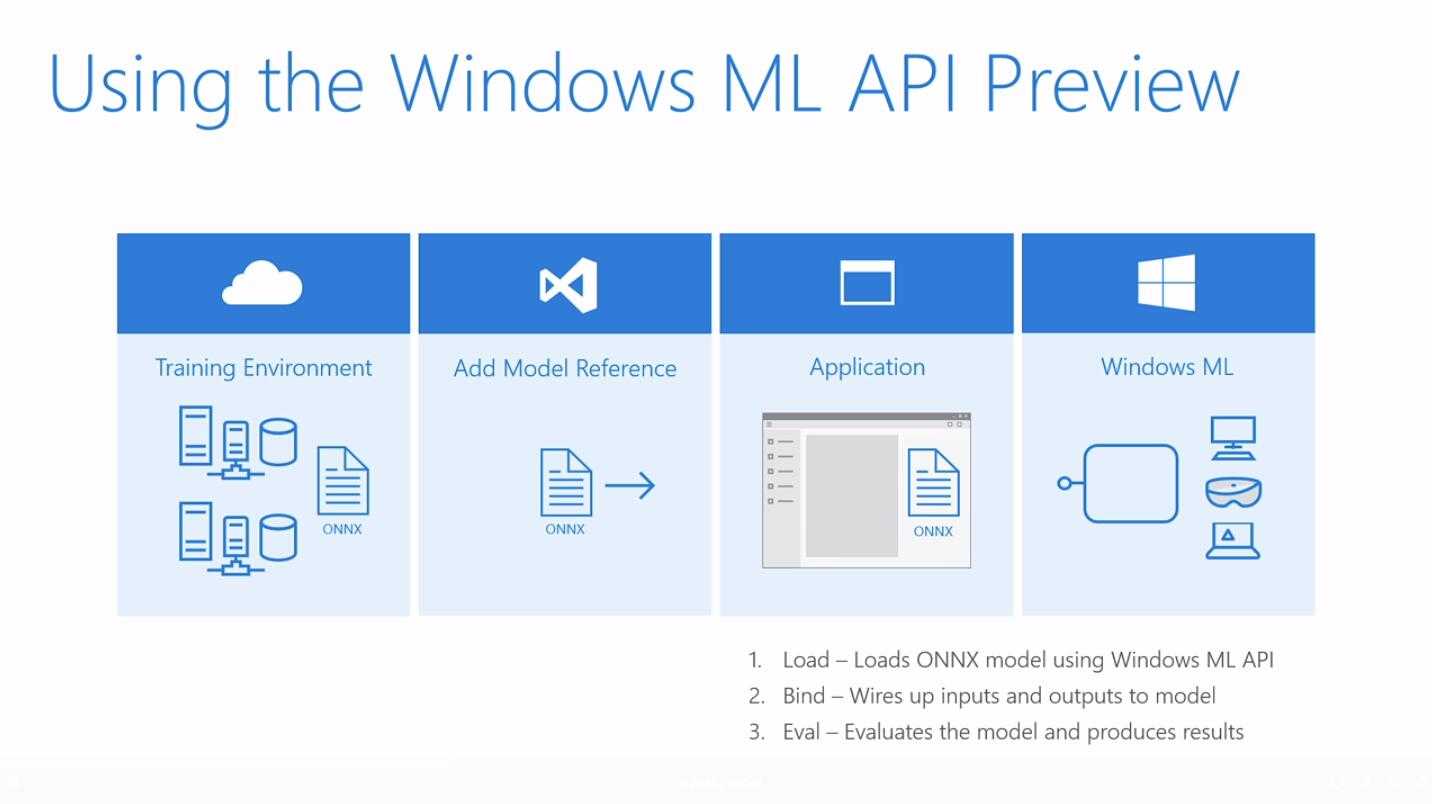
从上图中可以看出整个 Windows ML 的使用过程:
- 首先在云端或者本地服务器上训练模型,生成 ONNX 模型文件
- 把 ONNX 添加到本地开发环境,如 Visual Studio 中
- 在本地程序中通过 Windows 10 SDK 使用和评估 ONNX 模型的性能和学习结果
- 把集成了 ONNX 的本地程序发布到 Windows 序列的全平台各种设备中
示例分析
Windows ML 的示例 Git 地址:GitHub Windows-Machine-Learning
上面的链接中也提供了 Windows Insider Preview 17110 OS、Windows 10 SDK 17110 和 Visual Studio 2017 的下载地址,按照指示我下载安装好了开发环境。
来看第一个示例:MNIST_Demo,是一个手写数字识别的 UWP 程序,大家都知道,手写数字识别是 Machine Learning 的基础和入门课题,就像每种编程语言的 Hello World 一样,我们借这个示例来看一下 Windows ML 对于 ONNX 模型和 Windows 10 SDK 的使用过程。
首先来看一下示例在 Visual Studio 中的工程结构:
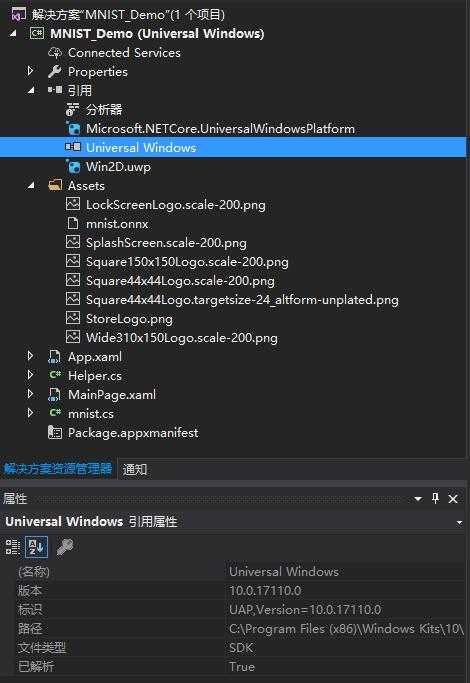
这里我们可以看到:
- Universal Windows,也就是 Windows 10 SDK 的引用版本是:10.0.17110.0,也就是 Windows ML 支持的最低版本预览版 SDK
- mnist.onnx,也就是前面说明的 Windows ML 模型支持格式,被直接添加到了解决方案中的 Assets 文件夹中,Build Action 为 “Content”
而在 mnist.cs 文件中
using System;
using System.Collections.Generic;
using System.Threading.Tasks;
using Windows.Media;
using Windows.Storage;
using Windows.AI.MachineLearning.Preview;
...
...
public sealed class MNISTModel
{
private LearningModelPreview learningModel;
...
我们可以看到,Windows ML 的命名空间是:Windows.AI.MachineLearning.Preview
可以看得出,目前因为还是预览版本,所有命名空间包含了 Preview 的字样,但 Windows.AI.MachineLearning 这个命名空间应该可以确定。
来看看 Windows ML winmd 的结构:
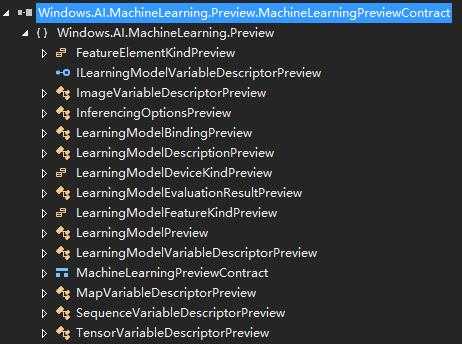
而模型的名称是 LearningModelPreview,来看一下类的定义:
#region 程序集 Windows.AI.MachineLearning.Preview.MachineLearningPreviewContract, Version=1.0.0.0, Culture=neutral, PublicKeyToken=null, ContentType=WindowsRuntime
// C:\Program Files (x86)\Windows Kits\10\References\10.0.17110.0\Windows.AI.MachineLearning.Preview.MachineLearningPreviewContract\1.0.0.0\Windows.AI.MachineLearning.Preview.MachineLearningPreviewContract.winmd
#endregion

using System.Collections.Generic;
using Windows.Foundation;
using Windows.Foundation.Metadata;
using Windows.Storage;
using Windows.Storage.Streams;

namespace Windows.AI.MachineLearning.Preview
{
    [ContractVersion(typeof(MachineLearningPreviewContract), 65536)]
    [Static(typeof(ILearningModelPreviewStatics), 65536, "Windows.AI.MachineLearning.Preview.MachineLearningPreviewContract")]
    public sealed class LearningModelPreview : ILearningModelPreview
    {
        [RemoteAsync]
        public IAsyncOperation<LearningModelEvaluationResultPreview> EvaluateAsync(LearningModelBindingPreview binding, string correlationId);
        [RemoteAsync]
        public IAsyncOperation<LearningModelEvaluationResultPreview> EvaluateFeaturesAsync(IDictionary<string, object> features, string correlationId);
        [RemoteAsync]
        public static IAsyncOperation<LearningModelPreview> LoadModelFromStorageFileAsync(IStorageFile modelFile);
        [RemoteAsync]
        public static IAsyncOperation<LearningModelPreview> LoadModelFromStreamAsync(IRandomAccessStreamReference modelStream);

        public InferencingOptionsPreview InferencingOptions { get; set; }
        public LearningModelDescriptionPreview Description { get; }
    }
}
这个类包含了推断选项、模型的两种加载方式和模型评估方法。
接下来看看界面代码中模型实际的加载方式:
private async void LoadModel()
{
    //Load a machine learning model
    StorageFile modelFile = await StorageFile.GetFileFromApplicationUriAsync(new Uri($"ms-appx:///Assets/MNIST.onnx"));
    ModelGen = await MNISTModel.CreateMNISTModel(modelFile);
}
public static async Task<MNISTModel> CreateMNISTModel(StorageFile file)
{
    LearningModelPreview learningModel = await LearningModelPreview.LoadModelFromStorageFileAsync(file);
    MNISTModel model = new MNISTModel();
    model.learningModel = learningModel;
    return model;
}
mnist.onnx 模型文件被作为一个项目文件被加载到 StorageFile 中,使用 mnist 类的 CreateMNISTModel 方法,具体说是 LearningModelPreview 类的 LoadModelFromStorageFileAsync 方法完成模型加载。
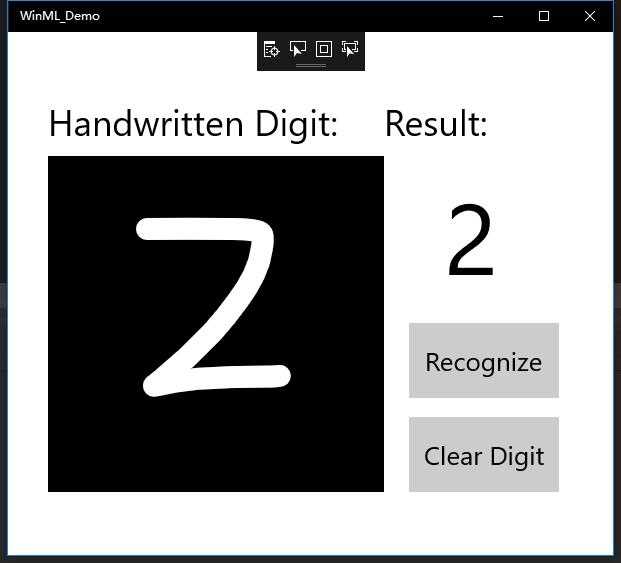
整个 Sample 完成的事情就是使用 InkCanvas 获取用户的手写输入,输入给 Windows ML 进行检测,输出检测结果。来看看运行结果:
另外发布会的展示过程中还展示了其他的 Sample,这里暂不详细介绍,大家可以看看它完成的效果:
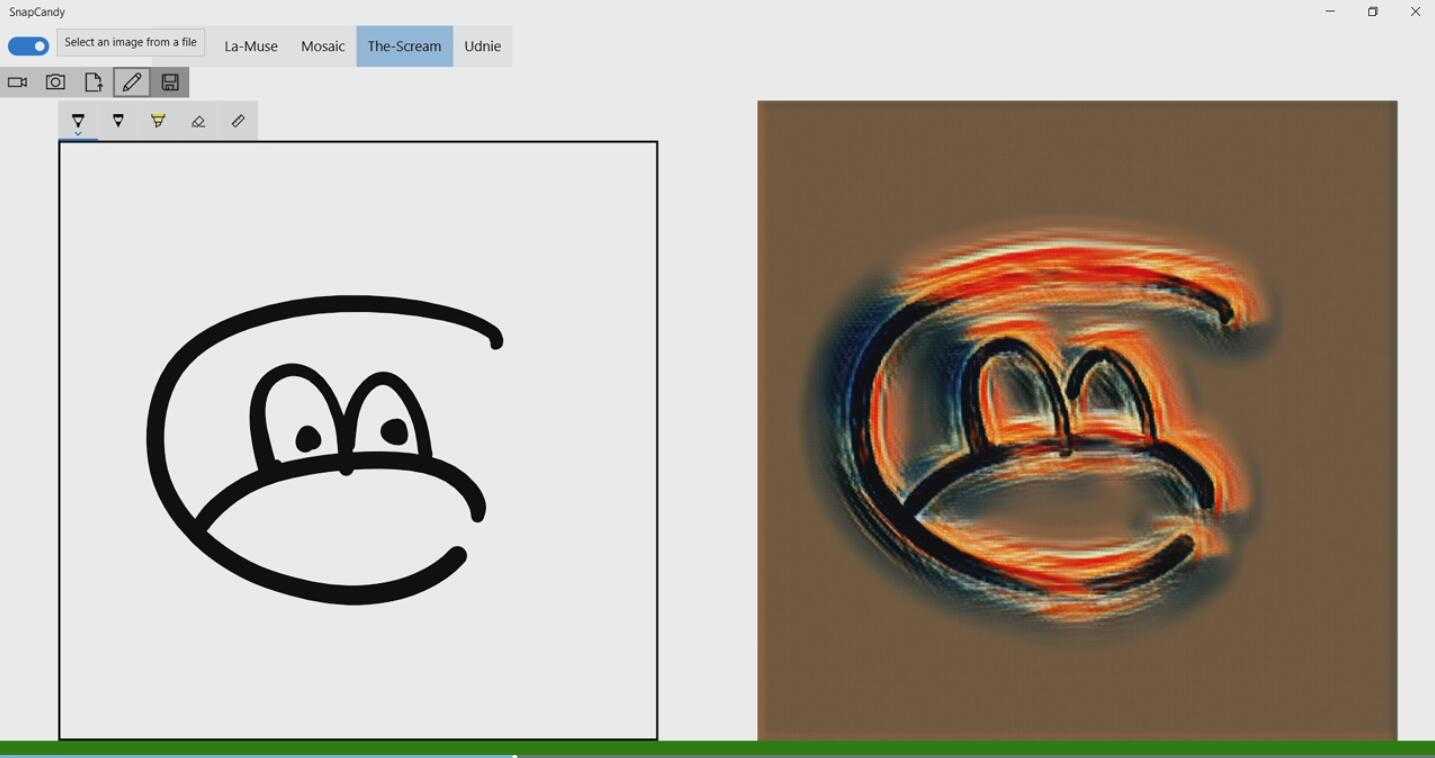

这是一个图片艺术化风格转换的 Sample,类似 Prisma 的实现方式。尤其是第二张,是从摄像头采集图像的实时转换,摄像头图像流的帧率应该在 30 帧以上,依然能在本地运行模型的情况下,完成实时转换。这也让我们对本地程序完成视频风格转换很有信心。
到这里,对于 Windows AI Platform 和 Windows ML 的介绍就完成了,因为目前官方提供的还是预览版,而且公开的内容还不够多,后续我们会继续跟进研究,欢迎大家一起讨论,谢谢!
