来源:http://www.cnblogs.com/lxblog/
最近项目中应用多次应用了图片合成,为了今后方便特此记下。
在WPF下有两种图片合成的方式,一种还是用原来C#提供的GDI+方式,命名空间是System.Drawing 和 System.Drawing.Imaging,另一种是WPF中新添加的API,命名空间是 System.Windows.Media 和 System.Windows.Media.Imaging 。
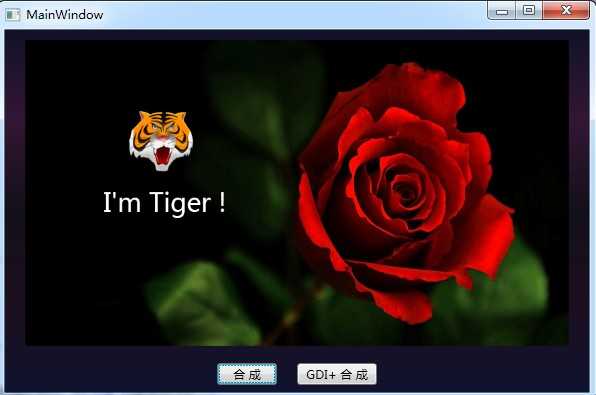
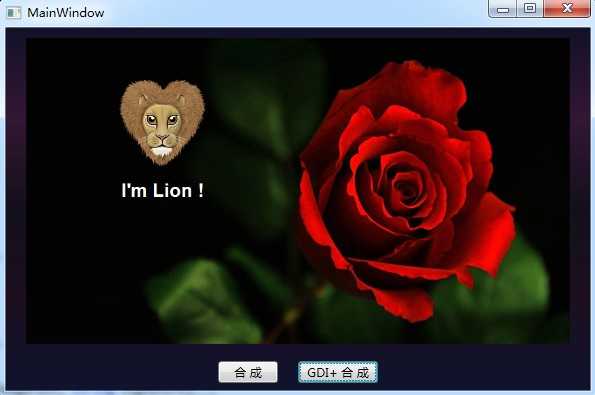
我们来做一个简单的例子,分别用上面的两种方式实现,功能是在一个背景图上面,画一个头像,然后在写一个签名。
首先准备一张背景图(bg.jpg)和两个头像图片(tiger.png 和 lion.png)最后的生成的图片效果如下图:


把准备的素材拷贝到项目中,其文件属性【复制到输出目录】选择【始终复制】,【生成操作】选择【内容】。
这里贴一下两种方式的主要代码,具体代码可以在文章最后点击下载。
方法一
private BitmapSource MakePicture(string bgImagePath, string headerImagePath, string signature)
        {

            //获取背景图
            BitmapSource bgImage = new BitmapImage(new Uri(bgImagePath, UriKind.Relative));
            //获取头像
            BitmapSource headerImage = new BitmapImage(new Uri(headerImagePath, UriKind.Relative));

            //创建一个RenderTargetBitmap 对象,将WPF中的Visual对象输出
            RenderTargetBitmap composeImage = new RenderTargetBitmap(bgImage.PixelWidth, bgImage.PixelHeight, bgImage.DpiX, bgImage.DpiY, PixelFormats.Default);

            FormattedText signatureTxt = new FormattedText(signature,
                                                   System.Globalization.CultureInfo.CurrentCulture,
                                                   System.Windows.FlowDirection.LeftToRight,
                                                   new Typeface(System.Windows.SystemFonts.MessageFontFamily, FontStyles.Normal, FontWeights.Normal, FontStretches.Normal),
                                                   50,
                                                   System.Windows.Media.Brushes.White);


            DrawingVisual drawingVisual = new DrawingVisual();
            DrawingContext drawingContext = drawingVisual.RenderOpen();
            drawingContext.DrawImage(bgImage, new Rect(0, 0, bgImage.Width, bgImage.Height));

            //计算头像的位置
            double x = (bgImage.Width / 2 - headerImage.Width) / 2;
            double y = (bgImage.Height - headerImage.Height) / 2 - 100;
            drawingContext.DrawImage(headerImage, new Rect(x, y, headerImage.Width, headerImage.Height));

            //计算签名的位置
            double x2 = (bgImage.Width/2 - signatureTxt.Width) / 2;
            double y2 = y + headerImage.Height + 20;
            drawingContext.DrawText(signatureTxt, new System.Windows.Point(x2, y2));
            drawingContext.Close();
            composeImage.Render(drawingVisual);

            //定义一个JPG编码器
            JpegBitmapEncoder bitmapEncoder = new JpegBitmapEncoder();
            //加入第一帧
            bitmapEncoder.Frames.Add(BitmapFrame.Create(composeImage));

            //保存至文件(不会修改源文件,将修改后的图片保存至程序目录下)
            string savePath = System.AppDomain.CurrentDomain.SetupInformation.ApplicationBase + @"\合成.jpg";
            bitmapEncoder.Save(File.OpenWrite(Path.GetFileName(savePath)));
            return composeImage;
        }
方法二
private BitmapSource MakePictureGDI(string bgImagePath, string headerImagePath, string signature)
        {
            GDI.Image bgImage = GDI.Bitmap.FromFile(bgImagePath);
            GDI.Image headerImage = GDI.Bitmap.FromFile(headerImagePath);

            //新建一个画板,画板的大小和底图一致
            System.Drawing.Bitmap bitmap = new System.Drawing.Bitmap(bgImage.Width, bgImage.Height);
            System.Drawing.Graphics g = System.Drawing.Graphics.FromImage(bitmap);
            //设置高质量插值法
            g.InterpolationMode = System.Drawing.Drawing2D.InterpolationMode.High;
            //设置高质量,低速度呈现平滑程度
            g.SmoothingMode = System.Drawing.Drawing2D.SmoothingMode.HighQuality;
            //清空画布并以透明背景色填充
            g.Clear(System.Drawing.Color.Transparent);

            //先在画板上面画底图
            g.DrawImage(bgImage, new GDI.Rectangle(0, 0, bitmap.Width, bitmap.Height));

            //再在画板上画头像
            int x = (bgImage.Width / 2 - headerImage.Width) / 2;
            int y = (bgImage.Height - headerImage.Height) / 2 - 100;
            g.DrawImage(headerImage, new GDI.Rectangle(x, y, headerImage.Width, headerImage.Height),
                                     new GDI.Rectangle(0, 0, headerImage.Width, headerImage.Height),
                                     GDI.GraphicsUnit.Pixel);


            //在画板上写文字
            using (GDI.Font f = new GDI.Font("Arial", 20, GDI.FontStyle.Bold))
            {
                using (GDI.Brush b = new GDI.SolidBrush(GDI.Color.White))
                {
                    float fontWidth = g.MeasureString(signature, f).Width;
                    float x2 = (bgImage.Width / 2 - fontWidth) / 2;
                    float y2 = y + headerImage.Height + 20;
                    g.DrawString(signature, f, b, x2, y2);
                }
            }

            try
            {
                string savePath = System.AppDomain.CurrentDomain.SetupInformation.ApplicationBase + @"\GDI+合成.jpg";
                bitmap.Save(savePath, System.Drawing.Imaging.ImageFormat.Jpeg);
                return ToBitmapSource(bitmap);
            }
            catch (System.Exception e)
            {
                throw e;
            }
            finally
            {
                bgImage.Dispose();
                headerImage.Dispose();
                g.Dispose();
            }
        }

        #region GDI+ Image 转化成 BitmapSource
        [System.Runtime.InteropServices.DllImport("gdi32")]
        static extern int DeleteObject(IntPtr o);
        public BitmapSource ToBitmapSource(GDI.Bitmap bitmap)
        {
            IntPtr ip = bitmap.GetHbitmap();

            BitmapSource bitmapSource = System.Windows.Interop.Imaging.CreateBitmapSourceFromHBitmap(
                ip, IntPtr.Zero, System.Windows.Int32Rect.Empty,
                System.Windows.Media.Imaging.BitmapSizeOptions.FromEmptyOptions());
            DeleteObject(ip);//释放对象
            return bitmapSource;
        }
        #endregion
