一,服务端时序图分析

实例代码:
 1 package bhz.netty.start;
 2
 3
 4 import io.netty.bootstrap.ServerBootstrap;
 5 import io.netty.channel.ChannelFuture;
 6 import io.netty.channel.ChannelInitializer;
 7 import io.netty.channel.ChannelOption;
 8 import io.netty.channel.EventLoopGroup;
 9 import io.netty.channel.nio.NioEventLoopGroup;
10 import io.netty.channel.socket.SocketChannel;
11 import io.netty.channel.socket.nio.NioServerSocketChannel;
12 import io.netty.handler.timeout.ReadTimeoutHandler;
13
14 public class Server {
15
16
17     public static void main(String[] args) throws Exception {
18         //ONE:
19         //1 用于接受客户端连接的线程工作组
20         EventLoopGroup boss = new NioEventLoopGroup();
21         //2 用于对接受客户端连接读写操作的线程工作组
22         EventLoopGroup work = new NioEventLoopGroup();
23
24         //TWO:
25         //3 辅助类。用于帮助我们创建NETTY服务
26         ServerBootstrap b = new ServerBootstrap();
27         b.group(boss, work)    //绑定两个工作线程组
28          .channel(NioServerSocketChannel.class)    //设置NIO的模式
29          .option(ChannelOption.SO_BACKLOG, 1024)    //设置TCP缓冲区
30          //.option(ChannelOption.SO_SNDBUF, 32*1024)    // 设置发送数据的缓存大小
31          .option(ChannelOption.SO_RCVBUF, 32*1024)    // 设置接受数据的缓存大小
32          .childOption(ChannelOption.SO_KEEPALIVE, Boolean.TRUE)    // 设置保持连接
33          .childOption(ChannelOption.SO_SNDBUF, 32*1024)
34          // 初始化绑定服务通道
35          .childHandler(new ChannelInitializer<SocketChannel>() {
36             @Override
37             protected void initChannel(SocketChannel sc) throws Exception {
38                 // 为通道进行初始化: 数据传输过来的时候会进行拦截和执行
39                 //sc.pipeline().addLast(new ReadTimeoutHandler(5));
40                 sc.pipeline().addLast(new ServerHandler());
41             }
42          });
43
44         ChannelFuture cf = b.bind(8765).sync();
45
46
47
48         //释放连接
49         cf.channel().closeFuture().sync();
50         work.shutdownGracefully();
51         boss.shutdownGracefully();
52     }
53 }
 1 package bhz.netty.start;
 2
 3 import io.netty.buffer.ByteBuf;
 4 import io.netty.buffer.Unpooled;
 5 import io.netty.channel.ChannelFutureListener;
 6 import io.netty.channel.ChannelHandlerContext;
 7 import io.netty.channel.ChannelInboundHandlerAdapter;
 8 import io.netty.util.ReferenceCountUtil;
 9
10 public class ServerHandler extends ChannelInboundHandlerAdapter {
11
12     /**
13      * 当我们通道进行激活的时候 触发的监听方法
14      */
15     @Override
16     public void channelActive(ChannelHandlerContext ctx) throws Exception {
17
18         System.err.println("--------通道激活------------");
19     }
20
21     /**
22      * 当我们的通道里有数据进行读取的时候 触发的监听方法
23      */
24     @Override
25     public void channelRead(ChannelHandlerContext ctx /*NETTY服务上下文*/, Object msg /*实际的传输数据*/) throws Exception {
26 //        try{
27             //do something with msg
28
29             //NIO通信(传输的数据是什么? ----> buffer对象)
30             ByteBuf buf = (ByteBuf)msg;
31             byte[] request = new byte[buf.readableBytes()];
32             buf.readBytes(request);
33             String body = new String(request, "utf-8");
34             System.out.println("服务器: " + body);
35
36             //ByteBuf
37             String response = "我是返回的数据!!";
38             ctx.writeAndFlush(Unpooled.copiedBuffer(response.getBytes()));
39             //添加addListener 可以触发关闭通道监听事件
40             //.addListener(ChannelFutureListener.CLOSE);
41
42 //        } finally {
43 //            ReferenceCountUtil.release(msg);
44 //        }
45
46
47
48
49     }
50
51     @Override
52     public void channelReadComplete(ChannelHandlerContext ctx) throws Exception {
53        System.err.println("--------数据读取完毕----------");
54     }
55
56     @Override
57     public void exceptionCaught(ChannelHandlerContext ctx, Throwable cause)
58             throws Exception {
59         System.err.println("--------数据读异常----------: ");
60         cause.printStackTrace();
61         ctx.close();
62     }
63
64
65 }
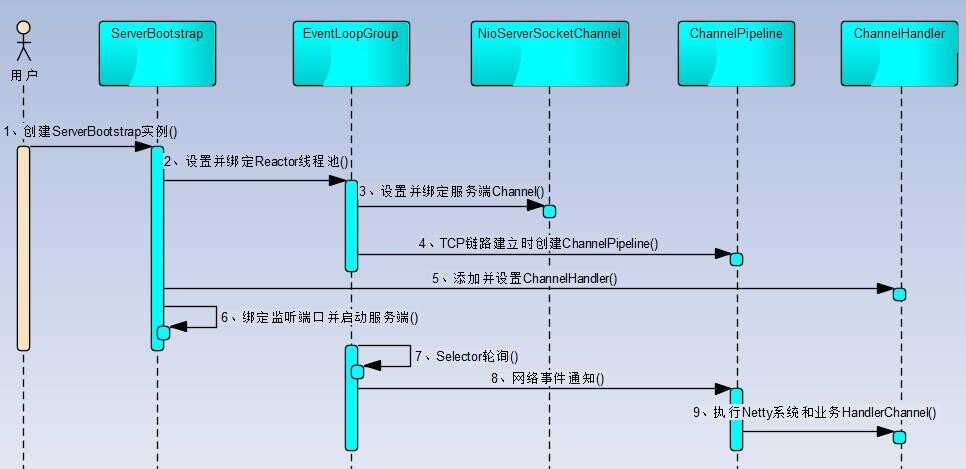
图2-2 Netty服务端创建时序图
下面我们对Netty服务端创建的关键步骤和原理进行讲解。
步骤1:创建ServerBootstrap实例。ServerBootstrap是Netty服务端的启动辅助类,它提供了一系列的方法用于设置服务端启动相关的参数。底层通过门面模式对各种能力进行抽象和封装,尽量不需要用户跟过多的底层API打交道,降低用户的开发难度。
我们在创建ServerBootstrap实例时,会惊讶的发现ServerBootstrap只有一个无参的构造函数,作为启动辅助类这让人不可思议,因为它需要与多个其它组件或者类交互。ServerBootstrap构造函数没有参数的根本原因是因为它的参数太多了,而且未来也可能会发生变化,为了解决这个问题,就需要引入Builder模式。《Effective Java》第二版第2条建议遇到多个构造器参数时要考虑用构建器,关于多个参数构造函数的缺点和使用构建器的优点大家可以查阅《Effective Java》,在此不再详述。
步骤2:设置并绑定Reactor线程池。Netty的Reactor线程池是EventLoopGroup,它实际就是EventLoop的数组。EventLoop的职责是处理所有注册到本线程多路复用器Selector上的Channel,Selector的轮询操作由绑定的EventLoop线程run方法驱动,在一个循环体内循环执行。值得说明的是,EventLoop的职责不仅仅是处理网络I/O事件,用户自定义的Task和定时任务Task也统一由EventLoop负责处理,这样线程模型就实现了统一。从调度层面看,也不存在在EventLoop线程中再启动其它类型的线程用于异步执行其它的任务,这样就避免了多线程并发操作和锁竞争,提升了I/O线程的处理和调度性能。
步骤3:设置并绑定服务端Channel。作为NIO服务端,需要创建ServerSocketChannel,Netty对原生的NIO类库进行了封装,对应实现是NioServerSocketChannel。对于用户而言,不需要关心服务端Channel的底层实现细节和工作原理,只需要指定具体使用哪种服务端Channel即可。因此,Netty的ServerBootstrap方法提供了channel方法用于指定服务端Channel的类型。Netty通过工厂类,利用反射创建NioServerSocketChannel对象。由于服务端监听端口往往只需要在系统启动时才会调用,因此反射对性能的影响并不大。相关代码如下所示:

步骤4:链路建立的时候创建并初始化ChannelPipeline。ChannelPipeline并不是NIO服务端必需的,它本质就是一个负责处理网络事件的职责链,负责管理和执行ChannelHandler。网络事件以事件流的形式在ChannelPipeline中流转,由ChannelPipeline根据ChannelHandler的执行策略调度ChannelHandler的执行。典型的网络事件如下:
- 链路注册;
- 链路激活;
- 链路断开;
- 接收到请求消息;
- 请求消息接收并处理完毕;
- 发送应答消息;
- 链路发生异常;
- 发生用户自定义事件。
步骤5:初始化ChannelPipeline完成之后,添加并设置ChannelHandler。ChannelHandler是Netty提供给用户定制和扩展的关键接口。利用ChannelHandler用户可以完成大多数的功能定制,例如消息编解码、心跳、安全认证、TSL/SSL认证、流量控制和流量整形等。Netty同时也提供了大量的系统ChannelHandler供用户使用,比较实用的系统ChannelHandler总结如下:
- 系统编解码框架-ByteToMessageCodec;
- 通用基于长度的半包解码器-LengthFieldBasedFrameDecoder;
- 码流日志打印Handler-LoggingHandler;
- SSL安全认证Handler-SslHandler;
- 链路空闲检测Handler-IdleStateHandler;
- 流量整形Handler-ChannelTrafficShapingHandler;
- Base64编解码-Base64Decoder和Base64Encoder。
创建和添加ChannelHandler的代码示例如下:

步骤6:绑定并启动监听端口。在绑定监听端口之前系统会做一系列的初始化和检测工作,完成之后,会启动监听端口,并将ServerSocketChannel注册到Selector上监听客户端连接,相关代码如下:

步骤7:Selector轮询。由Reactor线程NioEventLoop负责调度和执行Selector轮询操作,选择准备就绪的Channel集合,相关代码如下:

步骤8:当轮询到准备就绪的Channel之后,就由Reactor线程NioEventLoop执行ChannelPipeline的相应方法,最终调度并执行ChannelHandler,代码如下:

步骤9:执行Netty系统ChannelHandler和用户添加定制的ChannelHandler。ChannelPipeline根据网络事件的类型,调度并执行ChannelHandler,相关代码如下所示:

二,客户端时序图分析

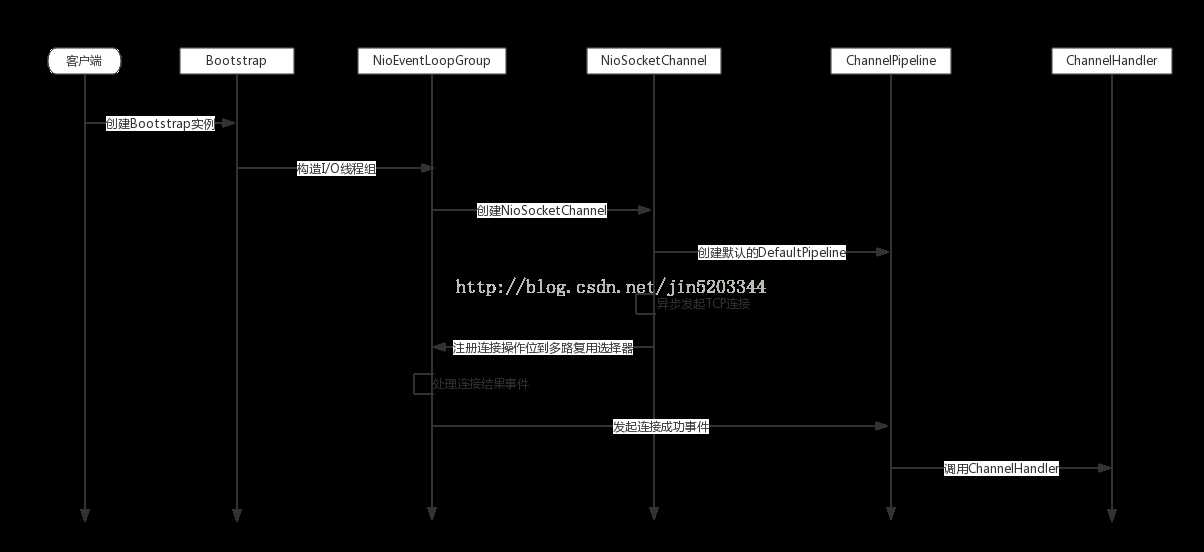
步骤:
1.用户线程创建Bootstrap实例
2.创建处理客户端连接,I/O读写Reactor线程组NioEventLoopGroup
3.创建NioSocketChannel
4.创建默认的ChannelHandlerPipeline,用户调度和执行网络事件
5.异步发起TCP连接,如果成功将NioSocketChannel注册到多路复用选择器上,监听读操作位,用于数据读取和消息发送,如果失败,注册连接操作位到多路复用选择 器,等待连接结果
6.注册对应的网络监听状态位到多路复用选择器
7.由多路复用选择器轮询Channel,处理连接结果
8.如果连接成功,设置Future结果,发送连接成功事件,触发ChannelHandlerPipeline执行
9.由ChannelHandlerPipeline调度和执行系统和用户ChannelHandler
 1 package bhz.netty.start;
 2
 3 import io.netty.bootstrap.Bootstrap;
 4 import io.netty.buffer.Unpooled;
 5 import io.netty.channel.ChannelFuture;
 6 import io.netty.channel.ChannelInitializer;
 7 import io.netty.channel.EventLoopGroup;
 8 import io.netty.channel.nio.NioEventLoopGroup;
 9 import io.netty.channel.socket.SocketChannel;
10 import io.netty.channel.socket.nio.NioSocketChannel;
11 import io.netty.handler.timeout.ReadTimeoutHandler;
12
13 public class Client {
14
15     public static void main(String[] args) throws Exception {
16         //ONE:
17         //1 线程工作组
18         EventLoopGroup work = new NioEventLoopGroup();
19
20         //TWO:
21         //3 辅助类。用于帮助我们创建NETTY服务
22         Bootstrap b = new Bootstrap();
23         b.group(work)    //绑定工作线程组
24          .channel(NioSocketChannel.class)    //设置NIO的模式
25          // 初始化绑定服务通道
26          .handler(new ChannelInitializer<SocketChannel>() {
27             @Override
28             protected void initChannel(SocketChannel sc) throws Exception {
29                 // 为通道进行初始化: 数据传输过来的时候会进行拦截和执行
30                 //sc.pipeline().addLast(new ReadTimeoutHandler(5));
31                 sc.pipeline().addLast(new ClientHandler());
32             }
33          });
34
35         ChannelFuture cf =  b.connect("127.0.0.1", 8765).syncUninterruptibly();
36
37         cf.channel().writeAndFlush(Unpooled.copiedBuffer("hello netty!-1".getBytes()));
38
39 //        Thread.sleep(1000);
40 //
41 //        cf.channel().write(Unpooled.copiedBuffer("hello netty!-2".getBytes()));
42 //
43 //        Thread.sleep(1000);
44 //        cf.channel().write(Unpooled.copiedBuffer("hello netty!-3".getBytes()));
45 //
46 //        Thread.sleep(1000);
47 //        cf.channel().write(Unpooled.copiedBuffer("hello netty!-4".getBytes()));
48 //
49 //        Thread.sleep(1000);
50 //        cf.channel().writeAndFlush(Unpooled.copiedBuffer("hello netty!-5".getBytes()));
51
52
53         //释放连接
54         cf.channel().closeFuture().sync();
55         work.shutdownGracefully();
56     }
57 }
 1 package bhz.netty.start;
 2
 3 import io.netty.buffer.ByteBuf;
 4 import io.netty.channel.ChannelHandlerContext;
 5 import io.netty.channel.ChannelInboundHandlerAdapter;
 6 import io.netty.util.ReferenceCountUtil;
 7
 8 public class ClientHandler  extends ChannelInboundHandlerAdapter {
 9
10
11     @Override
12     public void channelRead(ChannelHandlerContext ctx, Object msg) throws Exception {
13         try {
14             ByteBuf buffer = (ByteBuf)msg;
15              byte[] data = new byte[buffer.readableBytes()];
16              buffer.readBytes(data);
17              String str = new String(data, "utf-8");
18              System.err.println("客户端:" + str);
19         } finally {
20             ReferenceCountUtil.release(msg);
21         }
22     }
23
24     @Override
25     public void exceptionCaught(ChannelHandlerContext ctx, Throwable cause)
26             throws Exception {
27         ctx.close();
28     }
29
30 }
