标签:des android style blog http color io os java
这其实很简单就可以实现,只需要自定义一个View继承自HorizontalScrollView
1,新建一个项目,再新建一个MySlideMenu继承HorizontalScrollView
public class MySlideMenu extends HorizontalScrollView { //继承自横向可滚动ScrollView
private int mScreenWidth; //屏幕宽度
private int mMenuRightPadding; //菜单栏的右边距
//菜单栏的宽度
private int mMenuWidth;
private int mMenuHalfWidth; //菜单栏的半边宽度
private boolean isOpen; //标志当前菜单栏是否打开
private boolean isOnce; //是否第一次打开
private ViewGroup mContent; //内容页面
private ViewGroup mMenu; //菜单页面
public MySlideMenu(Context context, AttributeSet attrs){
this(context, attrs, 0);
}
public MySlideMenu(Context context, AttributeSet attrs, int defStyle) {
super(context, attrs, defStyle);
mScreenWidth=ScreenUtils.getScreenWidth(context);
TypedArray a=context.getTheme().obtainStyledAttributes(attrs,
R.styleable.SlidingMenu, defStyle, 0);
int n = a.getIndexCount();
for (int i = 0; i < n; i++) {
int attr=a.getIndex(i);
if(attr==R.styleable.SlidingMenu_rightPadding){
mMenuRightPadding = a.getDimensionPixelSize(attr,
(int) TypedValue.applyDimension(
TypedValue.COMPLEX_UNIT_DIP, 50f,
getResources().getDisplayMetrics()));// 默认为10DP
}
}
a.recycle();
}
@Override
protected void onMeasure(int widthMeasureSpec, int heightMeasureSpec) {
if(!isOnce){ //只允许获得第一次的 测量结果
LinearLayout ll=(LinearLayout) getChildAt(0);
mMenu=(ViewGroup) ll.getChildAt(0); //从线性布局中获得 Menu布局
mContent=(ViewGroup) ll.getChildAt(1);
mMenuWidth=mScreenWidth-mMenuRightPadding;
mMenuHalfWidth=mMenuWidth/2;
mMenu.getLayoutParams().width=mMenuWidth;
mContent.getLayoutParams().width=mScreenWidth;
}
super.onMeasure(widthMeasureSpec, heightMeasureSpec);
}
@Override
protected void onLayout(boolean changed, int l, int t, int r, int b) {
super.onLayout(changed, l, t, r, b);
if(changed){
this.scrollTo(mMenuWidth, 0); //将菜单隐藏
isOnce=true;
}
}
//打开菜单
public void openMenu(){
if(isOpen){
return;
}
this.scrollTo(0, 0);
isOpen=true;
}
//关闭菜单
public void closeMenu(){
if(!isOpen){
return;
}
this.scrollTo(mMenuWidth,0);
isOpen=false;
}
//切换菜单开关状态
public void toggle(){
if(isOpen){
closeMenu();
}
else{
openMenu();
}
}
//监听手势滑动
@Override
public boolean onTouchEvent(MotionEvent ev) {
switch (ev.getAction()) {
case MotionEvent.ACTION_UP:
int scrollX=getScrollX(); //获取滑动的横坐标
if(scrollX>mMenuHalfWidth){ //判断 有没有滑倒一半的距离
this.smoothScrollTo(mMenuWidth, 0); //隐藏
isOpen=false;
}
else{
this.smoothScrollTo(0, 0);//展开
isOpen=true;
}
return true;
}
return super.onTouchEvent(ev);
}
//监听滑动时 菜单视图 和 滑动视图出现相应的放大缩小的特效
@Override
protected void onScrollChanged(int l, int t, int oldl, int oldt) {
super.onScrollChanged(l, t, oldl, oldt);
float scale = l * 1.0f / mMenuWidth;
float leftScale = 1 - 0.3f * scale;
float rightScale = 0.8f + scale * 0.2f;
ViewHelper.setScaleX(mMenu, leftScale);
ViewHelper.setScaleY(mMenu, leftScale);
ViewHelper.setAlpha(mMenu, 0.6f + 0.4f * (1 - scale));
ViewHelper.setTranslationX(mMenu, mMenuWidth * scale * 0.7f);
ViewHelper.setPivotX(mContent, 0);
ViewHelper.setPivotY(mContent, mContent.getHeight() / 2);
ViewHelper.setScaleX(mContent, rightScale);
ViewHelper.setScaleY(mContent, rightScale);
}
}
这里面其实就是用到了一个横向的ScrollView,并且在滑动时加入了一些动画效果而已,但ViewHelper并不是andorid API提供的,而是需要下载nineoldandroids-2.4.0.jar包.
2,新建一个屏幕辅助类
/**
* 获得屏幕相关的辅助类
*
* @author zhy
*
*/
public class ScreenUtils
{
private ScreenUtils()
{
/* cannot be instantiated */
throw new UnsupportedOperationException("cannot be instantiated");
}
/**
* 获得屏幕高度
*
* @param context
* @return
*/
public static int getScreenWidth(Context context)
{
WindowManager wm = (WindowManager) context
.getSystemService(Context.WINDOW_SERVICE);
DisplayMetrics outMetrics = new DisplayMetrics();
wm.getDefaultDisplay().getMetrics(outMetrics);
return outMetrics.widthPixels;
}
/**
* 获得屏幕宽度
*
* @param context
* @return
*/
public static int getScreenHeight(Context context)
{
WindowManager wm = (WindowManager) context
.getSystemService(Context.WINDOW_SERVICE);
DisplayMetrics outMetrics = new DisplayMetrics();
wm.getDefaultDisplay().getMetrics(outMetrics);
return outMetrics.heightPixels;
}
/**
* 获得状???栏的高??
*
* @param context
* @return
*/
public static int getStatusHeight(Context context)
{
int statusHeight = -1;
try
{
Class<?> clazz = Class.forName("com.android.internal.R$dimen");
Object object = clazz.newInstance();
int height = Integer.parseInt(clazz.getField("status_bar_height")
.get(object).toString());
statusHeight = context.getResources().getDimensionPixelSize(height);
} catch (Exception e)
{
e.printStackTrace();
}
return statusHeight;
}
/**
* 获取当前屏幕截图,包含状态栏
*
* @param activity
* @return
*/
public static Bitmap snapShotWithStatusBar(Activity activity)
{
View view = activity.getWindow().getDecorView();
view.setDrawingCacheEnabled(true);
view.buildDrawingCache();
Bitmap bmp = view.getDrawingCache();
int width = getScreenWidth(activity);
int height = getScreenHeight(activity);
Bitmap bp = null;
bp = Bitmap.createBitmap(bmp, 0, 0, width, height);
view.destroyDrawingCache();
return bp;
}
/**
* 获取当前屏幕截图,不包含状???栏
*
* @param activity
* @return
*/
public static Bitmap snapShotWithoutStatusBar(Activity activity)
{
View view = activity.getWindow().getDecorView();
view.setDrawingCacheEnabled(true);
view.buildDrawingCache();
Bitmap bmp = view.getDrawingCache();
Rect frame = new Rect();
activity.getWindow().getDecorView().getWindowVisibleDisplayFrame(frame);
int statusBarHeight = frame.top;
int width = getScreenWidth(activity);
int height = getScreenHeight(activity);
Bitmap bp = null;
bp = Bitmap.createBitmap(bmp, 0, statusBarHeight, width, height
- statusBarHeight);
view.destroyDrawingCache();
return bp;
}
}
其实就用到了一个获取屏幕宽度的方法.
3.看看activity_main.xml
<com.example.mytest.MySlideMenu xmlns:android="http://schemas.android.com/apk/res/android"
android:id="@+id/id_menu"
xmlns:tools="http://schemas.android.com/tools"
xmlns:zhy="http://schemas.android.com/apk/res/com.example.mytest"
android:layout_width="wrap_content"
android:layout_height="fill_parent"
android:background="@drawable/img_frame_background"
android:scrollbars="none"
zhy:rightPadding="100dp" >
<LinearLayout
android:layout_width="wrap_content"
android:layout_height="fill_parent"
android:orientation="horizontal" >
<include layout="@layout/layout_menu" />
<LinearLayout
android:layout_width="fill_parent"
android:layout_height="fill_parent"
android:background="@drawable/qq" >
<Button
android:layout_width="wrap_content"
android:layout_height="wrap_content"
android:onClick="toggleMenu"
android:text="切换菜单" />
</LinearLayout>
</LinearLayout>
</com.example.mytest.MySlideMenu>
xml视图中就包含了两个View,一个是Menu,一个是Content.
4,再看Menu视图
<?xml version="1.0" encoding="utf-8"?>
<RelativeLayout xmlns:android="http://schemas.android.com/apk/res/android"
android:layout_width="match_parent"
android:layout_height="match_parent"
android:background="#0000" >
<LinearLayout
android:layout_width="match_parent"
android:layout_height="wrap_content"
android:layout_centerVertical="true"
android:orientation="vertical" >
<RelativeLayout
android:layout_width="match_parent"
android:layout_height="wrap_content" >
<ImageView
android:id="@+id/one"
android:layout_width="50dp"
android:layout_height="50dp"
android:layout_centerVertical="true"
android:layout_marginLeft="20dp"
android:layout_marginTop="20dp"
android:src="@drawable/img_1" />
<TextView
android:layout_width="fill_parent"
android:layout_height="wrap_content"
android:layout_centerVertical="true"
android:layout_marginLeft="20dp"
android:layout_toRightOf="@id/one"
android:text="第1个Item"
android:textColor="#f0f0f0"
android:textSize="20sp" />
</RelativeLayout>
<RelativeLayout
android:layout_width="match_parent"
android:layout_height="wrap_content" >
<ImageView
android:id="@+id/two"
android:layout_width="50dp"
android:layout_height="50dp"
android:layout_centerVertical="true"
android:layout_marginLeft="20dp"
android:layout_marginTop="20dp"
android:src="@drawable/img_2" />
<TextView
android:layout_width="fill_parent"
android:layout_height="wrap_content"
android:layout_centerVertical="true"
android:layout_marginLeft="20dp"
android:layout_toRightOf="@id/two"
android:text="第2个Item"
android:textColor="#f0f0f0"
android:textSize="20sp" />
</RelativeLayout>
<RelativeLayout
android:layout_width="match_parent"
android:layout_height="wrap_content" >
<ImageView
android:id="@+id/three"
android:layout_width="50dp"
android:layout_height="50dp"
android:layout_centerVertical="true"
android:layout_marginLeft="20dp"
android:layout_marginTop="20dp"
android:src="@drawable/img_3" />
<TextView
android:layout_width="fill_parent"
android:layout_height="wrap_content"
android:layout_centerVertical="true"
android:layout_marginLeft="20dp"
android:layout_toRightOf="@id/three"
android:text="第3个Item"
android:textColor="#f0f0f0"
android:textSize="20sp" />
</RelativeLayout>
<RelativeLayout
android:layout_width="match_parent"
android:layout_height="wrap_content" >
<ImageView
android:id="@+id/four"
android:layout_width="50dp"
android:layout_height="50dp"
android:layout_centerVertical="true"
android:layout_marginLeft="20dp"
android:layout_marginTop="20dp"
android:src="@drawable/img_4" />
<TextView
android:layout_width="fill_parent"
android:layout_height="wrap_content"
android:layout_centerVertical="true"
android:layout_marginLeft="20dp"
android:layout_toRightOf="@id/four"
android:text="第一个Item"
android:textColor="#f0f0f0"
android:textSize="20sp" />
</RelativeLayout>
<RelativeLayout
android:layout_width="match_parent"
android:layout_height="wrap_content" >
<ImageView
android:id="@+id/five"
android:layout_width="50dp"
android:layout_height="50dp"
android:layout_centerVertical="true"
android:layout_marginLeft="20dp"
android:layout_marginTop="20dp"
android:src="@drawable/img_5" />
<TextView
android:layout_width="fill_parent"
android:layout_height="wrap_content"
android:layout_centerVertical="true"
android:layout_marginLeft="20dp"
android:layout_toRightOf="@id/five"
android:text="第5个Item"
android:textColor="#f0f0f0"
android:textSize="20sp" />
</RelativeLayout>
</LinearLayout>
</RelativeLayout>
也就是一些简单的线性排列而已.
5,最后一步,打开MainActivity.java
public class MainActivity extends Activity
{
private MySlideMenu mMenu;
@Override
protected void onCreate(Bundle savedInstanceState)
{
super.onCreate(savedInstanceState);
requestWindowFeature(Window.FEATURE_NO_TITLE);
setContentView(R.layout.activity_main);
mMenu = (MySlideMenu) findViewById(R.id.id_menu);
}
public void toggleMenu(View view)
{
mMenu.toggle();
}
}
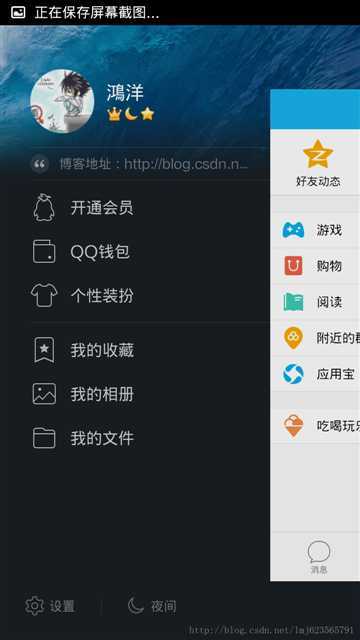
如此,轻松实现QQ侧滑效果.
android仿QQ的SlideMenu
标签:des android style blog http color io os java
原文地址:http://www.cnblogs.com/aibuli/p/e628cf1e7f106b2e4435fa95c0756ea7.html