一、根据官网手工搭建(http://projects.spring.io/spring-boot/#quick-start)
1、新建一个maven工程springbootfirst
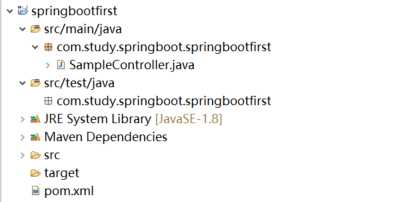
2、 如果要想开发 SpringBoot 程序只需要按照官方给出的要求配置一个父 pom (spring-boot-starter-parent)和添加web开发的支持(spring-boot-starter-web)即可。
 1 <project xmlns="http://maven.apache.org/POM/4.0.0" xmlns:xsi="http://www.w3.org/2001/XMLSchema-instance"
 2   xsi:schemaLocation="http://maven.apache.org/POM/4.0.0 http://maven.apache.org/xsd/maven-4.0.0.xsd">
 3   <modelVersion>4.0.0</modelVersion>
 4
 5   <groupId>com.study.springboot</groupId>
 6   <artifactId>springbootfirst</artifactId>
 7   <version>0.0.1-SNAPSHOT</version>
 8   <packaging>jar</packaging>
 9
10   <name>springbootfirst</name>
11   <url>http://maven.apache.org</url>
12
13   <properties>
14     <project.build.sourceEncoding>UTF-8</project.build.sourceEncoding>
15     <jdk.version>1.8</jdk.version>
16   </properties>
17
18     <!--想开发 SpringBoot 程序只需要按照官方给出的要求配置一个父 pom 即可。  -->
19     <parent>
20         <groupId>org.springframework.boot</groupId>
21         <artifactId>spring-boot-starter-parent</artifactId>
22         <version>1.5.4.RELEASE</version>
23     </parent>
24
25   <dependencies>
26
27     <!--添加web开发的支持  -->
28     <dependency>
29             <groupId>org.springframework.boot</groupId>
30             <artifactId>spring-boot-starter-web</artifactId>
31     </dependency>
32
33   </dependencies>
34
35
36   <build>
37         <finalName>springbootfirst</finalName>
38         <plugins>
39             <plugin>
40                 <groupId>org.apache.maven.plugins</groupId>
41                 <artifactId>maven-compiler-plugin</artifactId>
42                 <configuration>
43                     <source>${jdk.version}</source><!-- 源代码使用的开发版本 -->
44                     <target>${jdk.version}</target><!-- 需要生成的目标class文件的编译版本 -->
45                     <encode>${project.build.sourceEncoding}</encode>
46                 </configuration>
47             </plugin>
48         </plugins>
49     </build>
50
51 </project>
3、 编写一个具体的程序SampleController.java
 1 package com.study.springboot.springbootfirst;
 2
 3 import org.springframework.boot.*;
 4 import org.springframework.boot.autoconfigure.*;
 5 import org.springframework.stereotype.*;
 6 import org.springframework.web.bind.annotation.*;
 7
 8 @Controller
 9 @EnableAutoConfiguration
10 public class SampleController {
11
12     @RequestMapping("/")
13     @ResponseBody
14     String home() {
15         return "Hello World!";
16     }
17
18     public static void main(String[] args) throws Exception {
19         SpringApplication.run(SampleController.class, args);
20     }
21 }
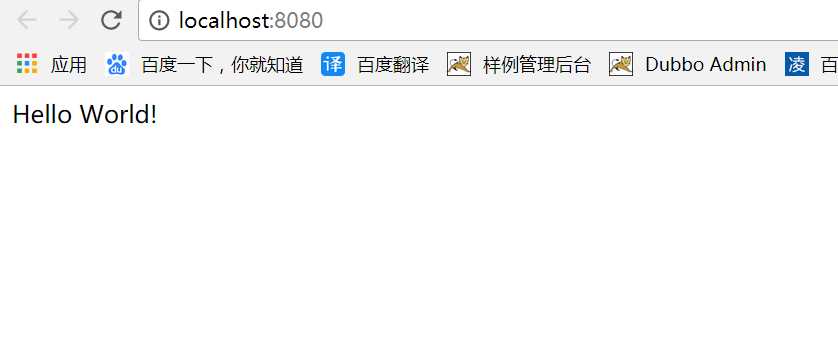
4.启动SampleController.java,在浏览器输入http://localhost:8080/即可看到我们使用SpringBoot搭建的第一个web程序成功了,就是这么的快速、简单、方便
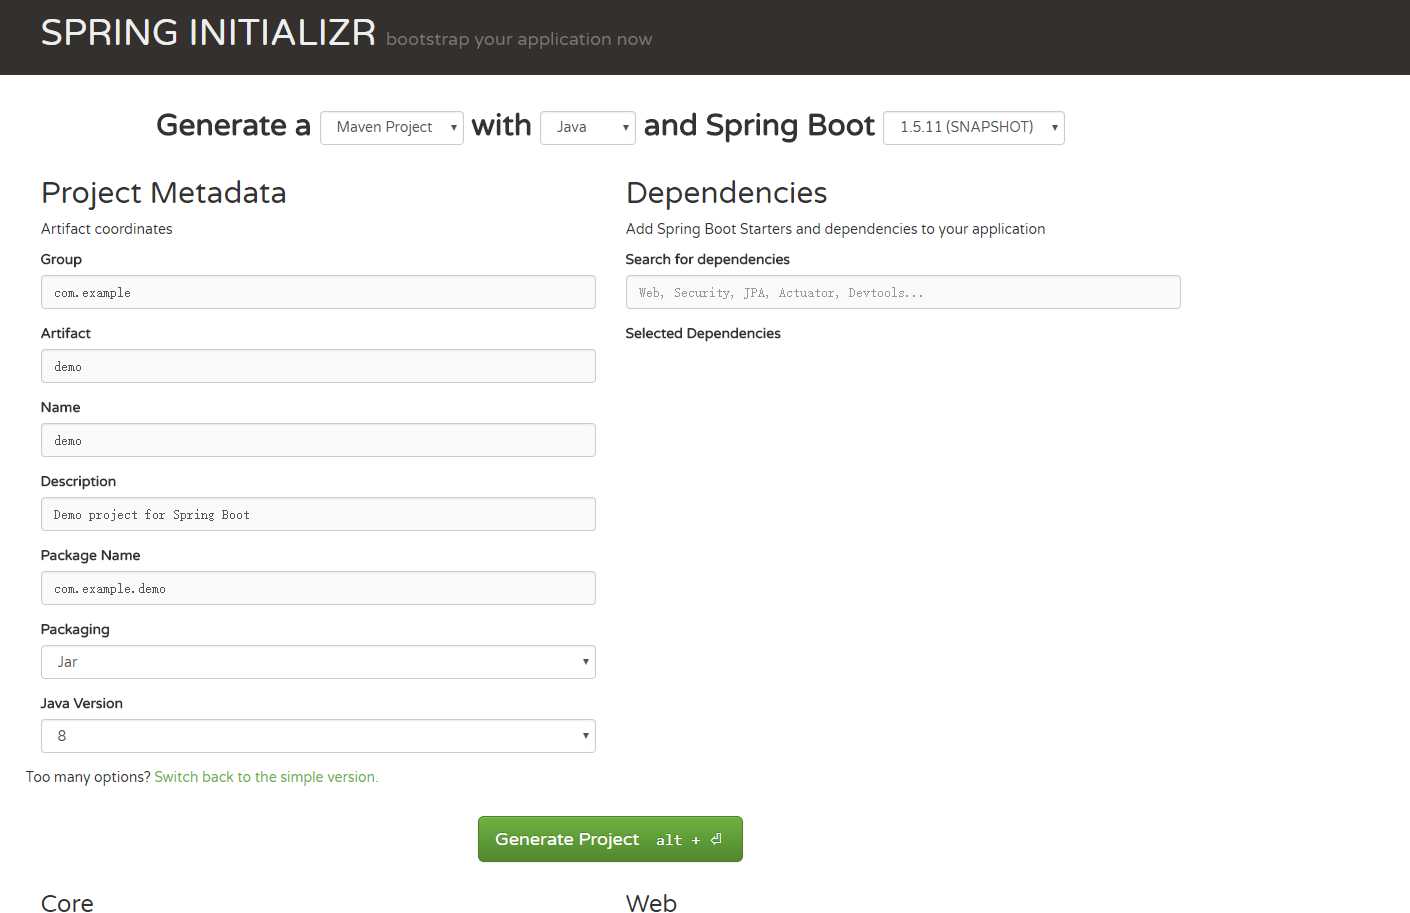
二、快速搭建
1、访问http://start.spring.io/
2、选择构建工具Maven Project、Spring Boot版本1.5.11以及一些工程基本信息,点击“Switch to the full version.”java版本选择1.8,可参考下图所示:
3、点击Generate Project下载项目压缩包
4、解压后,使用eclipse,Import -> Existing Maven Projects -> Next ->选择解压后的文件夹-> Finsh,OK done!