标签:android style blog http io os java ar 文件
首先修改values\strings.xml文件
代码如下:
<resources>

    <string name="app_name">mytab</string>

    <string name="menu_settings">Settings</string>

	<string name="app_title">Intent操作</string>
	<string name="send_name">发送Intent的Activity程序.</string>
	<string name="receive_name">接收Intent的Activity程序.</string>
</resources>
然后定义send_main.xml文件
代码如下:
<?xml version="1.0" encoding="utf-8"?>
<LinearLayout xmlns:android="http://schemas.android.com/apk/res/android"
    xmlns:tools="http://schemas.android.com/tools"
    android:id="@+id/MyLayout"
    android:layout_width="fill_parent"
    android:layout_height="fill_parent"
    tools:context=".MainActivity">
	<Button
	    android:id="@+id/mybut"
	    android:layout_width="wrap_content"
	    android:layout_height="wrap_content"
	    android:text="按下将跳转到另一个Activity程序"/>
</LinearLayout>
相应的定义Send.java类
代码如下:
package com.example.mytab;

import android.app.Activity;
import android.content.Intent;
import android.os.Bundle;
import android.view.View;
import android.view.View.OnClickListener;
import android.widget.Button;


public class Send extends Activity  {
	private Button mybut = null;
    @Override
    public void onCreate(Bundle savedInstanceState) {
        super.onCreate(savedInstanceState);
        setContentView(R.layout.send_main);
        this.mybut = (Button)super.findViewById(R.id.mybut);
        this.mybut.setOnClickListener(new OnClickListenerlmpl());
    }
    public class OnClickListenerlmpl implements OnClickListener{
    	public void onClick(View view){
    		Intent it = new Intent(Send.this,Receive.class);
    		it.putExtra("myinfo", "嗨,朋友");
    		Send.this.startActivity(it);
    	}
    }
}
对于Receive,有相应的定义
首先receive_main.xml文件
代码如下:
<?xml version="1.0" encoding="utf-8"?>
<LinearLayout xmlns:android="http://schemas.android.com/apk/res/android"
    android:id="@+id/MyLayout"
    android:layout_width="fill_parent"
    android:layout_height="fill_parent"
    android:orientation="vertical" >
    <TextView
        android:id="@+id/show"
        android:layout_width="wrap_content"
        android:layout_height="wrap_content"/>
</LinearLayout>
然后定义Receive.java类
代码如下:
package com.example.mytab;

import android.app.Activity;
import android.content.Intent;
import android.os.Bundle;
import android.widget.TextView;

public class Receive extends Activity{
	private TextView show = null;
	@Override
	public void onCreate(Bundle savedInstanceState){
		super.onCreate(savedInstanceState);
		super.setContentView(R.layout.receive_main);
		this.show = (TextView)super.findViewById(R.id.show);
		Intent it = super.getIntent();
		String info = it.getStringExtra("myinfo");
		this.show.setText(info);
	}
}
最后需要修改相应的Mainifest.xml文件,增加新的Activity程序
代码如下:
<manifest xmlns:android="http://schemas.android.com/apk/res/android"
    package="com.example.mytab"
    android:versionCode="1"
    android:versionName="1.0" >

    <uses-sdk
        android:minSdkVersion="16"
        android:targetSdkVersion="15" />

    <application
        android:icon="@drawable/ic_launcher"
        android:label="@string/app_name"
        android:theme="@style/AppTheme" >
        <activity
            android:name="Send"
            android:label="@string/send_name" >
            <intent-filter>
                <action android:name="android.intent.action.MAIN" />

                <category android:name="android.intent.category.LAUNCHER" />
            </intent-filter>
        </activity>
        <activity
            android:name="Receive"
            android:label="@string/receive_name"/>
    </application>

</manifest>
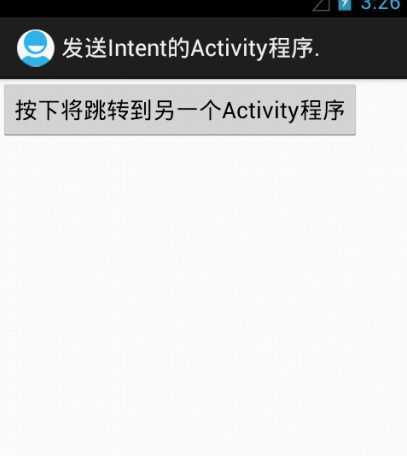
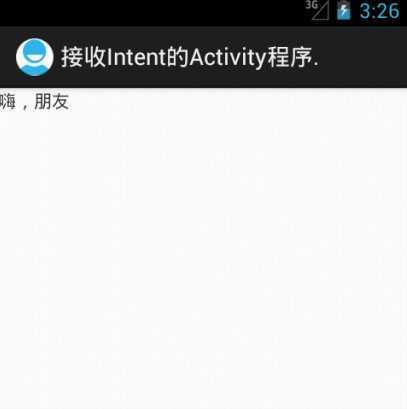
运行效果:

点击后跳转到另一个Activity类中,并传递消息

标签:android style blog http io os java ar 文件
原文地址:http://www.cnblogs.com/lxk2010012997/p/3987969.html