先介绍一下:
BeanNameUrlHandlerMapping是基于配置文件的方式; 所有处理器需要在XML文件中,以Bean的形式配置。
缺点:配置繁琐; 如果多个URL对应同一个处理器,那么需要配置多条,同时也会实例化多个对象等等。。。
因为springmvc 是基于spring的,所以他的初始化肯定是在spring容器初始化之后才进行的。
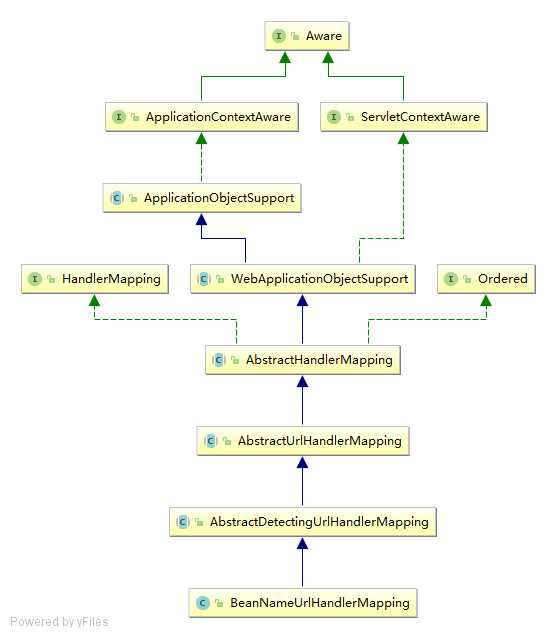
先上类图:

可以看到BeanNameUrlHandlerMapping父类最终实现了ApplicationContextAware接口,所以Spring容器会自动注入ApplicationContext,方法为:
 1     public final void setApplicationContext(ApplicationContext context) throws BeansException {
 2         if (context == null && !this.isContextRequired()) {
 3             this.applicationContext = null;
 4             this.messageSourceAccessor = null;
 5         } else if (this.applicationContext == null) {
 6             if (!this.requiredContextClass().isInstance(context)) {
 7                 throw new ApplicationContextException("Invalid application context: needs to be of type [" + this.requiredContextClass().getName() + "]");
 8             }
 9
10             this.applicationContext = context;
11             this.messageSourceAccessor = new MessageSourceAccessor(context);
12             this.initApplicationContext(context);  //这块实际上是一个钩子方法,供子类去覆盖! 进行初始化工作
13         } else if (this.applicationContext != context) {
14             throw new ApplicationContextException("Cannot reinitialize with different application context: current one is [" + this.applicationContext + "], passed-in one is [" + context + "]");
15         }
16
17     }
AbstractHandlerMapping: 这个类就是复写了这个方法 进行了拦截器的初始化
    protected void initApplicationContext() throws BeansException {
        this.extendInterceptors(this.interceptors); //供子类扩展拦截器
        this.detectMappedInterceptors(this.mappedInterceptors);//扫描应用下的MappedInterceptor,并添加到mappedInterceptors
        this.initInterceptors();//归集MappedInterceptor,并适配HandlerInterceptor和WebRequestInterceptor
    }
AbstractDetectingUrlHandlerMapping :同样重写这个方法,实现自己的逻辑
 1     public void initApplicationContext() throws ApplicationContextException {
 2         super.initApplicationContext();
 3         this.detectHandlers();
 4     }
 5
 6     protected void detectHandlers() throws BeansException {
 7         if (this.logger.isDebugEnabled()) {
 8             this.logger.debug("Looking for URL mappings in application context: " + this.getApplicationContext());
 9         }
10      // 扫描应用下所有的Object类
11         String[] beanNames = this.detectHandlersInAncestorContexts ? BeanFactoryUtils.beanNamesForTypeIncludingAncestors(this.getApplicationContext(), Object.class) : this.getApplicationContext().getBeanNamesForType(Object.class);
12         String[] arr$ = beanNames;
13         int len$ = beanNames.length;
14
15         for(int i$ = 0; i$ < len$; ++i$) { //遍历每一个扫描出来的类
16             String beanName = arr$[i$];
17             String[] urls = this.determineUrlsForHandler(beanName); //钩子方法,让子类去实现,通过handler解析url
18             if (!ObjectUtils.isEmpty(urls)) {
19                 this.registerHandler(urls, beanName); //返回的URL进行注册,实际上就是放到AbstractUrlHandlerMapping的一个map中
20             } else if (this.logger.isDebugEnabled()) {
21                 this.logger.debug("Rejected bean name ‘" + beanName + "‘: no URL paths identified");
22             }
23         }
24
25     }
BeanNameUrlHandlerMapping:实际上就实现了determineUrlsForHandler这个方法:
//
// Source code recreated from a .class file by IntelliJ IDEA
// (powered by Fernflower decompiler)
//

package org.springframework.web.servlet.handler;

import java.util.ArrayList;
import java.util.List;
import org.springframework.util.StringUtils;

public class BeanNameUrlHandlerMapping extends AbstractDetectingUrlHandlerMapping {
    public BeanNameUrlHandlerMapping() {
    }

    protected String[] determineUrlsForHandler(String beanName) {
        List<String> urls = new ArrayList();
        if (beanName.startsWith("/")) { //只有一点需要注意 就是bean id 必须是以‘/‘开头
            urls.add(beanName);
        }

        String[] aliases = this.getApplicationContext().getAliases(beanName);
        String[] arr$ = aliases;
        int len$ = aliases.length;

        for(int i$ = 0; i$ < len$; ++i$) {
            String alias = arr$[i$];
            if (alias.startsWith("/")) {
                urls.add(alias);
            }
        }

        return StringUtils.toStringArray(urls);
    }
}
AbstractUrlHandlerMappin:中注册处理器的方法:
 1     protected void registerHandler(String urlPath, Object handler) throws BeansException, IllegalStateException {
 2         Assert.notNull(urlPath, "URL path must not be null");
 3         Assert.notNull(handler, "Handler object must not be null");
 4         Object resolvedHandler = handler;
 5         if (!this.lazyInitHandlers && handler instanceof String) {
 6             String handlerName = (String)handler;
 7             if (this.getApplicationContext().isSingleton(handlerName)) {
 8                 resolvedHandler = this.getApplicationContext().getBean(handlerName);
 9             }
10         }
11
12         Object mappedHandler = this.handlerMap.get(urlPath);
13         if (mappedHandler != null) {
14             if (mappedHandler != resolvedHandler) { //不允许存在相同url不同handler,否则抛异常
15                 throw new IllegalStateException("Cannot map " + this.getHandlerDescription(handler) + " to URL path [" + urlPath + "]: There is already " + this.getHandlerDescription(mappedHandler) + " mapped.");
16             }
17         } else if (urlPath.equals("/")) {
18             if (this.logger.isInfoEnabled()) {
19                 this.logger.info("Root mapping to " + this.getHandlerDescription(handler));
20             }
21
22             this.setRootHandler(resolvedHandler);
23         } else if (urlPath.equals("/*")) {
24             if (this.logger.isInfoEnabled()) {
25                 this.logger.info("Default mapping to " + this.getHandlerDescription(handler));
26             }
27
28             this.setDefaultHandler(resolvedHandler);
29         } else { //这才是正常的存储逻辑
30             this.handlerMap.put(urlPath, resolvedHandler);
31             if (this.logger.isInfoEnabled()) {
32                 this.logger.info("Mapped URL path [" + urlPath + "] onto " + this.getHandlerDescription(handler));
33             }
34         }
35
36     }
到这里实际上处理器映射器的保存工作就算完事了。
实际上handlerMapping这一块,主要思路就是 写一个模板类,来处理公共的方法,如初始化拦截器,然后留下钩子方法,让子类去实现自己的逻辑就好了。
