安装前:
-
Overview
X3D-Edit version 3.3 standalone application and Netbeans plugin are available and ready.
X3D-Edit is written using Java 8 for Netbeans 8 platform. X3D-Edit runs on desktop/laptop/tablet systems and is portable across major operating systems (Windows 7-10, MacOSX, Linux).
As with any application, users may need administrative permissions to fully install or uninstall X3D-Edit on their system.
The X3D-Edit codebase builds and runs using either Java 7 or (preferred) Java 8. If needed, you can verify your installed Java version. (要求安装java7以上版本)
已经配置好X3D的下载地址:
https://savage.nps.edu/X3D-Edit/X3D-Edit3.3.zip
链接:https://pan.baidu.com/s/1cnsbz6K0N_A0Xep2nMOAGg 密码:dt40
注意:解压时路径中必须没有中文,解压完后
runX3dEditWin.baton a Windows machine.runX3dEditMac.sh.commandon a Mac.runX3dEditUnix.shon a Linux/Unix system.
如果是windows系统也可以直接运行..\X3D-Edit3.3\x3dedit33\bin\x3dedit3364.exe(x3dedit33.exe)
到这里你就可以使用X3D了,如果自己配置的话,请继续往下看:
自己配置的话先安装NetBeans IDE
NetBeans IDE 下载:http://www.oracle.com/technetwork/java/javase/downloads/index.html
之后根据以下教程配置:
-
Netbeans Plugin
Prerequisite: please install the latest NetBeans on your local system.
Netbeans users can connect to the Netbeans Update Center for automatic plugin download and installation using the following procedure. The image links below provide screen snapshots corresponding to each installation step.
Install instructions for Netbeans plugin:
- Select
Tools > Plugins > Settings > Choose "Every Startup" and Select "Add", - Now fill in the Netbeans Update Center Customizer by entering the following grey-background text:
Name: X3D-Edit Update Center


                        URL:
                        http://www.movesinstitute.org/X3D-Edit/netbeans_modules/updates.xml
Then clickOK. -
While still in the Plugins Settings tab,
look on left-hand side under
Configuration of Update Centersarea for theX3D Edit Update Centerentry, and ensure the Active-column checkbox in the lower left is checked. - While on this panel, confirm that you have selected Check Interval: Every Startup from the drop-down list.
-
Switch to the
Available Pluginstab, select the upper-left Install box for the X3D-Edit plugin,
and then select the lower-leftInstallbutton. -
You now see a
Welcome To Netbeans IDE Plugin Installer
panel.
Select theNextbutton. -
It is necessary to accept the open-source license and again select the
Installbutton. - A progress panel should then appear.
-
If any problems with certificates are encountered, select
Continue. Here is our current certificate information. Current difficulties with Netbeans module signing are documented in issue 1518. -
An installation complete panel indicates when the process is done.
Select the
Finishbutton. -
For confirmation, X3D-Edit now appears on the Plugins panel Installed tab, and you may now close the
Pluginspanel.
Netbeans is now ready to edit X3D scenes, also checking for weekly (or daily) updates.
- Select
-
Manual download and install of Netbeans plugin modules
Download and save the plugin modules from http://www.movesinstitute.org/X3D-Edit/netbeans_modules directory to a temporary directory on local disk.
Then select
Tools > Plugins > Downloadedto load plugin modules from a local disk directory to install those downloads.
-
Netbeans indicates when plugin updates are available for download and installation.
Alternatively you check for an update yourself. Select
Tools > Plugins > Updatesand then click the update button to confirm whether a newer version of X3D-Edit is available. This works identically both for the X3D-Edit standalone application and for the Netbeans plugin.Changelog summaries and date of latest revision are found in the project
manifest.mffile. (Also available: Xj3dWrapper/ manifest)X3D-Edit automatic updates are accepted by the Netbeans Plugin Portal since 2008.
安装完成后,就配置完了
之后新建一个X3D场景:

编写后发下它自带的浏览模型的视窗有点闪而且难看,可以使用BS Contact Stereo来进行浏览:
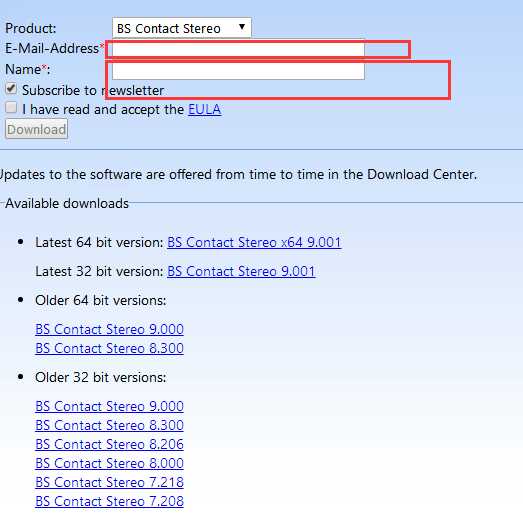
BS Contact Stereo下载地址:
http://www.bitmanagement.de/en/download
下面两个框填上就可以了:

BS Contact Stereo破解方法:http://blog.sina.com.cn/s/blog_59eb15b10100afg6.html
如果你的英文不错请参考网址:
https://savage.nps.edu/X3D-Edit/#Downloads
