一。spring-cloud-bus是什么?
回答这个问题之前,我们先回顾先前的分布式配置,当配置中心发生变化后,我们需要利用spring-boot-actuator里的refresh端点进行手动刷新:

根据上述示例情况:我们每次要获取最新配置时,要一个一个的通过refresh刷新服务节点,这种方式是不是非常low而且非常麻烦,那该怎么办呢?
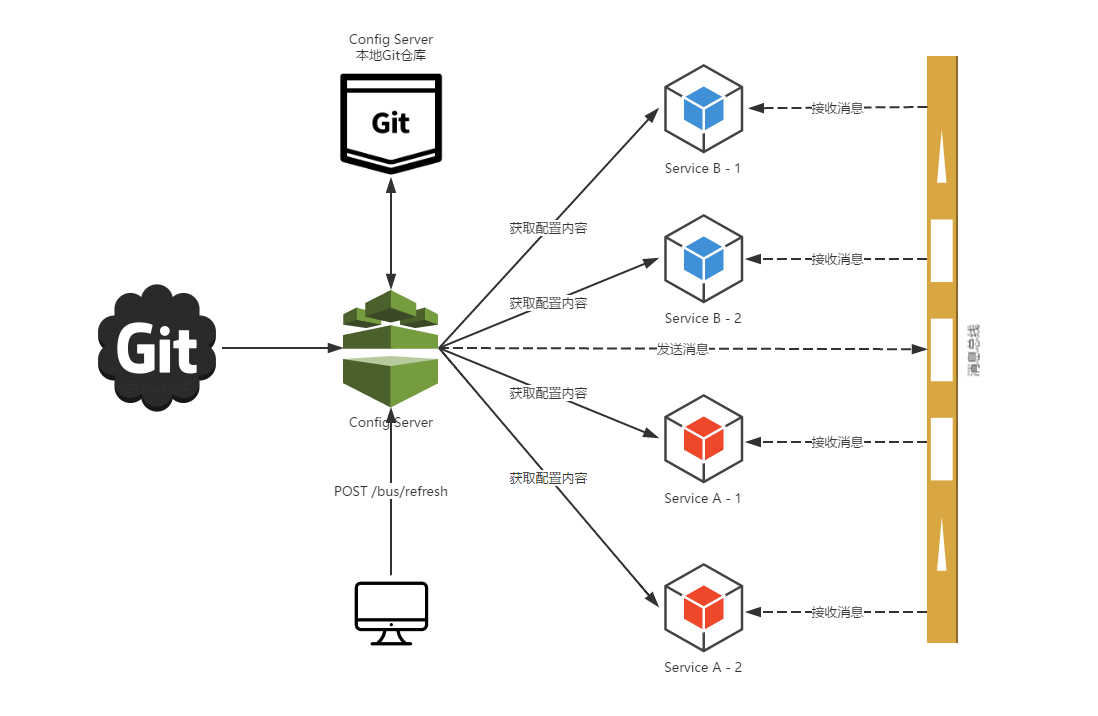
大家还记得zookeeper中watch是做什么用的吗?当监控的节点数据发生变化了,那么是不是所有订阅到该节点的客户端都会触发一个订阅回调呢?这其实也类似于我们的消息总线。在微服务架构的系统中,我们通常会使用轻量级的消息代理来构建一个公有的消息主题让系统中所有微服务实例都连接上来,由于该主题中产生的消息会被所有实例监听和消费,所以我们称它为消息总线。
那么在分布式配置中,我们的所有服务都订阅消息总线的话,当配置改变时,配置中心通知消息总线,然后所有的服务节点接收到订阅消息后,在从配置中心获取最新的配置,是不是一个一劳永逸的过程?那么可以得到如下结构图:
二、实现分布式配置的消息总线
我先贴出:项目结构图
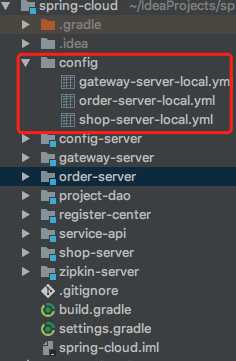
我们统一把配置放在config目录下
1、在对应的服务添加对应的依赖
首先我们先配置config-server。gradle配置文件:


dependencies {
    // testCompile group: ‘junit‘, name: ‘junit‘, version: ‘4.12‘
    compile(‘org.springframework.cloud:spring-cloud-config-server‘)
    compile(‘org.springframework.kafka:spring-kafka‘)
    compile(‘org.springframework.cloud:spring-cloud-starter-bus-kafka‘)
    compile(‘org.springframework.cloud:spring-cloud-starter-eureka-server‘)
}
注意我们使用kafka作为消息总线的中间件
然后我们依次在所需的服务中添加对应的依赖
dependencies {
    // testCompile group: ‘junit‘, name: ‘junit‘, version: ‘4.12‘
     compile(‘org.springframework.cloud:spring-cloud-starter-config‘)
    compile(‘org.springframework.kafka:spring-kafka‘)
    compile(‘org.springframework.cloud:spring-cloud-starter-bus-kafka‘)
    compile(‘org.springframework.cloud:spring-cloud-starter-eureka-server‘)
}
2、配置对应的application.yml
config-server的yml文件:
spring:
  application:
    name: config-server
  cloud:
    config:
      server:
        git:
          uri: file://${user.home}/IdeaProjects/spring-cloud
          repos:
            local:
              pattern: ‘**/local‘
              uri: file://${user.home}/IdeaProjects/spring-cloud
              searchPaths: config
          search-paths: config
      label: master
  kafka:
    bootstrap-servers: localhost:9092
server:
  port: 8888
endpoints:
  refresh:
    sensitive: false
  bus:
    sensitive: false
这里面注意要把端点先开放出来,然后进行kafka的相关配置,其余服务的配置文件也进行这样的操作,使其能与消息总线通讯。
3、依次启动服务
当服务启动成功时,SpringBootActuator给我们提供一个/bus/refresh端点,同时我们可以在kafka主题里面找到相应的topics,其名字为springCloudBus:
4、访问Config-Server的/bus/refesh
我们先使用kafka的消费端来监听一下消息内容。运行:
./kafka-console-consumer.sh --bootstrap-server localhost:9092 --topic springCloudBus
紧接着我们在访问 http://localhost:8888/bus/refresh 刷新config-server的配置
然后我们可以发现消费端,订阅到如下消息:

其中:type为消息的事件类型
timestamp 为消息的时间戳
orginService:消息的来源服务实例
destinationService:消息的目标服务实例,**代表了总线上的所有服务实例
在本例子中,我们可以看到每个服务的ackId都来自于 type为RefreshRemoteApplicationEvent的服务ID
5、运行服务
我们先通过gradle的build任务进行打包会得到如下文件:xxxx.jar与xxx.jar.orginal
那么进入到对应目录下 启动两个服务并注册到注册中心 命令如下:
java -Dserver.port=8300 -Dspring.profiles.active=local -jar xxxx.jar
java -Dserver.port=8200 -Dspring.profiles.active=local -jar xxxx.jar
注意一定不要在application.yml配置如上参数,否则通过(-Dxxx=xxx)系统变量设置的值将不会生效
此时我们更改config对应的配置并commit后,在运行步骤4,就可以拿到最新的结果了,再次附上相关代码:
StudentConfig:
package com.hzgj.lyrk.order.config;

import org.springframework.boot.context.properties.ConfigurationProperties;
import org.springframework.context.annotation.Configuration;

@ConfigurationProperties(prefix = "student")
@Configuration
public class StudentConfig {

    private String name;

    private String age;

    public String getName() {
        return name;
    }

    public void setName(String name) {
        this.name = name;
    }

    public String getAge() {
        return age;
    }

    public void setAge(String age) {
        this.age = age;
    }

    @Override
    public String toString() {
        return "StudentConfig{" +
                "name=‘" + name + ‘\‘‘ +
                ", age=‘" + age + ‘\‘‘ +
                ‘}‘;
    }
}
order-server-local:
student:
  name: student_local
  age: 17