一、先使用idea创建一个maven项目。
二、引入jar包,修改pom.xml


    <dependencies>


        <dependency>
            <groupId>org.eclipse.jetty</groupId>
            <artifactId>jetty-server</artifactId>
            <version>${jettyVersion}</version>
        </dependency>

        <dependency>
            <groupId>org.eclipse.jetty</groupId>
            <artifactId>jetty-servlet</artifactId>
            <version>${jettyVersion}</version>
        </dependency>

        <dependency>
            <groupId>org.eclipse.jetty</groupId>
            <artifactId>jetty-webapp</artifactId>
            <version>${jettyVersion}</version>
        </dependency>

        <dependency>
            <groupId>org.glassfish.jersey.core</groupId>
            <artifactId>jersey-server</artifactId>
            <version>${jerseyVersion}</version>
        </dependency>

        <dependency>
            <groupId>org.glassfish.jersey.containers</groupId>
            <artifactId>jersey-container-servlet-core</artifactId>
            <version>${jerseyVersion}</version>
        </dependency>

        <dependency>
            <groupId>org.glassfish.jersey.containers</groupId>
            <artifactId>jersey-container-jetty-http</artifactId>
            <version>${jerseyVersion}</version>
        </dependency>

        <dependency>
            <groupId>net.sf.json-lib</groupId>
            <artifactId>json-lib</artifactId>
            <version>2.4</version>
            <classifier>jdk15</classifier>
        </dependency>

        <dependency>
            <groupId>junit</groupId>
            <artifactId>junit</artifactId>
            <version>4.11</version>
            <!-- 开发的时候引入,发布的时候不会加载此包 -->
            <scope>test</scope>
        </dependency>

        <!-- Spring -->
        <dependency>
            <groupId>org.springframework</groupId>
            <artifactId>spring-core</artifactId>
            <version>${spring.version}</version>
        </dependency>

        <dependency>
            <groupId>org.springframework</groupId>
            <artifactId>spring-web</artifactId>
            <version>${spring.version}</version>
        </dependency>

        <dependency>
            <groupId>org.springframework</groupId>
            <artifactId>spring-oxm</artifactId>
            <version>${spring.version}</version>
        </dependency>

        <dependency>
            <groupId>org.springframework</groupId>
            <artifactId>spring-tx</artifactId>
            <version>${spring.version}</version>
        </dependency>

        <dependency>
            <groupId>org.springframework</groupId>
            <artifactId>spring-jdbc</artifactId>
            <version>${spring.version}</version>
        </dependency>

        <dependency>
            <groupId>org.springframework</groupId>
            <artifactId>spring-aop</artifactId>
            <version>${spring.version}</version>
        </dependency>

        <dependency>
            <groupId>org.springframework</groupId>
            <artifactId>spring-context-support</artifactId>
            <version>${spring.version}</version>
        </dependency>

        <dependency>
            <groupId>org.springframework</groupId>
            <artifactId>spring-test</artifactId>
            <version>${spring.version}</version>
        </dependency>

        <dependency>
            <groupId>org.springframework</groupId>
            <artifactId>spring-orm</artifactId>
            <version>${spring.version}</version>
        </dependency>

        <!-- Spring-aop的两个依赖包aspectjrt&aspectjweaver -->
        <dependency>
            <groupId>org.aspectj</groupId>
            <artifactId>aspectjrt</artifactId>
            <version>1.8.10</version>
        </dependency>

        <dependency>
            <groupId>org.aspectj</groupId>
            <artifactId>aspectjweaver</artifactId>
            <version>1.8.10</version>
        </dependency>


        <!-- https://mvnrepository.com/artifact/org.mybatis/mybatis -->
        <dependency>
            <groupId>org.mybatis</groupId>
            <artifactId>mybatis</artifactId>
            <version>3.2.6</version>
        </dependency>

        <!-- 添加mybatis/spring整合包依赖 -->
        <dependency>
            <groupId>org.mybatis</groupId>
            <artifactId>mybatis-spring</artifactId>
            <version>1.3.0</version>
        </dependency>

        <!-- DataBase数据库连接 mysql包-->
        <dependency>
            <groupId>mysql</groupId>
            <artifactId>mysql-connector-java</artifactId>
            <version>6.0.3</version>
        </dependency>


        <!-- c3p0数据源 -->
        <dependency>
            <groupId>com.mchange</groupId>
            <artifactId>c3p0</artifactId>
            <version>0.9.5.2</version>
        </dependency>

        <!-- httpClient -->
        <dependency>
            <groupId>org.apache.httpcomponents</groupId>
            <artifactId>httpclient</artifactId>
            <version>4.5.3</version>
        </dependency>


        <!-- https://mvnrepository.com/artifact/javax.xml.bind/jaxb-api -->
        <dependency>
            <groupId>javax.xml.bind</groupId>
            <artifactId>jaxb-api</artifactId>
            <version>2.3.0</version>
        </dependency>


    </dependencies>
三、添加web模块,并修改web.xml
<?xml version="1.0" encoding="UTF-8"?>
<web-app xmlns="http://xmlns.jcp.org/xml/ns/javaee"
         xmlns:xsi="http://www.w3.org/2001/XMLSchema-instance"
         xsi:schemaLocation="http://xmlns.jcp.org/xml/ns/javaee http://xmlns.jcp.org/xml/ns/javaee/web-app_4_0.xsd"
         version="4.0">

    <!-- 指定Spring配置文件的位置 -->
    <context-param>
        <param-name>contextConfigLocation</param-name>
        <param-value>classpath:applicationContext.xml</param-value>
    </context-param>

    <!-- 配置Web应用启动时候加载Spring容器 -->
    <listener>
        <listener-class>org.springframework.web.context.ContextLoaderListener</listener-class>
    </listener>
</web-app>
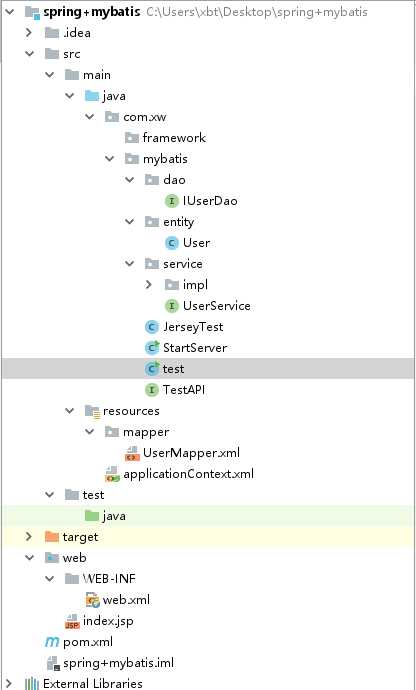
四、先看看我已经完成的项目结构:
五、建立实体类,Mybatis的Dao接口和mapper.xml
首先是实体类,我重载了一个空的构造方法和一个需要输入所有属性的构造方法:
public class User {

    private Integer id;
    private String email;
    private String password;
    private String username;

    public User(){

    }

    public User(Integer id, String email, String password, String username) {
        this.id = id;
        this.email = email;
        this.password = password;
        this.username = username;
    }

    public Integer getId() {
        return id;
    }

    public void setId(Integer id) {
        this.id = id;
    }

    public String getEmail() {
        return email;
    }

    public void setEmail(String email) {
        this.email = email == null ? null : email.trim();
    }

    public String getPassword() {
        return password;
    }

    public void setPassword(String password) {
        this.password = password == null ? null : password.trim();
    }

    public String getUsername() {
        return username;
    }

    public void setUsername(String username) {
        this.username = username == null ? null : username.trim();
    }
}
其次是IUserDao接口,这里简单的声明了普通的数据库操作方法:
public interface IUserDao {

    User login(User user);

    User selectByPrimaryKey(@Param("id")Integer id);

    int deleteByPrimaryKey(Integer id);

    int insert(User record);

    int insertSelective(User record);

    int updateByPrimaryKeySelective(User record);

    int updateByPrimaryKey(User record);
}
然后是UserMapper.xml,注意一下要与上面的方法名对应即可,
<?xml version="1.0" encoding="UTF-8" ?>
<!DOCTYPE mapper PUBLIC "-//mybatis.org//DTD Mapper 3.0//EN" "http://mybatis.org/dtd/mybatis-3-mapper.dtd" >
<mapper namespace="com.xw.mybatis.dao.IUserDao" >

  <resultMap id="BaseResultMap" type="com.xw.mybatis.entity.User" >
    <id column="id" property="id" jdbcType="INTEGER" />
    <result column="email" property="email" jdbcType="VARCHAR" />
    <result column="password" property="password" jdbcType="VARCHAR" />
    <result column="userName" property="username" jdbcType="VARCHAR" />
  </resultMap>


  <sql id="Base_Column_List" >
    id, email, password,userName
  </sql>

  <select id="login" resultMap="BaseResultMap" parameterType="com.xw.mybatis.entity.User">
    SELECT <include refid="Base_Column_List"/> FROM t_user WHERE userName = #{username,jdbcType=VARCHAR} and password = #{password,jdbcType=VARCHAR}

  </select>

  <select id="selectByPrimaryKey" resultMap="BaseResultMap">
    select
    <include refid="Base_Column_List" />
    from t_user
    where id = #{id,jdbcType=INTEGER}
  </select>

  <delete id="deleteByPrimaryKey" parameterType="java.lang.Integer" >
    delete from t_user
    where id = #{id,jdbcType=INTEGER}
  </delete>

  <insert id="insert" parameterType="com.xw.mybatis.entity.User" >
    insert into t_user (id, email, password,userName)
    values (#{id,jdbcType=INTEGER}, #{email,jdbcType=VARCHAR}, #{password,jdbcType=VARCHAR},#{username,jdbcType=VARCHAR})
  </insert>

  <insert id="insertSelective" parameterType="com.xw.mybatis.entity.User" >
    insert into t_user
    <trim prefix="(" suffix=")" suffixOverrides="," >
      <if test="id != null" >
        id,
      </if>
      <if test="email != null" >
        email,
      </if>
      <if test="password != null" >
        password,
      </if>
      <if test="username != null" >
        userName,
      </if>
    </trim>
    <trim prefix="values (" suffix=")" suffixOverrides="," >
      <if test="id != null" >
        #{id,jdbcType=INTEGER},
      </if>
      <if test="email != null" >
        #{email,jdbcType=VARCHAR},
      </if>
      <if test="password != null" >
        #{password,jdbcType=VARCHAR},
      </if>
      <if test="username != null" >
        #{username,jdbcType=VARCHAR},
      </if>
    </trim>
  </insert>

  <update id="updateByPrimaryKeySelective" parameterType="com.xw.mybatis.entity.User" >
    update t_user
    <set >
      <if test="email != null" >
        email = #{email,jdbcType=VARCHAR},
      </if>
      <if test="password != null" >
        password = #{password,jdbcType=VARCHAR},
      </if>
      <if test="username != null" >
        userName = #{username,jdbcType=VARCHAR},
      </if>
    </set>
    where id = #{id,jdbcType=INTEGER}
  </update>

  <update id="updateByPrimaryKey" parameterType="com.xw.mybatis.entity.User" >
    update t_user
    set email = #{email,jdbcType=VARCHAR},
      password = #{password,jdbcType=VARCHAR},
      userName = #{username,jdbcType=VARCHAR}
    where id = #{id,jdbcType=INTEGER}
  </update>

  <select id="selectByRange" resultMap="BaseResultMap">

    SELECT <include refid="Base_Column_List"/>
    FROM t_user
    WHERE id
    BETWEEN #{low,jdbcType=INTEGER}
    AND #{high,jdbcType=INTEGER}

  </select>

</mapper>
六、建立Service层
首先是UserService接口
public interface UserService {

  User login(User user);

  User getUserById(String id);

  void add(User user);

  void update(User user);

  List<User> findByRange(int low, int high);
}
然后是实现UserService接口的的IUserService类,这里就已经注入Dao层的类了:
@Service("userService")
public class IUserService implements UserService {

  @Autowired
  private IUserDao userDao;


  public User login(User user) {
    return userDao.login(user);
  }

  public User getUserById(String id) {
    return userDao.selectByPrimaryKey(Integer.parseInt(id));
  }

  public void add(User user) {
    userDao.insert(user);
  }

  public void update(User user) {}


  public List<User> findByRange(int low, int high) {
    return userDao.selectByRange(Integer.valueOf(low), Integer.valueOf(high));
  }

}
七、配置spring相关的xml
applicationContext.xml的配置如下
<?xml version="1.0" encoding="UTF-8"?>
<beans xmlns="http://www.springframework.org/schema/beans"
       xmlns:xsi="http://www.w3.org/2001/XMLSchema-instance"
       xmlns:task="http://www.springframework.org/schema/task"
       xmlns:tx="http://www.springframework.org/schema/tx"
       xmlns:aop="http://www.springframework.org/schema/aop"
       xmlns:context="http://www.springframework.org/schema/context"
       xsi:schemaLocation="http://www.springframework.org/schema/beans
       http://www.springframework.org/schema/beans/spring-beans.xsd
       http://www.springframework.org/schema/task
       http://www.springframework.org/schema/task/spring-task.xsd
       http://www.springframework.org/schema/tx
       http://www.springframework.org/schema/tx/spring-tx.xsd
       http://www.springframework.org/schema/aop
       http://www.springframework.org/schema/aop/spring-aop.xsd http://www.springframework.org/schema/context http://www.springframework.org/schema/context/spring-context.xsd">


    <bean id="springBeanUtil" class="com.xw.framework.utils.SpringBeanUtil"/>

    <context:component-scan base-package="com.xw.mybatis" />

    <bean id="dataSource" class="com.mchange.v2.c3p0.ComboPooledDataSource" destroy-method="close" >
    <property name="driverClass" value="com.mysql.cj.jdbc.Driver" />
    <property name="jdbcUrl" value="jdbc:mysql://192.168.121.128:3306/test?useSSL=false" />
    <property name="user" value="root" />
    <property name="password" value="Xx943217258!" />
    <property name="maxPoolSize" value="2000" />
    <property name="minPoolSize" value="20" />
    <property name="initialPoolSize" value="20" />
    <property name="maxIdleTime" value="2000" />
    </bean>

    <!-- mybatis和spring完美整合,不需要mybatis的配置映射文件 -->
    <bean id="sqlSessionFactory" class="org.mybatis.spring.SqlSessionFactoryBean">
        <property name="dataSource" ref="dataSource"/>
        <!-- 自动扫描mapping.xml文件 -->
        <property name="mapperLocations" value="classpath*:mapper/*.xml"></property>
    </bean>

    <!-- DAO接口所在包名,Spring会自动查找其下的类 -->
    <bean class="org.mybatis.spring.mapper.MapperScannerConfigurer">
    <property name="basePackage" value="com.xw.mybatis.dao"/>
    <property name="sqlSessionFactoryBeanName" value="sqlSessionFactory"></property>
</bean>


    <!-- (事务管理)transaction manager, use JtaTransactionManager for global tx -->
    <bean id="transactionManager" class="org.springframework.jdbc.datasource.DataSourceTransactionManager">
        <property name="dataSource" ref="dataSource"/>
    </bean>

    <!-- (事务管理)transaction manager, use JtaTransactionManager for global tx -->
    <tx:annotation-driven transaction-manager="transactionManager"/>


    <bean id ="test" class="com.xw.mybatis.test"/>

</beans>
八、测试数据库的类
首先是这个测试接口,
public interface TestAPI {

    User login(User user);

    User findById(String id);

    void Insert(User user);

    pageEntity<User> Paging(pageEntity<User> pageEntity);
}
然后是实现:
public class test implements TestAPI{

    @Autowired
    private UserService userService;

    public User login(User user){
        return userService.login(user);
    }


    public User findById(String id) {
        return userService.getUserById(id);
    }


    public void Insert(User user) {
        userService.add(user);
    }


    public static void main(String[] args){


        ApplicationContext context = new ClassPathXmlApplicationContext("/applicationContext.xml");
        TestAPI test =(TestAPI) context.getBean("test");

SpringBeanUtil.getContext().getBean("test");

        User user = new User(1,"xx.com","123456","xx");
        User user2 = test.findById("0");//根据id找数据
        User user3 = test.login(user);//验证数据是否存在
        System.out.println(user2.getUsername());
        System.out.println(user3.getUsername());


        for(int i = 1; i < 20; i++){
            User user = new User(i,"xx.com","123456","user"+i);
            test.Insert(user);
        }


    }
}
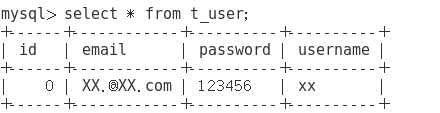
运行前的数据库是这样的:
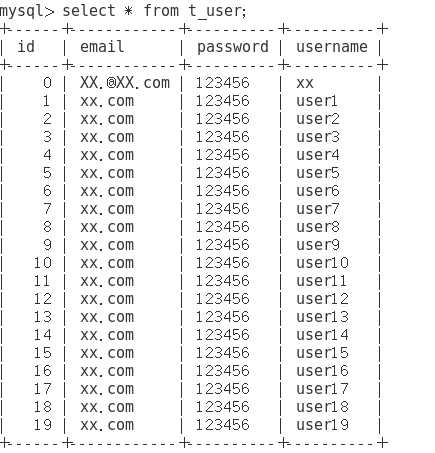
运行后:
十、创建响应页面的jersey类
JerseyTest类:
@Path("hello")
public class JerseyTest {

    @GET
    @Produces("text/plain")
    public String getString(){
        ApplicationContext context = new ClassPathXmlApplicationContext("/applicationContext.xml");
        TestAPI test =(TestAPI) context.getBean("test");
        StringBuffer s = new StringBuffer();
        s.append("username");
        s.append("  " + "email ");
        s.append("  " + "password");
        s.append("  " + "id");
        for (int i = 0; i < 10; i++){
            User user = test.findById(Integer.toString(i));
            s.append("\n" + user.getUsername());
            s.append("  " + user.getEmail());
            s.append("  " + user.getPassword());
            s.append("  " + user.getId());
        }
        return s.toString();
    }
}
九、启动jetty
创建StartServer类用于启动:
public class StartServer {

    public static void main(String[] args) {

        try{
            Server server =new Server(8088);
            ServletHolder sh = new ServletHolder(ServletContainer.class);

            sh.setInitParameter("com.sun.jersey.config.property.resourceConfigClass", "com.sun.jersey.api.core.PackagesResourceConfig");
            sh.setInitParameter("jersey.config.server.provider.classnames",JerseyTest.class.getCanonicalName());

            ServletContextHandler context = new ServletContextHandler(ServletContextHandler.SESSIONS);
            context.addServlet(sh, "/*");
            server.setHandler(context);

            server.start();
            server.join();

        }catch (Exception e){

        }
    }
}
十、结果
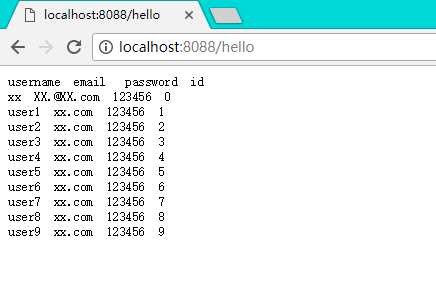
运行这个Server类,在浏览器中输入http://localhost:8088/hello
得到结果: