标签:put type click socket 模板引擎 正则表达 target 配置 read
对于所有的Web应用,本质上其实就是一个socket服务端,用户的浏览器其实就是一个socket客户端。
#!/usr/bin/env python
#coding:utf-8

import socket

def handle_request(client):
    buf = client.recv(1024)
    client.send("HTTP/1.1 200 OK\r\n\r\n")
    client.send("Hello, Seven")

def main():
    sock = socket.socket(socket.AF_INET, socket.SOCK_STREAM)
    sock.bind((‘localhost‘,8000))
    sock.listen(5)

    while True:
        connection, address = sock.accept()
        handle_request(connection)
        connection.close()

if __name__ == ‘__main__‘:
    main()
上述通过socket来实现了其本质,而对于真实开发中的python web程序来说,一般会分为两部分:服务器程序和应用程序。服务器程序负责对socket服务器进行封装,并在请求到来时,对请求的各种数据进行整理。应用程序则负责具体的逻辑处理。为了方便应用程序的开发,就出现了众多的Web框架,例如:Django、Flask、web.py 等。不同的框架有不同的开发方式,但是无论如何,开发出的应用程序都要和服务器程序配合,才能为用户提供服务。这样,服务器程序就需要为不同的框架提供不同的支持。这样混乱的局面无论对于服务器还是框架,都是不好的。对服务器来说,需要支持各种不同框架,对框架来说,只有支持它的服务器才能被开发出的应用使用。这时候,标准化就变得尤为重要。我们可以设立一个标准,只要服务器程序支持这个标准,框架也支持这个标准,那么他们就可以配合使用。一旦标准确定,双方各自实现。这样,服务器可以支持更多支持标准的框架,框架也可以使用更多支持标准的服务器。
WSGI(Web Server Gateway Interface)是一种规范,它定义了使用python编写的web app与web server之间接口格式,实现web app与web server间的解耦。
python标准库提供的独立WSGI服务器称为wsgiref。
from wsgiref.simple_server import make_server


def RunServer(environ, start_response):
    start_response(‘200 OK‘, [(‘Content-Type‘, ‘text/html‘)])
    return [bytes(‘<h1>Hello, web!</h1>‘, encoding=‘utf-8‘), ]


if __name__ == ‘__main__‘:
    httpd = make_server(‘‘, 8000, RunServer)
    print("Serving HTTP on port 8000...")
    httpd.serve_forever()
Python的WEB框架有Django、Tornado、Flask 等多种,Django相较与其他WEB框架其优势为:大而全,框架本身集成了ORM、模型绑定、模板引擎、缓存、Session等诸多功能。
一、安装Django
pip install django
二、创建Django工程
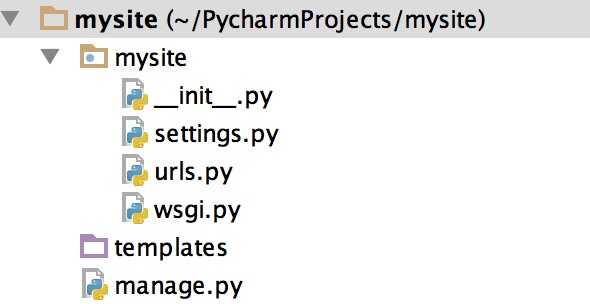
三、程序目录

mysite
- mysite # 对整个程序进行配置
- init
- settings # 配置文件
- url # URL对应关系
- wsgi # 遵循WSIG规范,uwsgi + nginx
- manage.py # 管理Django程序:
- python manage.py
- python manage.py startapp xx
- python manage.py makemigrations
- python manage.py migrate
-templates #放置网页内容
# 运行Django功能
python manage.py runserver 127.0.0.1:8000
四、创建app
# 创建app
python manage.py startapp cmdb
python manage.py startapp openstack
python manage.py startapp xxoo....

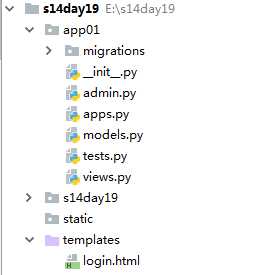
app:
migrations 数据修改表结构
admin Django为我们提供的后台管理
apps 配置当前app
models ORM,写指定的类 通过命令可以创建数据库结构
tests 单元测试
views 业务代码
五、工程前的默认配置
1.配置模板的路径
settings.py
MIDDLEWARE = [
    ‘django.middleware.security.SecurityMiddleware‘,
    ‘django.contrib.sessions.middleware.SessionMiddleware‘,
    ‘django.middleware.common.CommonMiddleware‘,
    # ‘django.middleware.csrf.CsrfViewMiddleware‘,
    ‘django.contrib.auth.middleware.AuthenticationMiddleware‘,
    ‘django.contrib.messages.middleware.MessageMiddleware‘,
    ‘django.middleware.clickjacking.XFrameOptionsMiddleware‘,
]

ROOT_URLCONF = ‘s14day19.urls‘

TEMPLATES = [
    {
        ‘BACKEND‘: ‘django.template.backends.django.DjangoTemplates‘,
        ‘DIRS‘: [os.path.join(BASE_DIR, ‘templates‘)]
        ,
        ‘APP_DIRS‘: True,
        ‘OPTIONS‘: {
            ‘context_processors‘: [
                ‘django.template.context_processors.debug‘,
                ‘django.template.context_processors.request‘,
                ‘django.contrib.auth.context_processors.auth‘,
                ‘django.contrib.messages.context_processors.messages‘,
            ],
        },
    },
]
2.配置静态目录
新建static目录
settings.py中添加
STATIC_URL = ‘/static/‘
STATICFILES_DIRS = (
    os.path.join(BASE_DIR,"static"),
)
下面就可以编写程序了
Django请求生命周期
-> URL对应关系(匹配) -> 视图函数 -> 返回用户字符串
-> URL对应关系(匹配) -> 视图函数 -> 打开一个HTML文件,读取内容
1.url
urls.py
from django.contrib import admin
from django.urls import path
from cmdb import views

urlpatterns = [
    path(‘admin/‘, admin.site.urls),
    path(‘login/‘, views.login),
    path(‘home/‘, views.home),

]
2.基于正则表达式的url
re_path(‘detail-(\d+).html‘, views.detail),
#一个函数对应多个页面
re_path(‘detail-(\d+)-(\d+).html‘, views.detail),
#nid ,uid  一定按照顺序
re_path(‘detail-(?P<nid>\d+)-(?P<uid>\d+).html‘, views.detail),
#绑定nid和uid

 1 # def detail(request,nid):
 2 #     return HttpResponse(nid)
 3 #     # n = request.GET.get("nid")
 4 #
 5 #     # info = USER_DICT[nid]
 6 #     # return render(request,"detail.html",{"info":info})
 7 # def detail(request, nid):
 8 #     info = USER_DICT[nid]
 9 #     return render(request,"detail.html",{"info":info})
10 def detail(request,nid,uid):
11     print(nid,uid)
12
13     return HttpResponse(nid)
14     # info = USER_DICT[nid]
15     # return render(request,"detail.html",{"info":info})

 1 <!DOCTYPE html>
 2 <html lang="en">
 3 <head>
 4     <meta charset="UTF-8">
 5     <title>Title</title>
 6 </head>
 7 <body>
 8     {{ user_dict.user }}
 9     <ul>
10         {% for k,row in user_dict.items %}
11             <li><a target="_blank" href="/detail-{{ k }}.html">{{ row.user }}</a></li>
12         {% endfor %}
13     </ul>
14     <!--
15     <ul>
16         {% for k,row in user_dict.items %}
17             <li><a target="_blank" href="/detail/?nid={{ k }}">{{ row.user }}</a></li>
18         {% endfor %}
19     </ul>
20     -->
21
22 </body>
23 </html>

 1 <!DOCTYPE html>
 2 <html lang="en">
 3 <head>
 4     <meta charset="UTF-8">
 5     <title>Title</title>
 6 </head>
 7 <body>
 8     <h1>详细信息</h1>
 9     <h3>用户名:{{ info.user }}</h3>
10     <h3>密码:{{ info.password }}</h3>
11     <h3>邮箱:{{ info.email }}</h3>
12
13 </body>
14 </html>
3.为路由映射设置名称
对URL路由关系进行命名, ***** 以后可以根据此名称生成自己想要的URL *****
urls.py
urlpatterns = [
    path(‘indfasfasdfdex/‘, views.index, name="index1"),
    re_path(‘ind/(\d+)/‘, views.index, name="index2"),
    re_path(‘ind/(\d+)/(\d+)/‘, views.index, name="index3"),
    re_path(‘ind/(?P<nid>\d+)/(?P<uid>\d+)/‘, views.index, name="index4"),
]
views.py
def func(request, *args, **kwargs):
	from django.urls import reverse

	url1 = reverse(‘index1‘)                                         # indefasfasdfdex/
	url2 = reverse(‘index3‘, args=(1,2,))                       # ind/1/2/
	url3 = reverse(‘index4‘, kwargs={‘pid‘: 1, "nid": 9})  #ind/1/9/
xxx.html
{% url "index1" %}                      # indfasfasdfdex/
{% url "index2" 1 2 %}                # ind/1/2/
{% url "index3" pid=1 nid=9 %}   # ind/1/9/
注:
# 当前的URL
request.path_info
4.路由分发-----多级路由
主目录下的urls.py
urlpatterns = [
    path(‘cmdb/‘,include("app01.urls")),
    path(‘monitor/‘,include("app02.urls"))

]
app01下添加urls.py
from django.urls import path,re_path
from app01 import views

urlpatterns = [

    path(‘index/‘, views.index),

]
app02下添加urls.py
from django.urls import path,re_path
from app02 import views

urlpatterns = [

    path(‘index/‘, views.index),

]
views.py
def func(request):
# 包含所有的请求数据
...
return HttpResponse(‘字符串‘)
return render(request, ‘index.html‘, {‘‘})
retrun redirect(‘URL‘)
from django.shortcuts import render
from django.shortcuts import HttpResponse
from django.shortcuts import redirect

USER_LIST=[
    {"username":"zhangsan","gender":"man","email":"abc@123.com"},
    {"username":"zhangsi","gender":"woman","email":"abc@123.com"},
    {"username":"zhangwu","gender":"man","email":"abc@123.com"},
]

def home(request):
    print(request.method)
    if request.method == "POST":
        user=request.POST.get("username")
        gen=request.POST.get("gender")
        ema=request.POST.get("email")
        temp = {"username":user,"gender":gen,"email":ema}
        USER_LIST.append(temp)
    return render(request,"home.html",{"user_list":USER_LIST})


def login(request):
    # f = open("templates/login.html","r",encoding="utf-8")
    # date = f.read()
    # f.close()

    error_msg = " "
    if request.method == "POST":
        user = request.POST.get("user",None)
        pwd = request.POST.get("pwd",None)

        if user=="root" and pwd=="123":
            return redirect("http://www.baidu.com")
        else:
            error_msg = "用户名密码错误"

    return render(request,"login.html",{"error_msg":error_msg})
获取多数据和文件上传

 1 <!DOCTYPE html>
 2 <html lang="en">
 3 <head>
 4     <meta charset="UTF-8">
 5     <title>Title</title>
 6 </head>
 7 <body>
 8     <form action="/login/" method="POST" enctype="multipart/form-data">
 9         <p>
10             <input type="text" name="user" placeholder="用户名" />
11         </p>
12         <p>
13             <input type="password" name="password" placeholder="密码" />
14         </p>
15         <p>
16             男:<input type="radio" name="gender" value="1"/>
17             女:<input type="radio" name="gender" value="2"/>
18         </p>
19         <p>
20             篮球:<input type="checkbox" name="faver" value="11" />
21             足球:<input type="checkbox" name="faver" value="22" />
22             排球:<input type="checkbox" name="faver" value="33" />
23         </p>
24         <p>
25             <select name="city" multiple>
26                 <option value="bj">北京</option>
27                 <option value="sh">上海</option>
28                 <option value="tj">天津</option>
29             </select>
30         </p>
31         <p>
32             <input type="file" name="filesss"/>
33         </p>
34         <p>
35             <input type="submit" value="提交" />
36         </p>
37     </form>
38 </body>
39 </html>

 1 from django.shortcuts import render,HttpResponse,redirect
 2
 3 # Create your views here.
 4
 5 def index(request):
 6     return HttpResponse("Welcome to Index!")
 7
 8 def login(request):
 9     ‘‘‘if request.method == "GET":
10         return render(request, "login.html")
11     elif request.method == "POST":
12         u= request.POST.get("user")
13         p= request.POST.get("password")
14
15         if u == "abc" and p == "123":
16             return redirect("/index/")
17         else:
18             return render(request,"login.html")
19     else:
20         return redirect("/index/")
21     ‘‘‘
22
23     if request.method == "GET":
24             return render(request, "login.html")
25     elif request.method == "POST":
26         # v = request.POST.get("gender")
27         # print(v)
28         # v = request.POST.getlist("faver")
29         # print(v)
30         # v = request.POST.getlist("city")
31         # print(v)
32
33         # 文件上传
34         obj =request.FILES.get("filesss")
35         import os
36         file_path = os.path.join("upload",obj.name)
37         f= open(file_path,mode="wb")
38         for i in obj.chunks():
39             f.write(i)
40         f.close()
41
42
43
44         return render(request, "login.html")
45     else:
46         return redirect("/index/")
FBV & CBV
url.py index ---> 函数名
views.py def 函数(request):................
FBV /index/ -> 函数名
CBV /index/ -> 类
from django.views import View
class Home(View):

    def get(self,request):
        print(request.method)
        return render(request,"home.html")

    def post(self,request):
        print(request.method,"post")
        return render(request, "home.html")
模板语言
return render(request, ‘index.html‘, {‘li‘: [11,22,33]})
{% for item in li %}
<h1>{{item}}</h1>
{% endfor %}
*********** 索引用点 **********
<h2> {{item.0 }} </h2>

 1 <!DOCTYPE html>
 2 <html lang="en">
 3 <head>
 4     <meta charset="UTF-8">
 5     <title>Title</title>
 6 </head>
 7 <body style="margin: 0">
 8     <div style="background-color: #eeeeee;height: 50px;"></div>
 9     <form action="/home/" method="post">
10         <p>
11             <input type="text" name="username" placeholder="用户名" />
12         </p>
13         <p>
14             <input type="text" name="gender" placeholder="性别" />
15         </p>
16         <p>
17             <input type="text" name="email" placeholder="邮箱" />
18         </p>
19         <p>
20             <input type="submit" value="提交" />
21         </p>
22     </form>
23     <div>
24         <table>
25             {% for row in user_list %}
26                 <tr>
27                     <td>{{ row.username }}</td>
28                     <td>{{ row.gender }}</td>
29                     <td>{{ row.email }}</td>
30                 </tr>
31             {% endfor %}
32         </table>
33     </div>
34 </body>
35 </html>

 1 <!DOCTYPE html>
 2 <html lang="en">
 3 <head>
 4     <meta charset="UTF-8">
 5     <title>Title</title>
 6     <link rel="stylesheet" href="/static/commons.css" />
 7     <style>
 8         label{
 9             width: 80px;
10             text-align: right;
11             display: inline-block;
12         }
13     </style>
14 </head>
15 <body>
16         <form action="/login/" method="post">
17         <p>
18             <label for="username">用户名:</label>
19             <input id="username" name="user" type="text" />
20         </p>
21         <p>
22             <label for="password">密码:</label>
23             <input id="password" name="pwd" type="text" />
24             <input type="submit" value="提交" />
25             <span style="color: red">{{ error_msg }}</span>
26         </p>
27     </form>
28     <script src="/static/jquery-1.12.4.js"></script>
29 </body>
30 </html>
*******************************To Be Continue************************************
Python自动化开发学习的第十一周----WEB框架--Django基础
标签:put type click socket 模板引擎 正则表达 target 配置 read
原文地址:https://www.cnblogs.com/garrett0220/p/8677260.html