标签:推荐 整合 控制 先来 not web应用 灰色 轻量 enc
框架:是能完成一定功能的半成品。
框架能够帮助我们完成的是:项目的整体框架、一些基础功能、规定了类和对象如何创建,如何协作等,当我们开发一个项目时,框架帮助我们完成了一部分功能,我们自己再完成一部分,那这个项目就完成了。
非侵入式设计:
从框架的角度可以理解为:无需继承框架提供的任何类
这样我们在更换框架时,之前写过的代码几乎可以继续使用。
轻量级和重量级:
轻量级是相对于重量级而言的,轻量级一般就是非入侵性的、所依赖的东西非常少、资源占用非常少、部署简单等等,其实就是比较容易使用,而重量级正好相反。
JavaBean:
即符合 JavaBean 规范的 Java 类
POJO:即 Plain Old Java Objects,简单老式 Java 对象
它可以包含业务逻辑或持久化逻辑,但不担当任何特殊角色且不继承或不实现任何其它Java框架的类或接口。
容器:
在日常生活中容器就是一种盛放东西的器具,从程序设计角度看就是装对象的的对象,因为存在放入、拿出等操作,所以容器还要管理对象的生命周期。
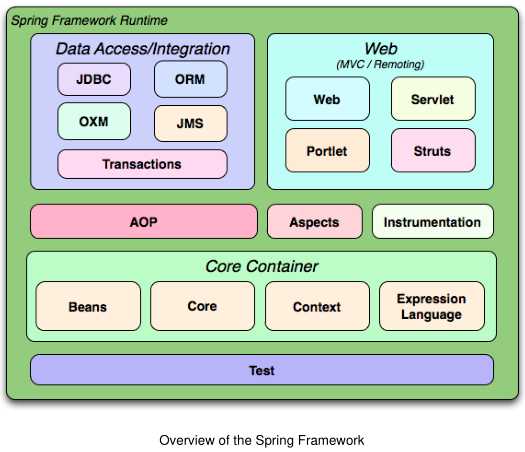
①.Spring 能帮我们根据配置文件创建及组装对象之间的依赖关系。
②.Spring 面向切面编程能帮助我们无耦合的实现日志记录,性能统计,安全控制。
③.Spring 能非常简单的帮我们管理数据库事务。
④.Spring 还提供了与第三方数据访问框架(如Hibernate、JPA)无缝集成,而且自己也提供了一套JDBC访问模板来方便数据库访问。
⑤.Spring 还提供与第三方Web(如Struts1/2、JSF)框架无缝集成,而且自己也提供了一套Spring MVC框架,来方便web层搭建。
⑥.Spring 能方便的与Java EE(如Java Mail、任务调度)整合,与更多技术整合(比如缓存框架)。
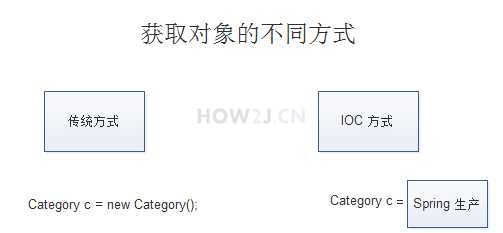
是一种设计思想,就是将原本在程序中手动创建对象的控制权,交由Spring框架来管理。
一个例子
在现实生活中,人们要用到一样东西的时候,第一反应就是去找到这件东西,比如想喝新鲜橙汁,在没有饮品店的日子里,最直观的做法就是:买果汁机、买橙子,然后准备开水。值得注意的是:这些都是你自己“主动”创造的过程,也就是说一杯橙汁需要你自己创造。

然而到了今时今日,由于饮品店的盛行,当我们想喝橙汁时,第一想法就转换成了找到饮品店的联系方式,通过电话等渠道描述你的需要、地址、联系方式等,下订单等待,过一会儿就会有人送来橙汁了。

请注意你并没有“主动”去创造橙汁,橙汁是由饮品店创造的,而不是你,然而也完全达到了你的要求,甚至比你创造的要好上那么一些。
(1) 新建一个空的 Java 项目,命名为【spring】
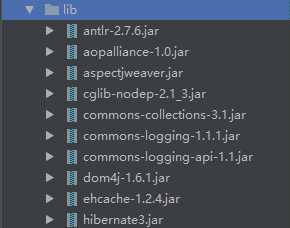
新建一个名为【lib】的目录,并添加进必要的 jar 包,导入项目
(2) 在 Packge【pojo】下新建一个【Source】类:
package pojo;

public class Source {
    private String fruit;   // 类型
    private String sugar;   // 糖分描述
    private String size;    // 大小杯
    /* setter and getter */
}
(3) 在 【src】 目录下新建一个 【applicationContext.xml】 文件,通过 xml 文件配置的方式装配我们的 bean
<?xml version="1.0" encoding="UTF-8"?>
<beans xmlns="http://www.springframework.org/schema/beans"
       xmlns:xsi="http://www.w3.org/2001/XMLSchema-instance"
       xsi:schemaLocation="http://www.springframework.org/schema/beans http://www.springframework.org/schema/beans/spring-beans.xsd">

    <bean name="source" class="pojo.Source">
        <property name="fruit" value="橙子"/>
        <property name="sugar" value="多糖"/>
        <property name="size" value="超大杯"/>
    </bean>
</beans>
(4) 在 Packge【test】下新建一个【TestSpring】类:
package test;

import org.junit.Test;
import org.springframework.context.ApplicationContext;
import org.springframework.context.support.ClassPathXmlApplicationContext;
import pojo.Source;

public class TestSpring {

    @Test
    public void test(){
        ApplicationContext context = new ClassPathXmlApplicationContext(
                new String[]{"applicationContext.xml"}
        );

        Source source = (Source) context.getBean("source");
        System.out.println(source.getFruit());
        System.out.println(source.getSugar());
        System.out.println(source.getSize());
    }
}
(5) 运行测试代码,可以正常拿到 xml 配置的 bean

总结:
传统的方式:
通过new 关键字主动创建一个对象
IOC方式:
对象的生命周期由Spring来管理,直接从Spring那里去获取一个对象。 IOC是反转控制 (Inversion Of Control)的缩写,就像控制权从本来在自己手里,交给了Spring。
指 Spring 创建对象的过程中,将对象依赖属性(简单值,集合,对象)通过配置设值给该对象
继续1.3.2 的例子
(1) 在 Packge【pojo】下新建一个【JuiceMaker】类:
package pojo;

public class JuiceMaker {

    // 唯一关联了一个 Source 对象
    private Source source = null;

    /* setter and getter */
    public String makeJuice(){
        String juice = "xxx用户点了一杯" + source.getFruit() + source.getSugar() + source.getSize();
        return juice;
    }
}
(2)在 xml 文件中配置 JuiceMaker 对象:
注意:这里要使用 ref 来注入另一个对象
<?xml version="1.0" encoding="UTF-8"?>
<beans xmlns="http://www.springframework.org/schema/beans"
       xmlns:xsi="http://www.w3.org/2001/XMLSchema-instance"
       xsi:schemaLocation="http://www.springframework.org/schema/beans http://www.springframework.org/schema/beans/spring-beans.xsd">

    <bean name="source" class="pojo.Source">
        <property name="fruit" value="橙子"/>
        <property name="sugar" value="多糖"/>
        <property name="size" value="超大杯"/>
    </bean>
    <bean name="juickMaker" class="pojo.JuiceMaker">
        <property name="source" ref="source" />
    </bean>
</beans>
(3)在 【TestSpring】 中添加如下代码:
package test;

import org.junit.Test;
import org.springframework.context.ApplicationContext;
import org.springframework.context.support.ClassPathXmlApplicationContext;
import pojo.JuiceMaker;
import pojo.Source;

public class TestSpring {

    @Test
    public void test(){
        ApplicationContext context = new ClassPathXmlApplicationContext(
                new String[]{"applicationContext.xml"}
        );

        Source source = (Source) context.getBean("source");
        System.out.println(source.getFruit());
        System.out.println(source.getSugar());
        System.out.println(source.getSize());

        JuiceMaker juiceMaker = (JuiceMaker) context.getBean("juickMaker");
        System.out.println(juiceMaker.makeJuice());
    }
}
(4)运行测试代码

总结:IoC 和 DI 其实是同一个概念的不同角度描述,DI 相对 IoC 而言,明确描述了“被注入对象依赖 IoC 容器配置依赖对象”
最后我们简单说说IoC是如何实现的。想象一下如果我们自己来实现这个依赖注入的功能,我们怎么来做? 无外乎:
我们发现其实自己来实现也不是很难,Spring实际也就是这么做的。这么看的话其实IoC就是一个工厂模式的升级版!当然要做一个成熟的IoC框架,还是非常多细致的工作要做,Spring不仅提供了一个已经成为业界标准的Java IoC框架,还提供了更多强大的功能,所以大家就别去造轮子啦!希望了解IoC更多实现细节不妨通过学习Spring的源码来加深理解!
如果说 IoC 是 Spring 的核心,那么面向切面编程就是 Spring 最为重要的功能之一了,在数据库事务中切面编程被广泛使用。AOP 即 Aspect Oriented Program 面向切面编程。
首先,在面向切面编程的思想里面,把功能分为核心业务功能,和周边功能。
周边功能在 Spring 的面向切面编程AOP思想里,即被定义为切面
在面向切面编程AOP的思想里面,核心业务功能和切面功能分别独立进行开发,然后把切面功能和核心业务功能 "编织" 在一起,这就叫AOP。
AOP能够将那些与业务无关,却为业务模块所共同调用的逻辑或责任(例如事务处理、日志管理、权限控制等)封装起来,便于减少系统的重复代码,降低模块间的耦合度,并有利于未来的可拓展性和可维护性。
(1)在 Packge【service】下创建 【ProductService】类:
package service;

public class ProductService {
    public void doSomeService(){
        System.out.println("doSomeService");
    }
}
(2)在 xml 文件中装配该 bean:
<bean name="productService" class="service.ProductService" />
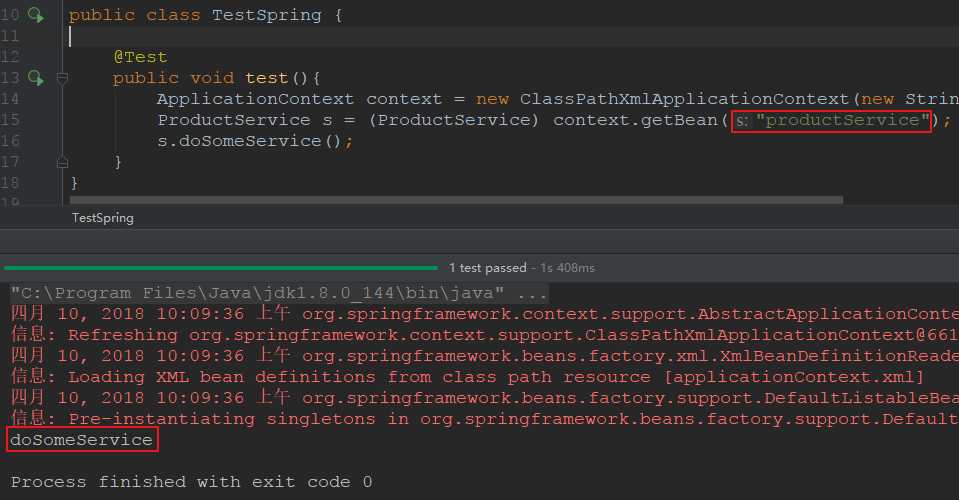
(3)在【TestSpring】中编写测试代码,运行:
(4)在 Packge【aspect】下准备日志切面 【LoggerAspect】类:
package aspect;

import org.aspectj.lang.ProceedingJoinPoint;

public class LoggerAspect {

    public Object log(ProceedingJoinPoint joinPoint) throws Throwable {
        System.out.println("start log:" + joinPoint.getSignature().getName());
        Object object = joinPoint.proceed();
        System.out.println("end log:" + joinPoint.getSignature().getName());
        return object;
    }
}
(5)在 xml 文件中声明业务对象和日志切面:
<?xml version="1.0" encoding="UTF-8"?>
<beans xmlns="http://www.springframework.org/schema/beans"
       xmlns:xsi="http://www.w3.org/2001/XMLSchema-instance"
       xmlns:aop="http://www.springframework.org/schema/aop"
       xmlns:tx="http://www.springframework.org/schema/tx"
       xmlns:context="http://www.springframework.org/schema/context"
       xsi:schemaLocation="
   http://www.springframework.org/schema/beans
   http://www.springframework.org/schema/beans/spring-beans-3.0.xsd
   http://www.springframework.org/schema/aop
   http://www.springframework.org/schema/aop/spring-aop-3.0.xsd
   http://www.springframework.org/schema/tx
   http://www.springframework.org/schema/tx/spring-tx-3.0.xsd
   http://www.springframework.org/schema/context
   http://www.springframework.org/schema/context/spring-context-3.0.xsd">

    <bean name="productService" class="service.ProductService" />
    <bean id="loggerAspect" class="aspect.LoggerAspect"/>

    <!-- 配置AOP -->
    <aop:config>
        <!-- where:在哪些地方(包.类.方法)做增加 -->
        <aop:pointcut id="loggerCutpoint"
                      expression="execution(* service.ProductService.*(..)) "/>

        <!-- what:做什么增强 -->
        <aop:aspect id="logAspect" ref="loggerAspect">
            <!-- when:在什么时机(方法前/后/前后) -->
            <aop:around pointcut-ref="loggerCutpoint" method="log"/>
        </aop:aspect>
    </aop:config>
</beans>
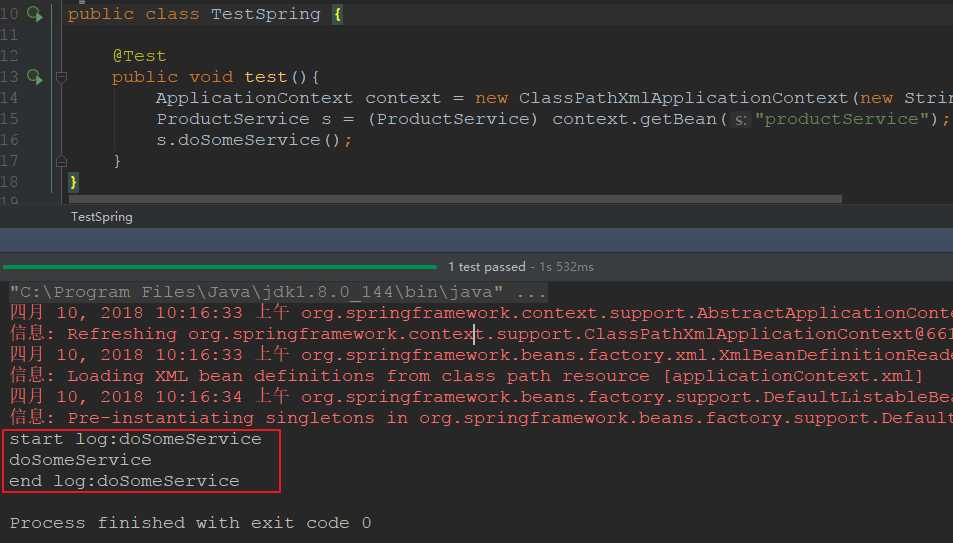
(6)再次运行 TestSpring 中的测试代码,代码并没有改变,但是在业务方法运行之前和运行之后,都分别输出了日志信息:
我们再来描述一下控制反转的概念:
控制反转是一种通过描述(在 Java 中可以是 XML 或者注解)并通过第三方(Spring)去产生或获取特定对象的方式。
主动创建的模式中,责任归于开发者,而在被动的模式下,责任归于 IoC 容器,基于这样的被动形式,我们就说对象被控制反转了。(也可以说是反转了控制)。
Spring IoC 容器的设计主要是基于以下两个接口:
其中 ApplicationContext 是 BeanFactory 的子接口之一,换句话说:BeanFactory 是 Spring IoC 容器所定义的最底层接口,而 ApplicationContext 是其最高级接口之一,并对 BeanFactory 功能做了许多的扩展,所以在绝大部分的工作场景下,都会使用 ApplicationContext 作为 Spring IoC 容器。

从上图中我们可以几乎看到, BeanFactory 位于设计的最底层,它提供了 Spring IoC 最底层的设计,为此,我们先来看看该类中提供了哪些方法:
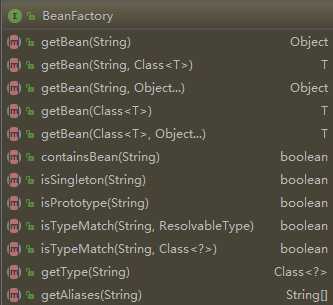
由于这个接口的重要性,所以有必要在这里作一下简短的说明:
bean = (Bean) factory.getBean(Bean.class);bean = (Bean) factory.getBean("beanName");bean = (Bean) factory.getBean("beanName", Bean.class);这就是 Spring IoC 最底层的设计,所有关于 Spring IoC 的容器将会遵守它所定义的方法。
根据 ApplicationContext 的类继承关系图,可以看到 ApplicationContext 接口扩展了许许多多的接口,因此它的功能十分强大,所以在实际应用中常常会使用到的是 ApplicationContext 接口,因为 BeanFactory 的方法和功能较少,而 ApplicationContext 的方法和功能较多。
通过1.3.2 Ioc的例子,我们来认识一个 ApplicationContext 的子类——ClassPathXmlApplicationContext。
(1)先在【src】目录下创建一个 【bean.xml】 文件:
<?xml version="1.0" encoding="UTF-8"?>
<beans xmlns="http://www.springframework.org/schema/beans"
       xmlns:xsi="http://www.w3.org/2001/XMLSchema-instance"
       xsi:schemaLocation="http://www.springframework.org/schema/beans http://www.springframework.org/schema/beans/spring-beans.xsd">
    <!-- 通过 xml 方式装配 bean -->
    <bean name="source" class="pojo.Source">
        <property name="fruit" value="橙子"/>
        <property name="sugar" value="多糖"/>
        <property name="size" value="超大杯"/>
    </bean>
</beans>
(2)这里定义了一个 bean ,这样 Spring IoC 容器在初始化的时候就能找到它们,然后使用 ClassPathXmlApplicationContext 容器就可以将其初始化:
ApplicationContext context = new ClassPathXmlApplicationContext("bean.xml");
Source source = (Source) context.getBean("source", Source.class);

System.out.println(source.getFruit());
System.out.println(source.getSugar());
System.out.println(source.getSize());
这样就会使用 Application 的实现类 ClassPathXmlApplicationContext 去初始化 Spring IoC 容器,然后开发者就可以通过 IoC 容器来获取资源了啦!
1.ClassPathXmlApplicationContext:
读取classpath中的资源
ApplicationContext ctx = new ClassPathXmlApplicationContext("applicationContext.xml");2:FileSystemXmlApplicationContext:-
读取指定路径的资源
ApplicationContext ac = new FileSystemXmlApplicationContext("c:/applicationContext.xml");3.XmlWebApplicationContext:
需要在Web的环境下才可以运行
XmlWebApplicationContext ac = new XmlWebApplicationContext(); // 这时并没有初始化容器
ac.setServletContext(servletContext); // 需要指定ServletContext对象
ac.setConfigLocation("/WEB-INF/applicationContext.xml"); // 指定配置文件路径,开头的斜线表示Web应用的根目录
ac.refresh(); // 初始化容器
虽然 Spring IoC 容器的生成十分的复杂,但是大体了解一下 Spring IoC 初始化的过程还是必要的。这对于理解 Spring 的一系列行为是很有帮助的。
注意:Bean 的定义和初始化在 Spring IoC 容器是两大步骤,它是先定义,然后初始化和依赖注入的。
做完了以上 3 步,Bean 就在 Spring IoC 容器中被定义了,而没有被初始化,更没有完成依赖注入,也就是没有注入其配置的资源给 Bean,那么它还不能完全使用。
对于初始化和依赖注入,Spring Bean 还有一个配置选项——【lazy-init】,其含义就是是否初始化 Spring Bean。在没有任何配置的情况下,它的默认值为 default,实际值为 false,也就是 Spring IoC 默认会自动初始化 Bean。如果将其设置为 true,那么只有当我们使用 Spring IoC 容器的 getBean 方法获取它时,它才会进行 Bean 的初始化,完成依赖注入。
最后我们简单说说IoC是如何实现的。想象一下如果我们自己来实现这个依赖注入的功能,我们怎么来做? 无外乎:
我们发现其实自己来实现也不是很难,Spring实际也就是这么做的。这么看的话其实IoC就是一个工厂模式的升级版!当然要做一个成熟的IoC框架,还是非常多细致的工作要做,Spring不仅提供了一个已经成为业界标准的Java IoC框架,还提供了更多强大的功能,所以大家就别去造轮子啦!希望了解IoC更多实现细节不妨通过学习Spring的源码来加深理解!
前面已经介绍了 Spring IoC 的理念和设计,这一篇文章将介绍的是如何将自己开发的 Bean 装配到 Spring IoC 容器中。
大部分场景下,我们都会使用 ApplicationContext 的具体实现类,因为对应的 Spring IoC 容器功能相对强大。
而在 Spring 中提供了 3 种方法进行配置:
1.4 Spring AOP 简介 中已经对AOP有个初步的了解了。下面再对AOP进行一下简要的回顾。
如果说 IoC 是 Spring 的核心,那么面向切面编程就是 Spring 最为重要的功能之一了,在数据库事务中切面编程被广泛使用。AOP 即 Aspect Oriented Program 面向切面编程。
AOP能够将那些与业务无关,却为业务模块所共同调用的逻辑或责任(例如事务处理、日志管理、权限控制等)封装起来,便于减少系统的重复代码,降低模块间的耦合度,并有利于未来的可拓展性和可维护性。
为了更好的说明 AOP 的概念,我们来举一个实际中的例子来说明。
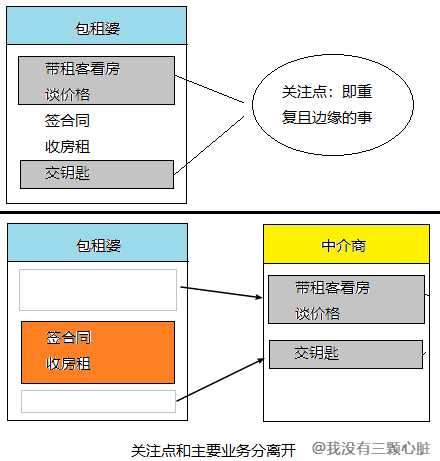
在上面的例子中,包租婆的核心业务就是签合同,收房租,那么这就够了,灰色框起来的部分都是重复且边缘的事,交给中介商就好了,这就是 AOP 的一个思想:让关注点代码与业务代码分离!
我们来实际的用代码感受一下
(1)在 Package【pojo】下新建一个【Landlord】类(我百度翻译的包租婆的英文):
package pojo;

import org.springframework.stereotype.Component;

@Component("landlord")
public class Landlord {

    public void service() {
        // 仅仅只是实现了核心的业务功能
        System.out.println("签合同");
        System.out.println("收房租");
    }
}
(2)在 Package【aspect】下新建一个中介商【Broker】类(我还是用的翻译...):
package aspect;

import org.aspectj.lang.annotation.After;
import org.aspectj.lang.annotation.Aspect;
import org.aspectj.lang.annotation.Before;
import org.springframework.stereotype.Component;

@Component
@Aspect
class Broker {

    @Before("execution(* pojo.Landlord.service())")
    public void before(){
        System.out.println("带租客看房");
        System.out.println("谈价格");
    }

    @After("execution(* pojo.Landlord.service())")
    public void after(){
        System.out.println("交钥匙");
    }
(3)在 applicationContext.xml 中配置自动注入,并告诉 Spring IoC 容器去哪里扫描这两个 Bean
<?xml version="1.0" encoding="UTF-8"?>
<beans xmlns="http://www.springframework.org/schema/beans"
       xmlns:xsi="http://www.w3.org/2001/XMLSchema-instance"
       xmlns:context="http://www.springframework.org/schema/context"
       xmlns:aop="http://www.springframework.org/schema/aop"
       xsi:schemaLocation="http://www.springframework.org/schema/beans
       http://www.springframework.org/schema/beans/spring-beans.xsd http://www.springframework.org/schema/context http://www.springframework.org/schema/context/spring-context.xsd http://www.springframework.org/schema/aop http://www.springframework.org/schema/aop/spring-aop.xsd">

    <context:component-scan base-package="aspect" />
    <context:component-scan base-package="pojo" />

    <aop:aspectj-autoproxy/>
</beans>
(4)在 Package【test】下编写测试代码
package test;

import org.springframework.context.ApplicationContext;
import org.springframework.context.support.ClassPathXmlApplicationContext;
import pojo.Landlord;

public class TestSpring {

    public static void main(String[] args) {

        ApplicationContext context =
                new ClassPathXmlApplicationContext("applicationContext.xml");
        Landlord landlord = (Landlord) context.getBean("landlord", Landlord.class);
        landlord.service();

    }
(5).执行看到效果
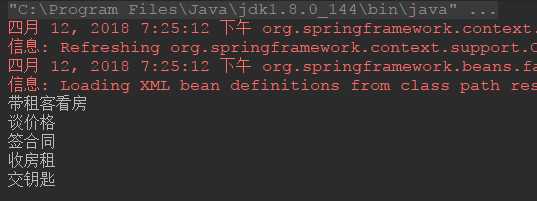
这个例子使用了一些注解,现在看不懂没有关系,但我们可以从上面可以看到,我们在 Landlord 的 service() 方法中仅仅实现了核心的业务代码,其余的关注点功能是根据我们设置的切面自动补全的。
使用注解的方式已经逐渐成为了主流,所以我们利用上面的例子来说明如何用注解来开发 Spring AOP。
Spring 是方法级别的 AOP 框架,我们主要也是以某个类额某个方法作为连接点,另一种说法就是:选择哪一个类的哪一方法用以增强功能。
    ....
    public void service() {
        // 仅仅只是实现了核心的业务功能
        System.out.println("签合同");
        System.out.println("收房租");
    }
    ....
我们在这里就选择上述 Landlord 类中的 service() 方法作为连接点。
选择好了连接点就可以创建切面了,我们可以把切面理解为一个拦截器,当程序运行到连接点的时候,被拦截下来,在开头加入了初始化的方法,在结尾也加入了销毁的方法而已,在 Spring 中只要使用 @Aspect 注解一个类,那么 Spring IoC 容器就会认为这是一个切面了:
package aspect;

import org.aspectj.lang.annotation.After;
import org.aspectj.lang.annotation.Aspect;
import org.aspectj.lang.annotation.Before;
import org.springframework.stereotype.Component;

@Component
@Aspect
class Broker {

    @Before("execution(* pojo.Landlord.service())")
    public void before(){
        System.out.println("带租客看房");
        System.out.println("谈价格");
    }

    @After("execution(* pojo.Landlord.service())")
    public void after(){
        System.out.println("交钥匙");
    }
}
注意: 被定义为切面的类仍然是一个 Bean ,需要 @Component 注解标注
代码部分中在方法上面的注解看名字也能猜出个大概,下面来列举一下 Spring 中的 AspectJ 注解:
| 注解 | 说明 |
|---|---|
@Before |
前置通知,在连接点方法前调用 |
@Around |
环绕通知,它将覆盖原有方法,但是允许你通过反射调用原有方法,后面会讲 |
@After |
后置通知,在连接点方法后调用 |
@AfterReturning |
返回通知,在连接点方法执行并正常返回后调用,要求连接点方法在执行过程中没有发生异常 |
@AfterThrowing |
异常通知,当连接点方法异常时调用 |
有了上表,我们就知道 before() 方法是连接点方法调用前调用的方法,而 after() 方法则相反,这些注解中间使用了定义切点的正则式,也就是告诉 Spring AOP 需要拦截什么对象的什么方法,下面讲到。
在上面的注解中定义了 execution 的正则表达式,Spring 通过这个正则表达式判断具体要拦截的是哪一个类的哪一个方法:
execution(* pojo.Landlord.service())依次对这个表达式作出分析:
* :代表任意返回类型的方法通过上面的表达式,Spring 就会知道应该拦截 pojo.Lnadlord 类下的 service() 方法。上面的演示类还好,如果多出都需要写这样的表达式难免会有些复杂,我们可以通过使用 @Pointcut 注解来定义一个切点来避免这样的麻烦:
package aspect;

import org.aspectj.lang.annotation.After;
import org.aspectj.lang.annotation.Aspect;
import org.aspectj.lang.annotation.Before;
import org.aspectj.lang.annotation.Pointcut;
import org.springframework.stereotype.Component;

@Component
@Aspect
class Broker {

    @Pointcut("execution(* pojo.Landlord.service())")
    public void lService() {
    }

    @Before("lService()")
    public void before() {
        System.out.println("带租客看房");
        System.out.println("谈价格");
    }

    @After("lService()")
    public void after() {
        System.out.println("交钥匙");
    }
}
...
我们来探讨一下环绕通知,这是 Spring AOP 中最强大的通知,因为它集成了前置通知和后置通知,它保留了连接点原有的方法的功能,所以它及强大又灵活,让我们来看看:
package aspect;

import org.aspectj.lang.ProceedingJoinPoint;
import org.aspectj.lang.annotation.Around;
import org.aspectj.lang.annotation.Aspect;
import org.springframework.stereotype.Component;

@Component
@Aspect
class Broker {

//  注释掉之前的 @Before 和 @After 注解以及对应的方法
//  @Before("execution(* pojo.Landlord.service())")
//  public void before() {
//      System.out.println("带租客看房");
//      System.out.println("谈价格");
//  }
//
//  @After("execution(* pojo.Landlord.service())")
//  public void after() {
//      System.out.println("交钥匙");
//  }

    //  使用 @Around 注解来同时完成前置和后置通知
    @Around("execution(* pojo.Landlord.service())")
    public void around(ProceedingJoinPoint joinPoint) {
        System.out.println("带租客看房");
        System.out.println("谈价格");

        try {
            joinPoint.proceed();
        } catch (Throwable throwable) {
            throwable.printStackTrace();
        }

        System.out.println("交钥匙");
    }
}
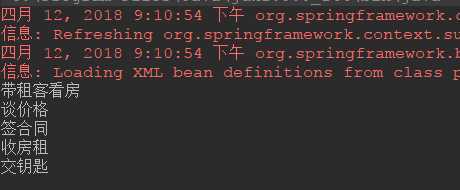
运行测试代码,结果仍然正确:
注解是很强大的东西,但基于 XML 的开发我们仍然需要了解,我们先来了解一下 AOP 中可以配置的元素:
| AOP 配置元素 | 用途 | 备注 |
|---|---|---|
aop:advisor |
定义 AOP 的通知其 | 一种很古老的方式,很少使用 |
aop:aspect |
定义一个切面 | —— |
aop:before |
定义前置通知 | —— |
aop:after |
定义后置通知 | —— |
aop:around |
定义环绕通知 | —— |
aop:after-returning |
定义返回通知 | —— |
aop:after-throwing |
定义异常通知 | —— |
aop:config |
顶层的 AOP 配置元素 | AOP 的配置是以它为开始的 |
aop:declare-parents |
给通知引入新的额外接口,增强功能 | —— |
aop:pointcut |
定义切点 | —— |
有了之前通过注解来编写的经验,并且有了上面的表,我们将上面的例子改写成 XML 配置很容易(去掉所有的注解):
<!-- 装配 Bean-->
<bean name="landlord" class="pojo.Landlord"/>
<bean id="broker" class="aspect.Broker"/>

<!-- 配置AOP -->
<aop:config>
    <!-- where:在哪些地方(包.类.方法)做增加 -->
    <aop:pointcut id="landlordPoint"
                  expression="execution(* pojo.Landlord.service())"/>
    <!-- what:做什么增强 -->
    <aop:aspect id="logAspect" ref="broker">
        <!-- when:在什么时机(方法前/后/前后) -->
        <aop:around pointcut-ref="landlordPoint" method="around"/>
    </aop:aspect>
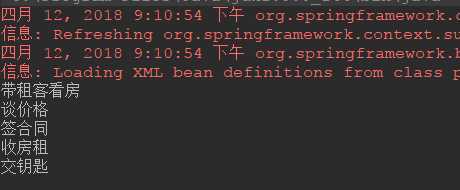
运行测试程序,看到正确结果:
扩展阅读:Spring【AOP模块】就这么简单 、 关于 Spring AOP(AspectJ)你该知晓的一切(慎独读,有些深度...)
参考文章
Java EE 互联网轻量级框架整合开发
《Java 实战(第四版)》
标签:推荐 整合 控制 先来 not web应用 灰色 轻量 enc
原文地址:https://www.cnblogs.com/arxive/p/8836070.html