标签:检查 [] ping artifact tap 4.0 选择 代码生成 需要
SpringBoot入门Demo
SpringBoot可以说是Spring的简化版。配置简单、使用方便。主要有以下几种特点:
(1)创建maven项目,构建java项目(注意:这里为java项目,也能通过内嵌的tomcat启动服务,访问controller指定路径返回的数据)
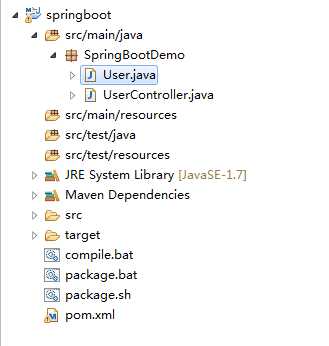
项目目录结构如下:
(需要编写的只有三个文件:User.java UserController.java pom.xml)

(2)User.java内容如下:(User.java主要是用于controller类请求方法中需要使用到User实体类)
package SpringBootDemo;

public class User {

    private int id;
    private String username;
    private String password;

    public User(){}

    public int getId() {
        return id;
    }

    public void setId(int id) {
        this.id = id;
    }

    public String getUsername() {
        return username;
    }

    public void setUsername(String username) {
        this.username = username;
    }

    public String getPassword() {
        return password;
    }

    public void setPassword(String password) {
        this.password = password;
    }

    public String toString(){
        return "user=[id:"+id+",username:"+username+",password:"+password+"]";
    }
}
(3)UserController类内容如下:(UserController相当于spring的controller类,但是必须使用@RestController注解标识)
@EnableAutoConfiguration :自动配置 这个注解应该放在SpringBoot项目的启动类的上面 (含有main方法,并且调用了SpringApplication.run(类.class);方法)
@SpringBootApplication : 标明这是SpringBoot的启动类
package SpringBootDemo;

import org.springframework.boot.SpringApplication;
import org.springframework.boot.autoconfigure.EnableAutoConfiguration;
import org.springframework.boot.autoconfigure.SpringBootApplication;
import org.springframework.web.bind.annotation.RequestMapping;
import org.springframework.web.bind.annotation.RestController;

/**
 * controller类
 * @author Administrator
 *
 */
@RestController
@EnableAutoConfiguration
@SpringBootApplication
public class UserController {

    @RequestMapping("/login")
    public User login(){
        User user= new User();
        user.setId(123);
        user.setUsername("qwe");
        user.setPassword("456");
        return user;
    }

    @RequestMapping("/print")
    public String print1(){
        return "HELLO WORLD";
    }

  //这是springBoot的启动入口方法,也可以去新建一个类 ,在类里面调用SpringApplication.run(UserController.class);
    public static void main(String[] args){
        SpringApplication.run(UserController.class);
    }
}
(4)pom.xml文件的配置如下:里面需要添加springBoot的包依赖
<project xmlns="http://maven.apache.org/POM/4.0.0" xmlns:xsi="http://www.w3.org/2001/XMLSchema-instance"
  xsi:schemaLocation="http://maven.apache.org/POM/4.0.0 http://maven.apache.org/xsd/maven-4.0.0.xsd">
  <modelVersion>4.0.0</modelVersion>

    <groupId>springboot.maven</groupId>
    <artifactId>springboot</artifactId>
    <version>0.0.1-SNAPSHOT</version>
    <packaging>jar</packaging>
    <name>springboot</name>
    <url>http://maven.apache.org</url>

    <build>
        <finalName>springboot</finalName>
        <plugins>
            <plugin>
                <inherited>true</inherited>
                <groupId>org.apache.maven.plugins</groupId>
                <artifactId>maven-compiler-plugin</artifactId>
                <version>3.1</version>
                <configuration>
                    <source>${compiler.source}</source>
                    <target>${compiler.target}</target>
                    <encoding>${project.build.sourceEncoding}</encoding>
                </configuration>
            </plugin>

            <plugin>
                <groupId>org.springframework.boot</groupId>
                <artifactId>spring-boot-maven-plugin</artifactId>
                <version>1.5.1.RELEASE</version>

            </plugin>

        </plugins>
    </build>
    <properties>
        <project.build.sourceEncoding>UTF-8</project.build.sourceEncoding>
        <compiler.source>1.7</compiler.source>
        <compiler.target>1.7</compiler.target>
        <junit.version>4.12</junit.version>
    </properties>

    <parent>
        <groupId>org.springframework.boot</groupId>
        <artifactId>spring-boot-starter-parent</artifactId>
        <version>1.5.1.RELEASE</version>
    </parent>

    <dependencies>
        <dependency>
            <groupId>junit</groupId>
            <artifactId>junit</artifactId>
            <version>${junit.version}</version>
            <scope>test</scope>
        </dependency>

        <dependency>
            <groupId>org.springframework.boot</groupId>
            <artifactId>spring-boot-starter-web</artifactId>
        </dependency>
    </dependencies>
</project>
<project xmlns="http://maven.apache.org/POM/4.0.0" xmlns:xsi="http://www.w3.org/2001/XMLSchema-instance"
  xsi:schemaLocation="http://maven.apache.org/POM/4.0.0 http://maven.apache.org/xsd/maven-4.0.0.xsd">
  <modelVersion>4.0.0</modelVersion>

    <groupId>springboot.maven</groupId>
    <artifactId>springboot</artifactId>
    <version>0.0.1-SNAPSHOT</version>
    <packaging>jar</packaging>
    <name>springboot</name>
    <url>http://maven.apache.org</url>

    <build>
        <finalName>springboot</finalName>
        <plugins>
            <plugin>
                <inherited>true</inherited>
                <groupId>org.apache.maven.plugins</groupId>
                <artifactId>maven-compiler-plugin</artifactId>
                <version>3.1</version>
                <configuration>
                    <source>${compiler.source}</source>
                    <target>${compiler.target}</target>
                    <encoding>${project.build.sourceEncoding}</encoding>
                </configuration>
            </plugin>

            <plugin>
                <groupId>org.springframework.boot</groupId>
                <artifactId>spring-boot-maven-plugin</artifactId>
                <version>1.5.1.RELEASE</version>

            </plugin>

        </plugins>
    </build>
    <properties>
        <project.build.sourceEncoding>UTF-8</project.build.sourceEncoding>
        <compiler.source>1.7</compiler.source>
        <compiler.target>1.7</compiler.target>
        <junit.version>4.12</junit.version>
    </properties>

    <parent>
        <groupId>org.springframework.boot</groupId>
        <artifactId>spring-boot-starter-parent</artifactId>
        <version>1.5.1.RELEASE</version>
    </parent>

    <dependencies>
        <dependency>
            <groupId>junit</groupId>
            <artifactId>junit</artifactId>
            <version>${junit.version}</version>
            <scope>test</scope>
        </dependency>

        <dependency>
            <groupId>org.springframework.boot</groupId>
            <artifactId>spring-boot-starter-web</artifactId>
        </dependency>
    </dependencies>
</project>
(5)启动项目。
进入 UserController类中,右击 --》选择 Run As --》 Java Application
启动成功后,会出现如图结果:

出现了 Started UserController。。。 这句话,标识启动成功,然后就可以去浏览器访问了
(6)访问项目
由于没有编写配置文件,所有以访问SpringBoot项目,默认是省略项目名的,直接使用 http://ip:port/RequestMapping对应的路径
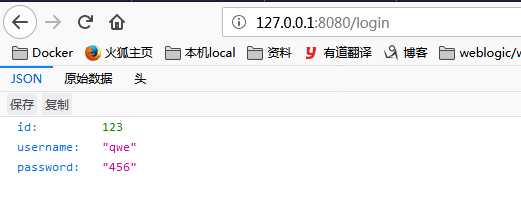
例如本例: http://127.0.0.1:8080/login
就会出现如下结果,如图所示:

标签:检查 [] ping artifact tap 4.0 选择 代码生成 需要
原文地址:https://www.cnblogs.com/DFX339/p/8857890.html