标签:imp 第一步 abs auto 开发 访问 tran path query
创建数据库boscrm
执行脚本:
脚本内容:

/*
Navicat MySQL Data Transfer

Source Server         : root
Source Server Version : 50022
Source Host           : localhost:3306
Source Database       : crm

Target Server Type    : MYSQL
Target Server Version : 50022
File Encoding         : 65001

Date: 2015-04-19 17:46:45
*/

SET FOREIGN_KEY_CHECKS=0;

-- ----------------------------
-- Table structure for `t_customer`
-- ----------------------------
DROP TABLE IF EXISTS `t_customer`;
CREATE TABLE `t_customer` (
  `id` int(11) NOT NULL auto_increment,
  `name` varchar(255) default NULL,
  `station` varchar(255) default NULL,
  `telephone` varchar(255) default NULL,
  `address` varchar(255) default NULL,
  `decidedzone_id` varchar(255) default NULL,
  PRIMARY KEY  (`id`)
) ENGINE=InnoDB DEFAULT CHARSET=utf8;

-- ----------------------------
-- Records of t_customer
-- ----------------------------
INSERT INTO `t_customer` VALUES (‘1‘, ‘张三‘, ‘百度‘, ‘13811111111‘, ‘北京市西城区长安街100号‘, null);
INSERT INTO `t_customer` VALUES (‘2‘, ‘李四‘, ‘哇哈哈‘, ‘13822222222‘, ‘上海市虹桥区南京路250号‘, null);
INSERT INTO `t_customer` VALUES (‘3‘, ‘王五‘, ‘搜狗‘, ‘13533333333‘, ‘天津市河北区中山路30号‘, null);
INSERT INTO `t_customer` VALUES (‘4‘, ‘赵六‘, ‘联想‘, ‘18633333333‘, ‘石家庄市桥西区和平路10号‘, null);
INSERT INTO `t_customer` VALUES (‘5‘, ‘小白‘, ‘测试空间‘, ‘18511111111‘, ‘内蒙古自治区呼和浩特市和平路100号‘, null);
INSERT INTO `t_customer` VALUES (‘6‘, ‘小黑‘, ‘联想‘, ‘13722222222‘, ‘天津市南开区红旗路20号‘, null);
INSERT INTO `t_customer` VALUES (‘7‘, ‘小花‘, ‘百度‘, ‘13733333333‘, ‘北京市东城区王府井大街20号‘, null);
INSERT INTO `t_customer` VALUES (‘8‘, ‘小李‘, ‘长城‘, ‘13788888888‘, ‘北京市昌平区建材城西路100号‘, null);

<?xml version="1.0" encoding="UTF-8"?>
<web-app xmlns:xsi="http://www.w3.org/2001/XMLSchema-instance" xmlns="http://java.sun.com/xml/ns/javaee" xsi:schemaLocation="http://java.sun.com/xml/ns/javaee http://java.sun.com/xml/ns/javaee/web-app_2_5.xsd" id="WebApp_ID" version="2.5">
  <display-name>bos-crm</display-name>

  <!-- 配置文件位置的配置  -->
  <context-param>
    <param-name>contextConfigLocation</param-name>
    <param-value>classpath:cxf.xml</param-value>
  </context-param>

  <!-- 配置spring容器随web项目的启动而启动 -->
  <listener>
      <listener-class>org.springframework.web.context.ContextLoaderListener</listener-class>
  </listener>


  <!-- 配置 CXF 框架提供的 Servlet -->
  <!-- 配置了spring容器监听之后,这里就不需要在配置初始化参数告诉配置文件位置 -->
  <servlet>
      <servlet-name>cxf</servlet-name>
      <servlet-class>org.apache.cxf.transport.servlet.CXFServlet</servlet-class>
  </servlet>
  <servlet-mapping>
      <servlet-name>cxf</servlet-name>
      <url-pattern>/service/*</url-pattern>
  </servlet-mapping>


  <welcome-file-list>
    <welcome-file>index.html</welcome-file>
    <welcome-file>index.htm</welcome-file>
    <welcome-file>index.jsp</welcome-file>
    <welcome-file>default.html</welcome-file>
    <welcome-file>default.htm</welcome-file>
    <welcome-file>default.jsp</welcome-file>
  </welcome-file-list>
</web-app>
针对 t_customer 表创建一个 Customer 客户实体类

package com.test.entity;

public class Customer {

    private Integer id;
    private String name;
    private String station;
    private String telephone;
    private String address;
    private String decidedzone_id;


    public Customer() {

    }

    public Customer(Integer id, String name, String station, String telephone, String address, String decidedzone_id) {
        this.id = id;
        this.name = name;
        this.station = station;
        this.telephone = telephone;
        this.address = address;
        this.decidedzone_id = decidedzone_id;
    }

    public Integer getId() {
        return id;
    }

    public void setId(Integer id) {
        this.id = id;
    }

    public String getName() {
        return name;
    }

    public void setName(String name) {
        this.name = name;
    }

    public String getStation() {
        return station;
    }

    public void setStation(String station) {
        this.station = station;
    }

    public String getTelephone() {
        return telephone;
    }

    public void setTelephone(String telephone) {
        this.telephone = telephone;
    }

    public String getAddress() {
        return address;
    }

    public void setAddress(String address) {
        this.address = address;
    }

    public String getDecidedzone_id() {
        return decidedzone_id;
    }

    public void setDecidedzone_id(String decidedzone_id) {
        this.decidedzone_id = decidedzone_id;
    }
}
decidedzone_id:逻辑外键。 两张表在不同的库里面。
t_customer表在boscrm库中,decidedzone在bos库中
package com.test.service;

import java.util.List;

import javax.jws.WebService;

import com.test.entity.Customer;

@WebService
public interface ICustomerService {

    public abstract List<Customer> findAll();
}
package com.test.service;

import java.sql.ResultSet;
import java.sql.SQLException;
import java.util.List;

import org.springframework.jdbc.core.JdbcTemplate;
import org.springframework.jdbc.core.RowMapper;
import org.springframework.transaction.annotation.Transactional;

import com.test.entity.Customer;

@Transactional
public class CustomerServiceImpl implements ICustomerService {

    private JdbcTemplate jdbcTemplate;
    public void setJdbcTemplate(JdbcTemplate jdbcTemplate){
        this.jdbcTemplate = jdbcTemplate;
    }
    @Override
    public List<Customer> findAll() {
        String sql = "select * from t_customer";
        List<Customer> list = jdbcTemplate.query(sql, new RowMapper<Customer>(){

            @Override
            public Customer mapRow(ResultSet rs, int arg1) throws SQLException {
                Integer id = rs.getInt("id"); //根据字段名称从结果集中获取对应的值
                String name = rs.getString("name");
                String station = rs.getString("station");
                String telephone = rs.getString("telephone");
                String address = rs.getString("address");
                String decidedzone_id = rs.getString("decidedzone_id");
                return new Customer(id, name, station, telephone, address, decidedzone_id);
            }
        });
        return list;
    }

}
Spring 注解和配置文件可以混合使用。
<?xml version="1.0" encoding="UTF-8"?>
<beans xmlns="http://www.springframework.org/schema/beans"
xmlns:xsi="http://www.w3.org/2001/XMLSchema-instance"
xmlns:jaxws="http://cxf.apache.org/jaxws"
xmlns:soap="http://cxf.apache.org/bindings/soap"
xmlns:context="http://www.springframework.org/schema/context"
xmlns:aop="http://www.springframework.org/schema/aop"
xmlns:tx="http://www.springframework.org/schema/tx"
xsi:schemaLocation="http://www.springframework.org/schema/beans
                    http://www.springframework.org/schema/beans/spring-beans.xsd
                    http://cxf.apache.org/bindings/soap
                    http://cxf.apache.org/schemas/configuration/soap.xsd
                    http://cxf.apache.org/jaxws
                    http://cxf.apache.org/schemas/jaxws.xsd
                    http://www.springframework.org/schema/context
                    http://www.springframework.org/schema/context/spring-context.xsd
                    http://www.springframework.org/schema/aop
                    http://www.springframework.org/schema/aop/spring-aop.xsd
                    http://www.springframework.org/schema/tx
                    http://www.springframework.org/schema/tx/spring-tx.xsd
                    ">
    <!-- 引入CXF Bean定义如下,早期的版本中使用 -->
    <import resource="classpath:META-INF/cxf/cxf.xml" />
    <import resource="classpath:META-INF/cxf/cxf-extension-soap.xml" />
    <import resource="classpath:META-INF/cxf/cxf-servlet.xml" />

    <!-- 配置数据源 -->
    <bean id="dataSource" class="org.springframework.jdbc.datasource.DriverManagerDataSource">
        <property name="driverClassName" value="com.mysql.jdbc.Driver"/>
        <property name="url" value="jdbc:mysql:///boscrm"/>
        <property name="username" value="root"/>
        <property name="password" value="root"/>
    </bean>

    <!-- 事务管理器 -->
    <bean id="transactionManager" class="org.springframework.jdbc.datasource.DataSourceTransactionManager">
        <property name="dataSource" ref="dataSource"/>
    </bean>

    <!-- 支持事务注解 -->
    <tx:annotation-driven transaction-manager="transactionManager"/>

    <bean name="jdbcTemplate" class="org.springframework.jdbc.core.JdbcTemplate">
        <property name="dataSource" ref="dataSource"/>
    </bean>

    <bean name="customerService" class="com.test.service.CustomerServiceImpl">
        <property name="jdbcTemplate" ref="jdbcTemplate"/>
    </bean>

    <!-- 注册服务 -->
    <jaxws:server id="myService" address="/customer">
        <jaxws:serviceBean>
            <ref bean="customerService"/>
        </jaxws:serviceBean>
    </jaxws:server>
</beans>
发布项目到tomcat,因为配置spring监听器,所以有问题,启动的时候就会报错。
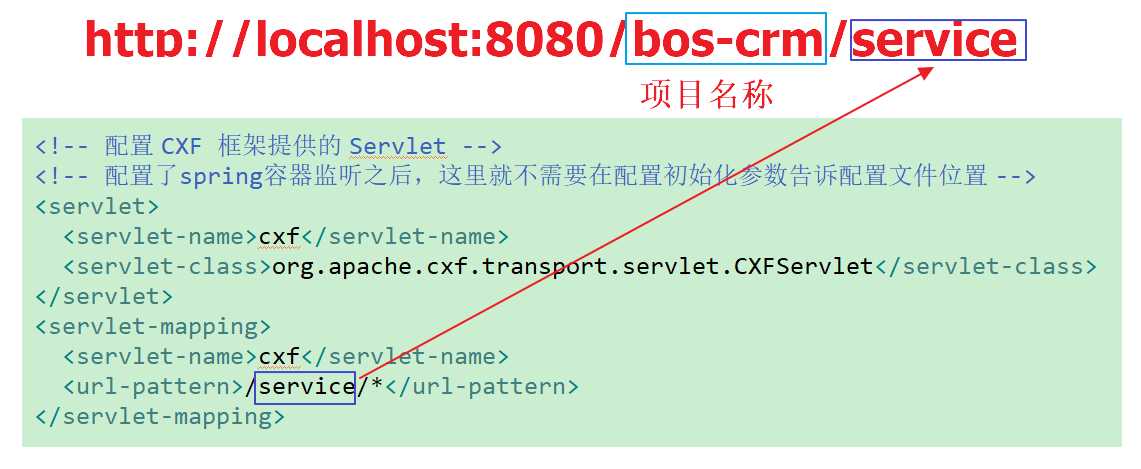
启动项目之后,在浏览器输入下面的地址即可访问:http://localhost:8080/bos-crm/service

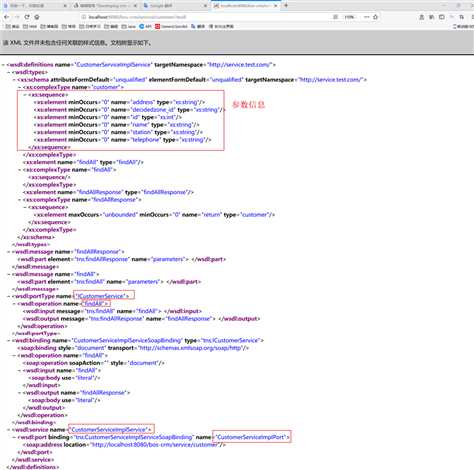
结果如下:点击就可以查看到wsdl文档

wsdl文档完整版如下:

Developing crm service based on apache cxf
标签:imp 第一步 abs auto 开发 访问 tran path query
原文地址:https://www.cnblogs.com/jepson6669/p/8886580.html