标签:例子 creates sign settings ast 打卡 apt-get edit 访问
基本是翻译官方教程

django-admin startproject mysite
创建工程的命令
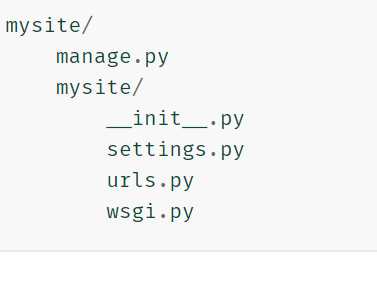
来看一下django的结构图
manage.py 和工程交互的多种方式
inner mysilte 是需要import的包
init.py是定义这里是py 的package
settings.py 设置
urls.py 声明?
wsgi.py Web Server Gateway Interface
python manger.py migrate 大概是配置吧
然后就是
python manage.py runserver 但是不行(估计是设置的问题)
然后
python manage.py runserver 0.0.0.0:8000
就可以访问了
web app 可以再在python path的任意位置
在这里我们创建在manage.py的同级目录下
创建
$ python manage.py startapp polls
编辑views.py文件
from django.http import HttpResponse
def index(request):
return HttpResponse("Hello, world. You‘re at the polls index.")
建立了最简单的views之后,需要将它映射到URL 中
在同一目录下建立
urls.py
编辑
from django.conf.urls import url

from . import views

urlpatterns = [
    url(r‘^$‘, views.index, name=‘index‘),
]
然后在全局的url中指向polls.urls
mysite/urls.py
from django.conf.urls import include, url
from django.contrib import admin

urlpatterns = [
    url(r‘^polls/‘, include(‘polls.urls‘)),
    url(r‘^admin/‘, admin.site.urls),
]
注意^符号,因为include 函数不吃$
使用include 可以将URL放在各个位置没有必要放在一块
值得一提的是唯一的例外是
admin.site.urls
我们是用的url函数建立联系的将
view.py 映射到URL上去
url函数:
参数:
regex 字符串
用于匹配的字符串
view
如果匹配到了regex就会调用这个指定的view function
用httpRequest作为第一个参数,和被匹配到的字符作为其他参数
If the regex uses simple captures, values are passed as positional arguments; if it uses named captures, values are passed as keyword arguments. We’ll give an example of this in a bit.
看不懂,不过后面会有例子
argument:kwargs
在字典里面的,tutoril里面不介绍
name
一个字符串
为URL指定一个无歧义的名字,这样可以再全局上对URL patterns做修改
配置数据库
以前安装了mysql
现在在安装了
安装mysqlclient 时报错 OSError: mysql_config not found
原因是没有安装:libmysqlclient-dev
sudo apt-get install libmysqlclient-dev
找到mysql_config文件的路径
sudo updatedb
locate mysql_config
mysql_config的位置为:/usr/bin/mysql_config
没有按照http://blog.163.com/zhu329599788@126/blog/static/6669335020161260025544/ 的源码包安装
只是直接Pip安装了
配置文件 setting.py
主要是Database的部分要加上一些参数
我又作死去改了mysql的端口,从默认的3306改成6666
主要是 /etc/mysql/my/cnf 里面的两处port设置
然后再运行 service mysql start 就可以了
运行服务器的时候要先
python manage.py migration
然后在setting.py 中添加了installed_app 中 “polls”
python manage.py migration其实就是将setting.py中的配置生效的过程
然后修改polls 下的models.py大概是 数据库模型的意思吧
from django.db import models
class Question(models.Model):
question_text = models.CharField(max_length=200)
pub_date = models.DateTimeField(‘date published‘)
class Choice(models.Model):
question = models.ForeignKey(Question, on_delete=models.CASCADE)
choice_text = models.CharField(max_length=200)
votes = models.IntegerField(default=0)
每一个class 都是django.db.models.Model 的子类
称为 model
每一个model 下的variables(models 下的Field子类) 对应着数据库中的一项
You’ll use this value in your Python code, and your database will use it as the column name.
每一个model 对应着数据库中的一个table
但是要想他们生效必须先
python manage.py makemigrations
再
python manage.py migrate
每一个 Field 类型的变量可以指定名字,
有些则需要参数,比如CharField 需要一个 maxlength
这个参数还将用于validation 中
Field 还可以有默认值
我们是用ForeignKey 定义了一个关系
每一个Choic 都被联系到一个Question上了
Django支持数据库的多种链接方式
多对多,一对一,多对一
在Django中app是独立的,每一个app可以被多个projetc使用
在Django中 INSTALLED_APPS 中最好不要直接写上“polls”
可以写上
"polls.apps.PollsConfig"
这样是吧polls的配置文件转移到了polls内,非常方便
在apps.py内有一个PollsConig类
有一个name 的方法返回polls
作用和上诉的东西应该是一样的
python manage.py makemigrations polls
By running makemigrations, you’re telling Django that you’ve made some changes to your models (in this case, you’ve made new ones) and that you’d like the changes to be stored as a migration.
makemigrations 只是做出了改变
这个文件生成在
polls/migrations/0001_initial.py.
这个文件可以手工编辑
Migrations are how Django stores changes to your models (and thus your database schema) - they’re just files on disk. You can read the migration for your new model if you like; it’s the file polls/migrations/0001_initial.py. Don’t worry, you’re not expected to read them every time Django makes one, but they’re designed to be human-editable in case you want to manually tweak how Django changes things.
There’s a command that will run the migrations for you and manage your database schema automatically - that’s called migrate, and we’ll come to it in a moment - but first, let’s see what SQL that migration would run. The sqlmigrate command takes migration names and returns their SQL:
python manage.py sqlmigrate polls 0001
这个命令可以展示migrate的细节
转化成了sql 语言来操作数据库
转化的结果由具体使用的数据库而定(我猜engine 就是做这个事情的)
Table 的名字由 app的名字和 model的名字混合而成
primary keys(id )是被自动添加上去的(可以手动修改)
惯例,django添加_id 对应 Forenognkey file name 上取(可以重写)
database-specific filed 取决于你的数据库
It’s tailored to the database you’re using, so database-specific field types such as auto_increment (MySQL), serial (PostgreSQL), or integer primary key autoincrement (SQLite) are handled for you automatically. Same goes for the quoting of field names – e.g., using double quotes or single quotes.
The sqlmigrate 并不真的去做migrate只是输出一下sql语句让你心里有个数
命令python manage.py check
是检查工程中有没有不问题(不实际的做 migrate 或 database)
更改数据库文件的三步骤
Change your models (in models.py).
Run python manage.py makemigrations to create migrations for those changes
Run python manage.py migrate to apply those changes to the database.
之所以要这么设计是为了,让多人开发变得方便
Read the django-admin documentation for full information on what the manage.py utility can do.
python manage.py
不简单的调用python,
因为manage.py 设置了
DJANGO_SETTINGS_MODULE 环境变量。
可以得到 sfsite/setings.py文件的路径
如果不想这么做也可以
只需要设计环境变量
DJANGO_SETTINGS_MODULE environment variable to mysite.settings
必须在同一级下的manage.py
因为要让import sfsite 有效
进入shell后就可以操作了
···
import django
django.setup()
q = Question(question_text="What‘s new?", pub_date=timezone.now())
q.save()
q.id
1
q.question_text
"What‘s new?"
q.pub_date
datetime.datetime(2012, 2, 26, 13, 0, 0, 775217, tzinfo=
q.question_text = "What‘s up?"
q.save()
Question.objects.all()
<QuerySet [
重新打卡shell
利用django提供的api对数据库进行操作
Question.objects.all() 查看所有
Question.objects.filter(id=1) 过滤
Question.objects.filter(question_text__startswith=‘What‘)
注意这个表示法,方法用__两个下划线表示
>>> from django.utils import timezone
>>> current_year = timezone.now().year
>>> Question.objects.get(pub_date__year=current_year)
<Question: What‘s up?>

# Request an ID that doesn‘t exist, this will raise an exception.
>>> Question.objects.get(id=2)
Traceback (most recent call last):
    ...
DoesNotExist: Question matching query does not exist.

# Lookup by a primary key is the most common case, so Django provides a
# shortcut for primary-key exact lookups.
# The following is identical to Question.objects.get(id=1).
>>> Question.objects.get(pk=1)
<Question: What‘s up?>

# Make sure our custom method worked.
>>> q = Question.objects.get(pk=1)
>>> q.was_published_recently()
True

# Give the Question a couple of Choices. The create call constructs a new
# Choice object, does the INSERT statement, adds the choice to the set
# of available choices and returns the new Choice object. Django creates
# a set to hold the "other side" of a ForeignKey relation
# (e.g. a question‘s choice) which can be accessed via the API.
>>> q = Question.objects.get(pk=1)

# Display any choices from the related object set -- none so far.
>>> q.choice_set.all()
<QuerySet []>

# Create three choices.
>>> q.choice_set.create(choice_text=‘Not much‘, votes=0)
<Choice: Not much>
>>> q.choice_set.create(choice_text=‘The sky‘, votes=0)
<Choice: The sky>
>>> c = q.choice_set.create(choice_text=‘Just hacking again‘, votes=0)

# Choice objects have API access to their related Question objects.
>>> c.question
<Question: What‘s up?>

# And vice versa: Question objects get access to Choice objects.
>>> q.choice_set.all()
<QuerySet [<Choice: Not much>, <Choice: The sky>, <Choice: Just hacking again>]>
>>> q.choice_set.count()
3

# The API automatically follows relationships as far as you need.
# Use double underscores to separate relationships.
# This works as many levels deep as you want; there‘s no limit.
# Find all Choices for any question whose pub_date is in this year
# (reusing the ‘current_year‘ variable we created above).
>>> Choice.objects.filter(question__pub_date__year=current_year)
<QuerySet [<Choice: Not much>, <Choice: The sky>, <Choice: Just hacking again>]>

# Let‘s delete one of the choices. Use delete() for that.
>>> c = q.choice_set.filter(choice_text__startswith=‘Just hacking‘)
>>> c.delete()
这样就可以对数据库进行操作
本质上是对models.py 里面的类的映射
标签:例子 creates sign settings ast 打卡 apt-get edit 访问
原文地址:https://www.cnblogs.com/sfzyk/p/7528857.html