标签:python call 文件夹 exe 相对 1.0 append 定义 book
准备工作
首先,需要在Microsoft的主页(https://azure.microsoft.com/zh-cn/)注册一个账号,然后进入门户去创建新资源,选择AI+Cognitive Services中的人脸API,填写相关信息就可以了。

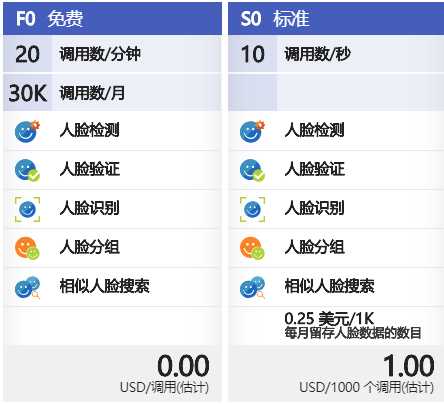
微软Azure的免费API是限制每分钟的访问量与月访问量的,其他功能倒是没什么区别。但是之前创建这个订阅是不需要绑定信用卡就可以获取API Key和API Secret的,后来再创建的时候发现必须要绑定Visa信用卡才可以了(?)

总之到这里,我们拿到了API Key,API Secret和URL。
然后准备好本地待识别情绪的图片/相片。
代码
介绍下所使用的第三方库
——httplib是一个相对底层的http请求模块
——urllib是接受URL请求的相关模块
——json (Emmmmmm……我也不知道该怎么解释这个)
——xlwt是对excel进行写入操作的一个库
——time是对时间进行处理的一个库,以下代码中其实就使用了sleep()和localtime()两个函数,sleep()是用来让程序暂停几秒的,localtime()是格式化时间戳为本地的时间
——os是操作系统的相关功能的一个库,例如用来处理文件和目录之类的
  1 # coding:utf-8
  2 # version:python2.7.6
  3 # author:Ivy Wong
  4
  5 # 导入相关模块
  6 import httplib, urllib, json
  7 import xlwt, time, os
  8
  9
 10
 11
 12 # 使用micrsoft的api识别情绪
 13 def useapi(img):
 14     # 定义html的header,这里Content-type决定了body中的类型,是URL还是文件类型的,这里的Json支持URL模式
 15     headers = {
 16         ‘Content-Type‘: ‘application/octet-stream‘,
 17         ‘Ocp-Apim-Subscription-Key‘: subscription_key,
 18     }
 19
 20     # 定义返回的内容,包括FaceId,年龄、性别等等
 21     params = urllib.urlencode({
 22         ‘returnFaceId‘: ‘true‘,
 23         ‘returnFaceLandmarks‘: ‘false‘,
 24         ‘returnFaceAttributes‘: ‘age,gender,smile,glasses,emotion‘,
 25     })
 26
 27     # Call Face API,进行人脸识别
 28     try:
 29         # Execute the REST API call and get the response.
 30         conn = httplib.HTTPSConnection(‘api.cognitive.azure.cn‘)
 31         conn.request("POST", "/face/v1.0/detect?%s" % params, img, headers)
 32         response = conn.getresponse()
 33         data = response.read()
 34
 35         # ‘data‘ contains the JSON data. The following formats the JSON data for display.
 36         parsed = json.loads(data)
 37         conn.close()
 38
 39     except Exception as e:
 40         print("[Errno {0}] {1}".format(e.errno, e.strerror))
 41
 42     return parsed
 43
 44
 45 # 将json字典写入excel
 46 # 变量用来循环时控制写入单元格,感觉这种方式有点傻,但暂时想不到优化方法
 47 def writeexcel(img, worksheet, row, files_name, path,file_num):
 48     parsed = useapi(img)
 49     if not parsed:
 50         print ‘This picture do not have any face‘
 51     elif ‘error‘ in parsed:
 52         print parsed[‘error‘][‘message‘]
 53         # 如果是达到每分钟的限制,就先暂停一分钟
 54         if parsed[‘error‘][‘message‘]==‘Rate limit is exceeded. Try again later.‘:
 55             print ‘The file number is ‘ + str(file_num)
 56             print ‘The program will be asleep for 60s‘
 57             time.sleep(60)
 58             print ‘Now, the program go back to work!‘
 59             writeexcel(img,worksheet,row,files_name,path,file_num)
 60     else:
 61         for list_item in parsed:
 62             # 写入文件名
 63             filename, extension=os.path.splitext(files_name)
 64             worksheet.write(row, 0, filename)
 65
 66             # 写入时间戳
 67             daystamp, timestamp, hourstamp = gettimestamp(path)
 68             worksheet.write(row, 1, label=daystamp)
 69             worksheet.write(row, 2, label=timestamp)
 70             worksheet.write(row,3,hourstamp)
 71
 72             # 写入api返回的数据
 73             emotion = []
 74             for key1, value1 in list_item.items():
 75                 if key1 == ‘faceAttributes‘:
 76                     for key2, value2 in value1.items():
 77                         if key2 == ‘age‘:
 78                             worksheet.write(row, 5, value2)
 79                         elif key2 == ‘emotion‘:
 80                             for key3, value3 in value2.items():
 81                                 if key3 == ‘anger‘:
 82                                     worksheet.write(row, 8, value3)
 83                                     emotion.append(value3)
 84                                 elif key3 == ‘contempt‘:
 85                                     worksheet.write(row, 9, value3)
 86                                     emotion.append(value3)
 87                                 elif key3 == ‘disgust‘:
 88                                     worksheet.write(row, 10, value3)
 89                                     emotion.append(value3)
 90                                 elif key3 == ‘fear‘:
 91                                     worksheet.write(row, 11, value3)
 92                                     emotion.append(value3)
 93                                 elif key3 == ‘happiness‘:
 94                                     worksheet.write(row, 12, value3)
 95                                     emotion.append(value3)
 96                                 elif key3 == ‘neutral‘:
 97                                     worksheet.write(row, 13, value3)
 98                                     emotion.append(value3)
 99                                 elif key3 == ‘sadness‘:
100                                     worksheet.write(row, 14, value3)
101                                     emotion.append(value3)
102                                 else:
103                                     worksheet.write(row, 15, value3)
104                                     emotion.append(value3)
105                         elif key2 == ‘gender‘:
106                             worksheet.write(row, 6, value2)
107                         elif key2 == ‘glasses‘:
108                             worksheet.write(row, 7, value2)
109                         else:
110                             pass
111                 elif key1 == ‘faceId‘:
112                     worksheet.write(row, 4, value1)
113                 else:
114                     pass
115             worksheet.write(row, 16, emotion.index(max(emotion)))
116             # 写入概率最大的情绪,0-sadness,1-neutral,2-contempt,3-disgust,4-anger,5-surprise,6-fear,7-happiness
117             row += 1
118             print ‘Success! The pic ‘ + str(files_name) + ‘ was detected!‘
119     return row, worksheet
120
121
122 # 获取时间戳
123 def gettimestamp(path):
124     statinfo = os.stat(path)
125     timeinfo = time.localtime(statinfo.st_ctime)
126     daystamp = str(timeinfo.tm_year) + ‘-‘ + str(timeinfo.tm_mon) + ‘-‘ + str(timeinfo.tm_mday)
127     timestamp = str(timeinfo.tm_hour) + ‘:‘ + str(timeinfo.tm_min) + ‘:‘ + str(timeinfo.tm_sec)
128     hourstamp = timeinfo.tm_hour+timeinfo.tm_min/60.0+timeinfo.tm_sec/3600.0
129     return daystamp, timestamp, hourstamp
130
131
132 subscription_key = ‘your_key‘
133 uri_base = ‘https://api.cognitive.azure.cn/face/v1.0‘
134 path = r‘图片文件夹路径‘
135 # 注意:由于我是对同一文件夹下的多个文件夹中的图片进行识别,所以这个path是图片所在文件夹的上一级文件夹。文件夹名尽量使用英文与数字,不然可能因为编码问题报错
136 # 创建excel
137 workbook = xlwt.Workbook(encoding=‘utf-8‘)
138
139
140
141 for root, dirs, files in os.walk(path, topdown=False):
142     for folder in dirs:
143
144         error_num = 0
145         error_list = []
146         print ‘Let us start dealing with folder ‘ + folder
147
148         # 创建一个新的sheet
149         worksheet = workbook.add_sheet(folder)
150         # 设置表头
151         title = [‘PhotoID‘, ‘daystamp‘, ‘timestamp‘, ‘hourstamp‘,‘faceID‘, ‘age‘, ‘gender‘,
152                  ‘glasses‘, ‘anger‘, ‘contempt‘,‘disgust‘, ‘fear‘, ‘happiness‘,
153                  ‘neutral‘, ‘sadness‘, ‘surprise‘,‘emotion‘]
154         for col in range(len(title)):
155             worksheet.write(0, col, title[col])
156
157         # 遍历每个folder里的图片
158         row = 1
159         file_num = 1
160         for root2, dirs2, files2 in os.walk(path + ‘\\‘ + folder):
161             for files_name in files2:
162                 try:
163                     path2 = path + ‘\\‘ + folder + ‘\\‘ + files_name
164                     print ‘Now, the program is going to deal with ‘ + folder + ‘ pic‘ + str(files_name)
165                     img = open(os.path.expanduser(path2), ‘rb‘)
166                     row, worksheet = writeexcel(img, worksheet, row, files_name, path2,file_num)
167                     file_num += 1
168                 except Exception as e:
169                     print e
170
171
172         print ‘The current folder is done.‘
173         print error_num,error_list
174
175 # 保存文件
176 workbook.save(‘detectface.xls‘)
177 print ‘The program is done!‘
成果
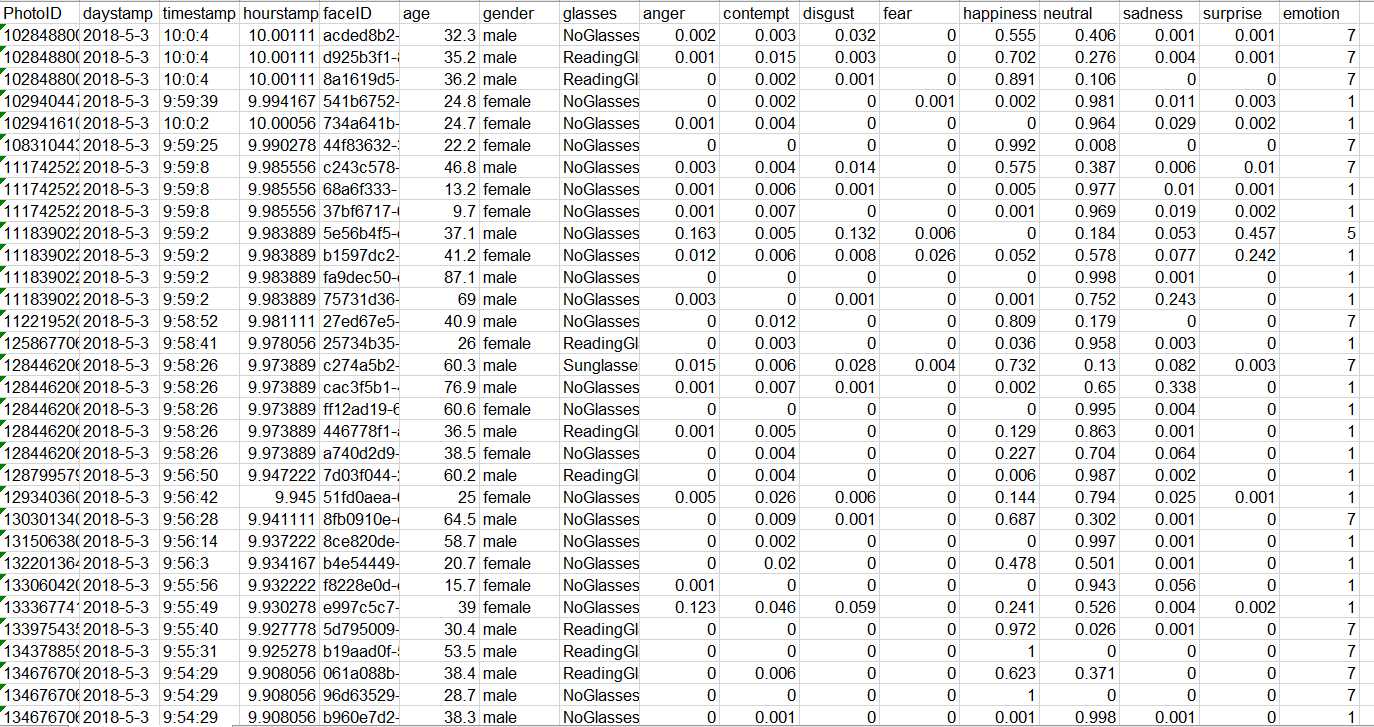
最后生成的excel大概是这个样子。

其中emotion就是概率最大的情绪,0-sadness,1-neutral,2-contempt,3-disgust,4-anger,5-surprise,6-fear,7-happiness。face++返回的有7种情绪,而azure返回的有8种情绪。
【Python】使用Microsoft Azure的人脸API进行本地图片情绪识别并存入excel
标签:python call 文件夹 exe 相对 1.0 append 定义 book
原文地址:https://www.cnblogs.com/IvyWong/p/8990033.html