标签:bin frame spring def 需要 环境 list 通过 ==
Spring MVC理解
最近在读一本《看透springMVC》的书,从了解到了一些更加精细系统的知识,边读变分享吧。
1.servlet--Spring MVC的本质
2.Spring MVC其实是一个工具,具体的理解可以分为两步:第一步,了解这个工具是怎么创建出来的;第二步,了解这个工具是怎么用的。
3.前期使用准备:环境的搭建
①创建WEB项目,导入jar包,Maven项目简单的加入springMVC和servlet的依赖就可以了.
//Maven项目加入依赖
<dependency>
    <groupId>javax.servlet</groupId>
    <artifactId>javax.servlet-api</artifactId>
    <version>3.1.0</version>
    <scope>provided</scope>
</dependency>
<dependency>
    <groupId>org.springframework</groupId>
    <artifactId>spring-webmvc</artifactId>
    <version> 4.1.5.RELEASE</version>
</dependency>
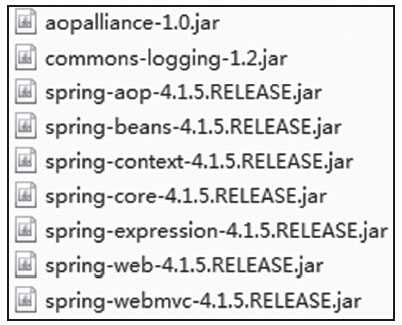
不是Maven项目需要导入的jar包:
②springMVC的简单配置
配置一个Spring MVC只需要三步:①在web.xml中配置Servlet;②创建Spring MVC的xml配置文件;③创建Controller和view。下面分别介绍。
在web.xml中配置Servlet:
<?xml version="1.0" encoding="UTF-8"?>
<web-app xmlns="http://xmlns.jcp.org/xml/ns/javaee"
        xmlns:xsi="http://www.w3.org/2001/XMLSchema-instance"
        xsi:schemaLocation="http://xmlns.jcp.org/xml/ns/javaee
http://xmlns.jcp.org/xml/ns/javaee/web-app_3_1.xsd"
        version="3.1">

    <!-- spring mvc配置开始  -->
    <servlet>
        <servlet-name>Name</servlet-name>
        <servlet-class>org.springframework.web.servlet.DispatcherServlet</servlet-class>
        <load-on-startup>1</load-on-startup>
    </servlet>

    <servlet-mapping>
        <servlet-name>Name</servlet-name>
        <url-pattern>/</url-pattern>
    </servlet-mapping>
    <!-- spring mvc配置结束  -->

    <welcome-file-list>
        <welcome-file>index</welcome-file>
    </welcome-file-list>
</web-app>
这里配置了一个叫Name的Servlet,自动启动,然后mapping到所有的请求。
所配置的Servlet是DispatcherServlet类型,它就是Spring MVC的入口,Spring MVC的本质就是一个Servlet。
在配置DispatcherServlet的时候可以设置contextConfigLocation参数来指定Spring MVC配置文件的位置,
如果不指定就默认使用WEB-INF/[ServletName]-servlet.xml文件,这里使用了默认值,也就是WEB-INF/Name-servlet.xml文件。
创建Spring MVC的xml配置文件
首先在WEB-INF目录下新建let’sGo-servlet.xml文件,然后使用Spring MVC最简单的配置方式来进行配置。
<!--WEB-INF/Name -servlet.xml -->
<?xml version="1.0" encoding="UTF-8"?>
//引入约束
<beans xmlns="http://www.springframework.org/schema/beans"
xmlns:xsi="http://www.w3.org/2001/XMLSchema-instance"
xmlns:p="http://www.springframework.org/schema/p"
xmlns:context="http://www.springframework.org/schema/context"
xmlns:mvc="http://www.springframework.org/schema/mvc"
xsi:schemaLocation="http://www.springframework.org/schema/beans
http://www.springframework.org/schema/beans/spring-beans.xsd
http://www.springframework.org/schema/context
http://www.springframework.org/schema/context/spring-context.xsd
http://www.springframework.org/schema/mvc
http://www.springframework.org/schema/mvc/spring-mvc.xsd">

<mvc:annotation-driven/>
<context:component-scan base-package="com.excelib" />
</beans>
<mvc:annotation-driven/>是Spring MVC提供的一键式的配置方法,配置此标签后Spring MVC会帮我们自动做一些注册组件之类的事情。这种配置方法非常简单,<mvc:-annotation-driven/>背后的原理会在后面详细解释。另外还配置了context:component-scan标签来扫描通过注释配置的类,如果使用了Spring可以通过context:include-filter子标签来设置只扫描@Controller就可以了,别的交给Spring容器去管理,不过这里只配置了Spring MVC,所以就全部放到Spring MVC里了。只扫描@Controller的配置如下:
<context:component-scan base-package="com.excelib" use-default-filters="false">
<context:include-filter type="annotation"expression="org.springframework.stereotype.Controller" />
</context:component-scan>
创建Controller和view
到现在Spring MVC的环境就已经搭建完成了。下面写个Controller和View,这样就可以运行了。
首先在com.excelib.controller包下建一个类——GoController。
package com.excelib.controller;

import org.apache.commons.logging.Log;
import org.apache.commons.logging.LogFactory;
import org.springframework.stereotype.Controller;
import org.springframework.ui.Model;
import org.springframework.web.bind.annotation.RequestMapping;
import org.springframework.web.bind.annotation.RequestMethod;

@Controller
public class GoController {
private final Log logger = LogFactory.getLog(GoController.class);
//处理HEAD类型的”/”请求
@RequestMapping(value={"/"},method= {RequestMethod.HEAD})
public String head() {
    return "go.jsp";
}
//处理GET类型的"/index"和”/”请求
@RequestMapping(value={"/index","/"},method= {RequestMethod.GET})
public String index(Model model) throws Exception {
   logger.info("======processed by index=======");
   //返回msg参数
   model.addAttribute("msg", "Go Go Go!");
   return "go.jsp";
  }
}
这里单独写了处理HEAD请求的方法,此方法可以用来检测服务器的状态,因为它不返回body所以比GET请求更节省网络资源。而单独写一个处理方法而不跟GET请求使用同一个方法,然后返回没有Body的Response是因为GET请求的处理过程可能会处理一些别的内容,如初始化一些首页需要显示的内容,还可能会连接数据库,而这些都比较浪费资源,并且对于HEAD请求来说也是不需要的,所以最好单独写一个方法。
如果没有配置ViewResolver,Spring MVC将默认使用org.springframework.web.servlet.view.InternalResourceViewResolver作为ViewResolver,而且prefix和suffix都为空。所以go.jsp返回值对应的就是根目录下的go.jsp文件。我们就把它建出来。
<%@ page contentType="text/html;charset=UTF-8" language="java" %>
<html>
<head>
<title> let‘sGo</title>
</head>
<body>
${msg}
</body>
</html>
好了,现在编译后部署到Tomcat就可以运行了,运行ing.....
标签:bin frame spring def 需要 环境 list 通过 ==
原文地址:https://www.cnblogs.com/yulibo/p/8996196.html