            # chkconfig iptables off
            # iptables -F
1.首先准备搭建环境
安装httpd、php、php-server、mysql-server。
    开启MySQL、httpd服务
            # service mysqld start

            对myuser用户进行授权
            # mysql> grant select,insert,update on *.* to ‘myuser‘@‘172.16.%.%‘ identified by ‘123456‘;
            # service mysqld restart
            # service httpd start
2.创建虚拟主机
在httpd片段配置文件(/etc/httpd/conf.d/) 下创建虚拟主机virhosts.conf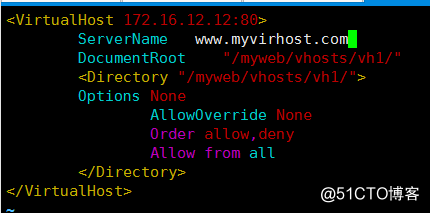
创建虚拟主机中目录
3.为虚拟主机中的IP提供网络接口,添加虚拟主机标签
(若要永久生效选择写入配置文件)
将本地论坛、博客及phpMyAdmin应用程序上传至/myweb/vhosts/vh1目录下

首先解压Discuz_X3.2_SC_GBK.zip
# unzip Discuz_X3.2_SC_GBK.zip
# mv Discuz_X3.2_SC_GBK/upload/ bbs/
重启httpd服务
# service httpd restart
打开浏览器输入172.16.12.12/bbs安装论坛

按照提示进行安装和设置!安装phpmyadmin
# cp -a phpMyAdmin-3.5.4-all-languages/config.sample.inc.php phpMyAdmin-3.5.4-all-languages/config.php
# mv phpMyAdmin-3.5.4-all-languages pma
访问“172.16.12.12/pma”进行安装

安装博客
上传phpwind_v8.7_GBK.zip文件
解压缩文件
# unzip phpwind_v8.7_GBK.zip
# mv phpwind_GBK_8.7/upload phpwind
访问“172.16.12.12/phpwind”进行安装
centos6下基于http2.2搭建论坛、博客系统及phpMyAdmin应用程序的实现
原文地址:http://blog.51cto.com/yigechenlin/2113103