标签:分享 .class 接口 odi png nbsp style 截图 imp
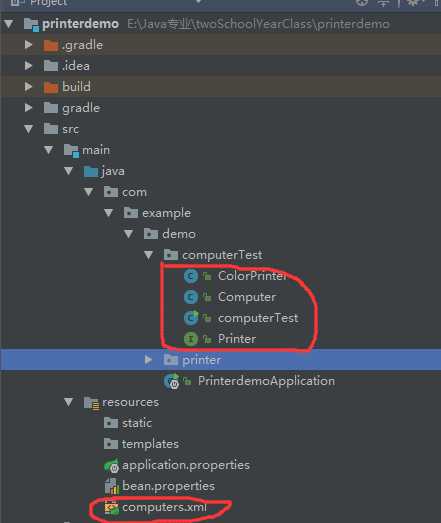
1、项目截图

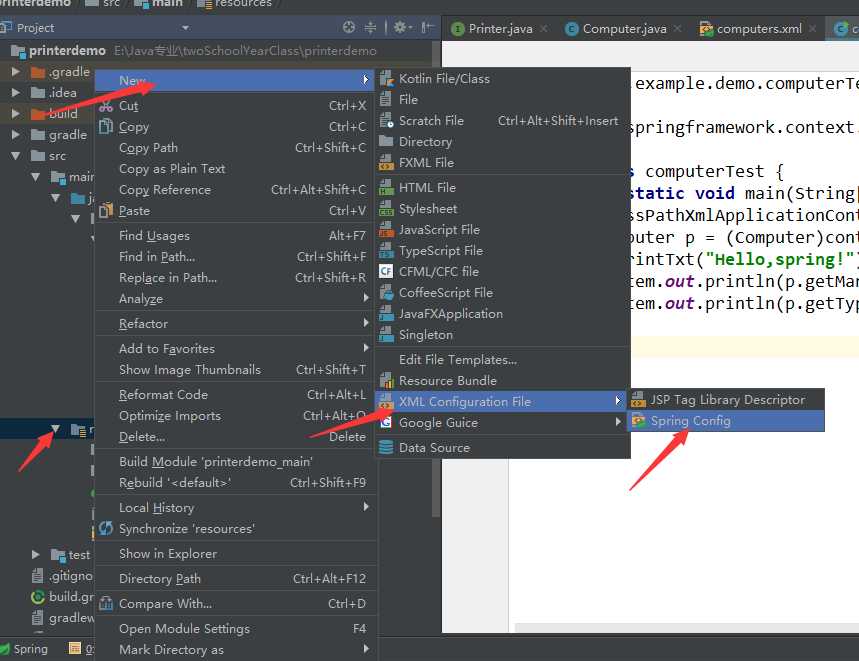
2、创建xml文件

3、打印机接口
package com.example.demo.computerTest;

public interface Printer {
    void init();
    void print(String txt);
}
4、彩色打印机
package com.example.demo.computerTest;


public class ColorPrinter implements Printer {
    @Override
    public void init() {
        System.out.println("启动彩色打印机!");
    }

    @Override
    public void print(String txt) {
        System.out.println("打印彩色文字:".concat(txt));
    }
}
5、电脑类
package com.example.demo.computerTest;

public class Computer {
    String manu;
    String type;
    Printer p;

    public String getManu() {
        return manu;
    }

    public void setManu(String manu) {
        this.manu = manu;
    }

    public String getType() {
        return type;
    }

    public void setType(String type) {
        this.type = type;
    }

  //printTxt()方法接收一个参数给打印机的print()方法实现打印的功能
    public void printTxt(String txt){
        p.init();
        p.print(txt);
    }

    public Printer getP() {
        return p;
    }

    public void setP(Printer p) {
        this.p = p;
    }
}
6、测试类
说明:
通过ClassPathXmlApplicationContext载入XML文件
通过向context.getBean()方法中传入参数,获取具体的bean,这个参数就是XML文件中的id名;
通过实例对象p可以调用Computer类中的方法,可以获取配置文件中为Computer类属性设置的值。
package com.example.demo.computerTest;

import org.springframework.context.support.ClassPathXmlApplicationContext;

public class computerTest {
    public static void main(String[] args) {
        ClassPathXmlApplicationContext context = new ClassPathXmlApplicationContext("computers.xml");
        Computer p = (Computer)context.getBean("pc");
        p.printTxt("Hello,spring!");
        System.out.println(p.getManu());
        System.out.println(p.getType());
    }
}
7、xml配置
说明:
通过id属性给每个Bean设置id;
通过class属性设置Bean的位置
通过ref属性可以引用已经定义好的bean
通过property可以操作bean中的属性:
name属性指定bean中的某个属性
value为该属性设置指定的值
<?xml version="1.0" encoding="UTF-8"?>
<beans xmlns="http://www.springframework.org/schema/beans"
       xmlns:xsi="http://www.w3.org/2001/XMLSchema-instance"
       xsi:schemaLocation="http://www.springframework.org/schema/beans http://www.springframework.org/schema/beans/spring-beans-3.0.xsd">
       <bean id="colorPrinter" class="com.example.demo.computerTest.ColorPrinter"/>
       <bean id="pc" class="com.example.demo.computerTest.Computer">
           <property name="manu">
               <value>苹果</value>
           </property>
           <property name="type" value="IPad"/>
           <property name="p" ref="colorPrinter"/>
       </bean>
</beans>
8、效果:

1、测试类还可以是下面的代码
package com.example.demo.computerTest;

import org.springframework.context.ApplicationContext;
import org.springframework.context.support.ClassPathXmlApplicationContext;

public class computerTest {
    public static void main(String[] args) {
        //ClassPathXmlApplicationContext context = new ClassPathXmlApplicationContext("computers.xml");
        //Computer p = (Computer)context.getBean("pc");
        //p.printTxt("Hello,spring!");
        //System.out.println(p.getManu());
        //System.out.println(p.getType());

        ApplicationContext context = new ClassPathXmlApplicationContext("computers.xml");
        Computer p = (Computer) context.getBean("pc");
        p.printTxt("Hello,Spring!");

    }
}
2、效果:

标签:分享 .class 接口 odi png nbsp style 截图 imp
原文地址:https://www.cnblogs.com/zn615/p/9009266.html