标签:res 用户 label http 1.5 match 相对布局 自动 wrap
(1)线性布局是一种很重要的布局,也是经常用到的一种布局
(2)在线性布局中,所有的元素都按照水平竖直的顺序在界面上排序
如果水平排序,则每行包含一个界面元素
如果垂直排序,则每列只包含一个元素
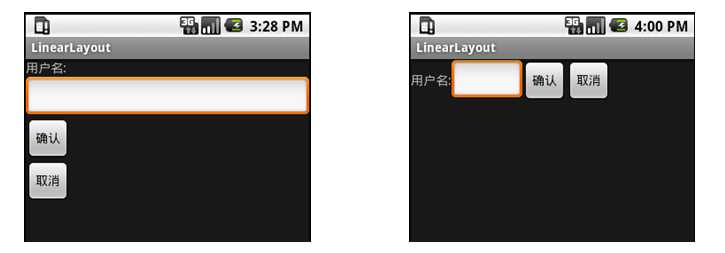
(3)线性布局常用的常用属性:
android:orientation=“vertical”(该属性决定了他的子控件的布局方式)】
android:gravity=“center”(该属性决定了他的子类的xy位置)
常用到的几个属性值:
center_vertical:垂直(y轴)居中)
center_horizontal:水平(x轴)居中
centrer:水平垂直都居中
right:子类控件位于当前布局的右边
left:子类控件位于当前布局的左边
bottom:子类控件位于当前布局的下面
(4)代码操作过程
1)首先为了能完整的体验创建线性布局的过程,首先删除自动建立的res/layout/main.xml文件,然后建立用于显示垂直排列的线性布局的XML文件
2)右键--->xml--->LayoutXML File打开新文件建立向导
3)文件名为:main_vertical.xml
4)保存位置为res/layout
5)双击建立的
关键代码:
横向:
android:orientation="horizontal"
纵向:
android:orientation="vertical"
完整代码:
<?xml version="1.0" encoding="utf-8"?>
<LinearLayout xmlns:android="http://schemas.android.com/apk/res/android"
    android:orientation="vertical" android:layout_width="match_parent"
    android:layout_height="match_parent"
    android:stretchColumns="*"
    android:id="@+id/Tablelayout01">
<TextView
    android:id="@+id/tv"
    android:layout_width="match_parent"
    android:layout_height="wrap_content"
    android:textSize="40dp"
    android:text="hello"/>

    <Button
        android:id="@+id/btn"
        android:layout_width="wrap_content"
        android:layout_height="wrap_content"
        android:text="button1"
        />
    <Button
        android:id="@+id/btn3"
        android:layout_width="wrap_content"
        android:layout_height="wrap_content"
        android:text="button2"
        />

    <Button
        android:id="@+id/btn2"
        android:layout_width="wrap_content"
        android:layout_height="wrap_content"
        android:layout_x="150dp"
        android:layout_y="120dp"
        android:text="button3"
        />

</LinearLayout>
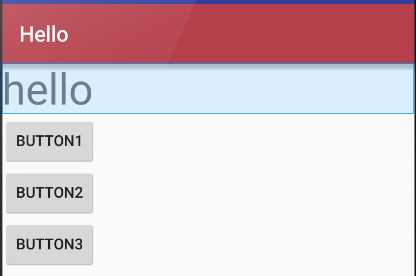
完整代码
<?xml version="1.0" encoding="utf-8"?>
<LinearLayout xmlns:android="http://schemas.android.com/apk/res/android"
    android:orientation="horizontal" android:layout_width="match_parent"
    android:layout_height="match_parent"
    android:stretchColumns="*"
    android:id="@+id/Tablelayout01">
<TextView
    android:id="@+id/tv"
    android:layout_width="wrap_content"
    android:layout_height="wrap_content"
    android:textSize="40dp"
    android:text="hello"/>

    <Button
        android:id="@+id/btn"
        android:layout_width="wrap_content"
        android:layout_height="wrap_content"
        android:text="button1"
        />
    <Button
        android:id="@+id/btn3"
        android:layout_width="wrap_content"
        android:layout_height="wrap_content"
        android:text="button2"
        />

    <Button
        android:id="@+id/btn2"
        android:layout_width="wrap_content"
        android:layout_height="wrap_content"
        android:layout_x="150dp"
        android:layout_y="120dp"
        android:text="button3"
        />

</LinearLayout>
效果:

http://www.cnblogs.com/excellencesy/p/9051441.html
(1)表格布局也是一种常用的界面布局,它将屏幕划分网络,通过指定行和列可以将界面元素添加到网格中
1)网格的边界对用户是不可见的
2)表格布局还支持嵌套,可以将另一个表格布局放置在前一个表格布局的网格中,也可以在表格不居中添加其他的界面布局,例如:线性布局,相对布局等等
(2)表格布局的注意事项
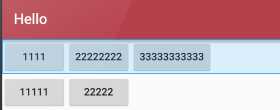
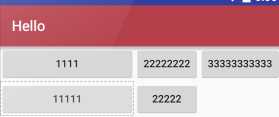
1)向界面中添加一个表格布局,无需修改布局的属性值。其中,id属性为TableLayout01.layout Width 和Layout height属性都是wrap_content
2)向TableLayout中添加一个表格布局,无需修改布局的属相值。其中为
android:collapseColumns="0,1"
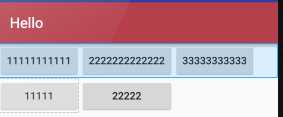
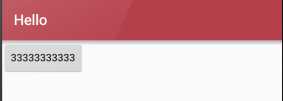
android:shrinkColumns="0,2,1"

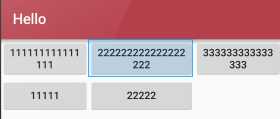
android:stretchColumns="0"
(3) 实例
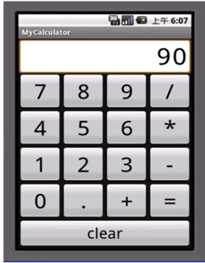
<?xml version="1.0" encoding="utf-8"?>
<TableLayout xmlns:android="http://schemas.android.com/apk/res/android"
    android:orientation="vertical" android:layout_width="match_parent"
    android:layout_height="match_parent"
    android:stretchColumns="*"
    android:id="@+id/Tablelayout01">
    <TextView android:id="@+id/tv"
        android:text="90"
        android:textSize="40dp"
        android:gravity="right"
        android:layout_width="match_parent"
        android:layout_height="50dp"/>
    <TableRow android:id="@+id/tableroe01"
        android:layout_width="wrap_content"
        android:layout_height="wrap_content">
        <Button android:id="@+id/bt1"
            android:text="1"
            android:layout_width="wrap_content"
            android:layout_height="wrap_content"/>
        <Button android:id="@+id/bt2"
            android:text="2"
            android:layout_width="wrap_content"
            android:layout_height="wrap_content"/>
        <Button android:id="@+id/bt3"
            android:text="3"
            android:layout_width="wrap_content"
            android:layout_height="wrap_content"/>
        <Button android:id="@+id/bt4"
            android:text="+"
            android:layout_width="wrap_content"
            android:layout_height="wrap_content"/>
    </TableRow>
    <TableRow android:id="@+id/tablerow02"
        android:layout_height="wrap_content"
        android:layout_width="wrap_content">
        <Button android:id="@+id/bt31"
            android:text="4"
            android:layout_width="wrap_content"
            android:layout_height="wrap_content"/>
        <Button android:id="@+id/bt32"
            android:text="5"
            android:layout_width="wrap_content"
            android:layout_height="wrap_content"/>
        <Button android:id="@+id/bt33"
            android:text="6"
            android:layout_width="wrap_content"
            android:layout_height="wrap_content"/>
        <Button android:id="@+id/bt34"
            android:text="-"
            android:layout_width="wrap_content"
            android:layout_height="wrap_content"/>
    </TableRow>
    <TableRow android:id="@+id/tablerow03"
        android:layout_height="wrap_content"
        android:layout_width="wrap_content">
        <Button android:id="@+id/bt41"
            android:text="7"
            android:layout_width="wrap_content"
            android:layout_height="wrap_content"/>
        <Button android:id="@+id/bt42"
            android:text="8"
            android:layout_width="wrap_content"
            android:layout_height="wrap_content"/>
        <Button android:id="@+id/bt43"
            android:text="9"
            android:layout_width="wrap_content"
            android:layout_height="wrap_content"/>
        <Button android:id="@+id/bt44"
            android:text="*"
            android:layout_width="wrap_content"
            android:layout_height="wrap_content"/>
    </TableRow>
    <TableRow android:id="@+id/tablerow04"
        android:layout_height="wrap_content"
        android:layout_width="wrap_content">
        <Button android:id="@+id/bt21"
            android:text="+"
            android:layout_width="wrap_content"
            android:layout_height="wrap_content"/>
        <Button android:id="@+id/bt22"
            android:text="-"
            android:layout_width="wrap_content"
            android:layout_height="wrap_content"/>
        <Button android:id="@+id/bt23"
            android:text="*"
            android:layout_width="wrap_content"
            android:layout_height="wrap_content"/>
        <Button android:id="@+id/bt24"
            android:text="/"
            android:layout_width="wrap_content"
            android:layout_height="wrap_content"/>
    </TableRow>
    <TableRow android:id="@+id/tablerow05"
        android:layout_height="wrap_content"
        android:layout_width="match_parent">
        <Button android:id="@+id/bt51"
            android:text="center"
            android:layout_width="match_parent"
            android:layout_height="wrap_content"
            android:layout_span="4" />
    </TableRow>
</TableLayout>
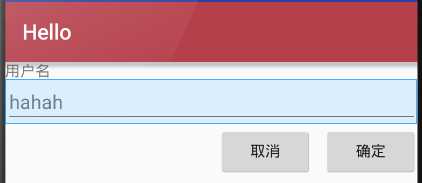
(1)相对布局是一种非常灵活的布局方式,能够通过指定界面元素与其他元素的相对位置关系,确定所有元素的布局位置
(2)能够最大程度保证在各种屏幕类型的手机上正确的显示界面布局
(3)相对布局示例说明
1)添加TextView控件(“用户名”),相对布局会将TextView控件放置在屏幕的最上方
2)然后添加TextView控件,并声明该控件的位置在TextView控件的下面,相对布局会根据TextView的位置确定EditText控件的位置
3)之后添加的第一个Button控件,声明在EditText控件的下方,且在福控件的最右边
4)最后,添加第二个Button控件,声明该控件处于相同的水平位置
关键代码解读:
android:layout_below="@id/label"
android:layout_alignParentRight="true"
android:layout_marginLeft="10dip"
android:layout_toLeftOf="@id/cancel"
android:layout_alignTop="@id/cancel“
完整代码:
<?xml version="1.0" encoding="utf-8"?>
<RelativeLayout xmlns:android="http://schemas.android.com/apk/res/android"
    android:orientation="vertical" android:layout_width="match_parent"
    android:layout_height="match_parent"
    android:stretchColumns="*"
    android:id="@+id/Tablelayout01">
<TextView
    android:id="@+id/tv"
    android:layout_width="match_parent"
    android:layout_height="wrap_content"
    android:text="用户名"/>
    <EditText
        android:id="@+id/et"
        android:layout_width="match_parent"
        android:layout_height="wrap_content"
        android:layout_below="@id/tv"
        android:hint="hahah"/>
    <Button
        android:id="@+id/btn"
        android:layout_width="wrap_content"
        android:layout_height="wrap_content"
        android:layout_alignParentRight="true"
        android:layout_below="@id/et"
        android:layout_marginLeft="10dip"
        android:text="确定"
        />
    <Button
        android:id="@+id/btn2"
        android:layout_width="wrap_content"
        android:layout_height="wrap_content"
       android:layout_toLeftOf="@id/btn"
        android:layout_alignTop="@id/btn"
        android:text="取消"
        />

</RelativeLayout>
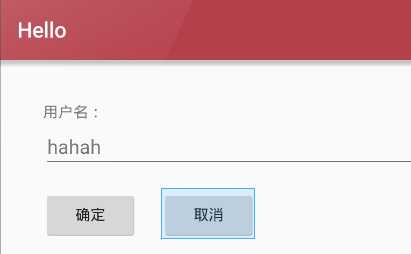
(1)绝对布局能通过指定界面元素的坐标位置,来确定用户界面的整体布局
(2)绝对布局是一种不推荐使用的界面布局,因为通过X轴和Y轴确定界面元素的位置后,android紫铜不能根据不同的屏幕对界面元素的位置进行调整,降低了界面布局对不同的类型和尺寸屏幕的适应能力
(3)每一个界面控件都必须指定坐标(X,Y),例如“确认”按钮的坐标是(40,120),“取消”按钮的坐标是(120,120)。坐标原点(0,0),在屏幕的左上角
关键代码解读:
android:layout_x="40dp"
android:layout_y="120dp"
完整代码:
<?xml version="1.0" encoding="utf-8"?>
<AbsoluteLayout xmlns:android="http://schemas.android.com/apk/res/android"
    android:orientation="vertical" android:layout_width="match_parent"
    android:layout_height="match_parent"
    android:stretchColumns="*"
    android:id="@+id/Tablelayout01">
<TextView
    android:id="@+id/tv"
    android:layout_width="match_parent"
    android:layout_height="wrap_content"
    android:layout_x="40dp"
    android:layout_y="40dp"
    android:text="用户名:"/>

    <EditText
        android:id="@+id/et"
        android:layout_width="match_parent"
        android:layout_height="wrap_content"
        android:layout_x="40dp"
        android:layout_y="60dp"
        android:hint="hahah"/>
    <Button
        android:id="@+id/btn"
        android:layout_width="wrap_content"
        android:layout_height="wrap_content"
        android:layout_x="40dp"
        android:layout_y="120dp"
        android:text="确定"
        />
    <Button
        android:id="@+id/btn2"
        android:layout_width="wrap_content"
        android:layout_height="wrap_content"
    android:layout_x="150dp"
        android:layout_y="120dp"
        android:text="取消"
        />

</AbsoluteLayout>
显示结果:
标签:res 用户 label http 1.5 match 相对布局 自动 wrap
原文地址:https://www.cnblogs.com/excellencesy/p/9053594.html