标签:lap varchar org JD 原子性 utf8 led 一段 命名
Spring进行声明式事务配置的方式有两种:
但无论使用什么方式进行Spring的事务操作,首先要配置一个事务管理器。
第一步,创建数据库表。
DROP TABLE IF EXISTS `account`;
CREATE TABLE `account` (
  `id` int(11) DEFAULT NULL,
  `username` varchar(100) DEFAULT NULL,
  `salary` int(11) DEFAULT NULL
) ENGINE=InnoDB DEFAULT CHARSET=utf8;

INSERT INTO `account` VALUES (‘1‘, ‘小郑‘, ‘10000‘);
INSERT INTO `account` VALUES (‘2‘, ‘小谭‘, ‘10000‘);
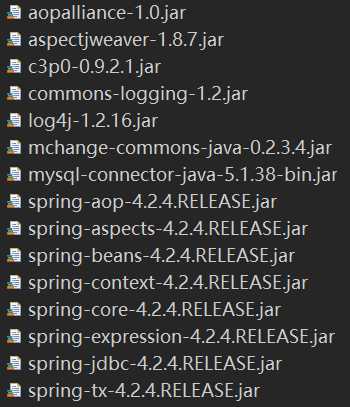
第二步,创建一个Web项目,并引入Spring的相关jar包。

第三步,创建业务层和DAO层的类。
在Web项目的src目录下创建一个cn.itcast.tx包,并在该包下编写业务层和DAO层的类。
public class BookService {

    private BookDao bookDao;

    public void setBookDao(BookDao bookDao) {
        this.bookDao = bookDao;
    }

}
public class BookDao {

    private JdbcTemplate jdbcTemplate;

    public void setJdbcTemplate(JdbcTemplate jdbcTemplate) {
        this.jdbcTemplate = jdbcTemplate;
    }

}
第四步,配置业务层和DAO层的类。
<?xml version="1.0" encoding="UTF-8"?>
<beans xmlns="http://www.springframework.org/schema/beans"
    xmlns:xsi="http://www.w3.org/2001/XMLSchema-instance"
    xmlns:context="http://www.springframework.org/schema/context"
    xmlns:aop="http://www.springframework.org/schema/aop"
    xmlns:tx="http://www.springframework.org/schema/tx"
    xsi:schemaLocation="http://www.springframework.org/schema/beans
    http://www.springframework.org/schema/beans/spring-beans.xsd
    http://www.springframework.org/schema/context
    http://www.springframework.org/schema/context/spring-context.xsd
    http://www.springframework.org/schema/aop
    http://www.springframework.org/schema/aop/spring-aop.xsd
    http://www.springframework.org/schema/tx
    http://www.springframework.org/schema/tx/spring-tx.xsd">

    <!-- 配置C3P0连接池 -->
    <bean id="dataSource" class="com.mchange.v2.c3p0.ComboPooledDataSource">
        <property name="driverClass" value="com.mysql.jdbc.Driver"></property>
        <property name="jdbcUrl" value="jdbc:mysql:///spring_lee"></property>
        <property name="user" value="root"></property>
        <property name="password" value="yezi"></property>
    </bean>

    <!-- 创建service和dao的对象 -->
    <bean id="bookService" class="cn.itcast.tx.BookService">
        <!-- 注入dao -->
        <property name="bookDao" ref="bookDao"></property>
    </bean>
    <bean id="bookDao" class="cn.itcast.tx.BookDao">
        <!-- 注入JdbcTemplate模板类的对象 -->
        <property name="jdbcTemplate" ref="jdbcTemplate"></property>
    </bean>

    <!-- 创建JdbcTemplate模板类的对象 -->
    <bean id="jdbcTemplate" class="org.springframework.jdbc.core.JdbcTemplate">
        <!-- 注入dataSource -->
        <property name="dataSource" ref="dataSource"></property>
    </bean>
</beans>
第五步,转账的具体实现,实现小郑转账1000元给小谭。
JavaEE中DAO层做的事情主要是对数据库进行操作,在DAO层里面一般不写业务操作,一般写单独操作数据库的方法。所以BookDao类的代码要修改为:
public class BookDao {

    private JdbcTemplate jdbcTemplate;

    public void setJdbcTemplate(JdbcTemplate jdbcTemplate) {
        this.jdbcTemplate = jdbcTemplate;
    }

    // 小郑少1000
    public void lessMoney() {
        String sql = "update account set salary=salary-? where username=?";
        jdbcTemplate.update(sql, 1000, "小郑");
    }

    // 小谭多1000
    public void moreMoney() {
        String sql = "update account set salary=salary+? where username=?";
        jdbcTemplate.update(sql, 1000, "小谭");
    }
}
JavaEE中Service层写具体的业务操作,所以BookService类的代码要修改为:
public class BookService {

    private BookDao bookDao;

    public void setBookDao(BookDao bookDao) {
        this.bookDao = bookDao;
    }

    // 转账的业务
    public void accountMoney() {
        // 1.小郑少1000
        bookDao.lessMoney();

        // 2.小谭多1000
        bookDao.moreMoney();
    }
}
第六步,编写一个测试类。
在cn.itcast.tx包下编写一个TestDemo单元测试类。
public class TestDemo {

    @Test
    public void testAccount() {
        ApplicationContext context = new ClassPathXmlApplicationContext("bean1.xml");
        BookService bookService = (BookService) context.getBean("bookService");
        bookService.accountMoney();
    }
}
测试以上方法即可实现小郑转账1000元给小谭。现在我来演示一个问题,在BookService类中调用BookDao类的两个方法构成了转账业务,但是如果小郑少了1000元之后,这时突然出现异常,比如银行断电,就会出现小郑的钱少了,而小谭的钱没有多,钱丢失了的情况。
public class BookService {

    private BookDao bookDao;

    public void setBookDao(BookDao bookDao) {
        this.bookDao = bookDao;
    }

    // 转账的业务
    public void accountMoney() {
        // 1.小郑少1000
        bookDao.lessMoney();

        int x = 10 / 0; // 模拟银行断电的情况(出现的异常)

        // 2.小谭多1000
        bookDao.moreMoney();
    }
}
这时应该怎么解决这个问题呢?就可使用事务来解决。Spring中进行事务的操作主要有两种方式:
基于xml配置文件的方式来进行声明式事务的操作,不需要进行手动编写代码,通过一段配置完成事务管理。
第一步,配置事务管理器。
Spring针对不同的持久化框架,提供了不同PlatformTransactionManager接口的实现类,如下:

所以我们需要在Spring的配置文件中添加如下配置:
<!-- 1.配置事务的管理器 -->
<bean id="transactionManager" class="org.springframework.jdbc.datasource.DataSourceTransactionManager">
    <!-- 指定要对哪个数据库进行事务操作 -->
    <property name="dataSource" ref="dataSource"></property>
</bean>
第二步,配置事务的增强,即指定对哪个事务管理器进行增强。故需要向Spring的配置文件中添加如下配置:
<!-- 2.配置事务的增强,指定对哪个事务管理器进行增强 -->
<tx:advice id="txadvice" transaction-manager="transactionManager">
    <tx:attributes>
        <!--
            表示来配置你要增强的方法的匹配的一个规则,
            注意:只须改方法的命名规则,其他都是固定的!
            propagation:事务的传播行为。
        -->
        <tx:method name="account*" propagation="REQUIRED"></tx:method>
        <!-- <tx:method name="insert*" propagation="REQUIRED"></tx:method> -->
    </tx:attributes>
</tx:advice>
第三步,配置切入点和切面。这步须向Spring的配置文件中添加如下配置:
<!-- 3.配置切入点和切面(最重要的一步) -->
<aop:config>
    <!-- 切入点 -->
    <aop:pointcut expression="execution(* cn.itcast.tx.BookService.*(..))" id="pointcut1"/>
    <!-- 切面,即表示把哪个增强用在哪个切入点上 -->
    <aop:advisor advice-ref="txadvice" pointcut-ref="pointcut1"/>
</aop:config>
这时测试TestDemo单元测试类的testAccount方法即可。
基于注解方式来进行声明式事务的操作会更加简单,在实际开发中我们也会用的比较多。
第一步,配置事务管理器。
<!-- 1.配置事务管理器 -->
<bean id="transactionManager" class="org.springframework.jdbc.datasource.DataSourceTransactionManager">
    <property name="dataSource" ref="dataSource"></property>
</bean>
第二步,开启事务注解。
<!-- 2.开启事务的注解 -->
<tx:annotation-driven transaction-manager="transactionManager"></tx:annotation-driven>
以上配置添加完毕之后,Spring核心配置文件的内容就为:
<?xml version="1.0" encoding="UTF-8"?>
<beans xmlns="http://www.springframework.org/schema/beans"
    xmlns:xsi="http://www.w3.org/2001/XMLSchema-instance"
    xmlns:context="http://www.springframework.org/schema/context"
    xmlns:aop="http://www.springframework.org/schema/aop"
    xmlns:tx="http://www.springframework.org/schema/tx"
    xsi:schemaLocation="http://www.springframework.org/schema/beans
    http://www.springframework.org/schema/beans/spring-beans.xsd
    http://www.springframework.org/schema/context
    http://www.springframework.org/schema/context/spring-context.xsd
    http://www.springframework.org/schema/aop
    http://www.springframework.org/schema/aop/spring-aop.xsd
    http://www.springframework.org/schema/tx
    http://www.springframework.org/schema/tx/spring-tx.xsd">

    <!-- 配置C3P0连接池 -->
    <bean id="dataSource" class="com.mchange.v2.c3p0.ComboPooledDataSource">
        <property name="driverClass" value="com.mysql.jdbc.Driver"></property>
        <property name="jdbcUrl" value="jdbc:mysql:///spring_lee"></property>
        <property name="user" value="root"></property>
        <property name="password" value="yezi"></property>
    </bean>

    <!-- 1.配置事务管理器 -->
    <bean id="transactionManager" class="org.springframework.jdbc.datasource.DataSourceTransactionManager">
        <property name="dataSource" ref="dataSource"></property>
    </bean>

    <!-- 2.开启事务的注解 -->
    <tx:annotation-driven transaction-manager="transactionManager"></tx:annotation-driven>

    <!-- 创建service和dao的对象 -->
    <bean id="bookService" class="cn.itcast.tx.BookService">
        <!-- 注入dao -->
        <property name="bookDao" ref="bookDao"></property>
    </bean>
    <bean id="bookDao" class="cn.itcast.tx.BookDao">
        <!-- 注入JdbcTemplate模板类的对象 -->
        <property name="jdbcTemplate" ref="jdbcTemplate"></property>
    </bean>

    <!-- 创建JdbcTemplate模板类的对象 -->
    <bean id="jdbcTemplate" class="org.springframework.jdbc.core.JdbcTemplate">
        <!-- 注入dataSource -->
        <property name="dataSource" ref="dataSource"></property>
    </bean>
</beans>
第三步,在具体使用事务的方法所在的类上面添加注解:@Transactional。即BookService类应修改为:
@Transactional
public class BookService {

    private BookDao bookDao;

    public void setBookDao(BookDao bookDao) {
        this.bookDao = bookDao;
    }

    // 转账的业务
    public void accountMoney() {
        // 1.小郑少1000
        bookDao.lessMoney();

        int x = 10 / 0; // 模拟银行断电的情况(出现的异常)

        // 2.小谭多1000
        bookDao.moreMoney();
    }
}
这时测试TestDemo单元测试类的testAccount方法即可。
标签:lap varchar org JD 原子性 utf8 led 一段 命名
原文地址:https://www.cnblogs.com/qinjf/p/9053994.html