标签:消费 img date pack over lock 处理 接口 core
使用多线程以及线程池的意义无需多说,要想掌握线程池,最好的方法还是自己手动去实现。
一、实现思路

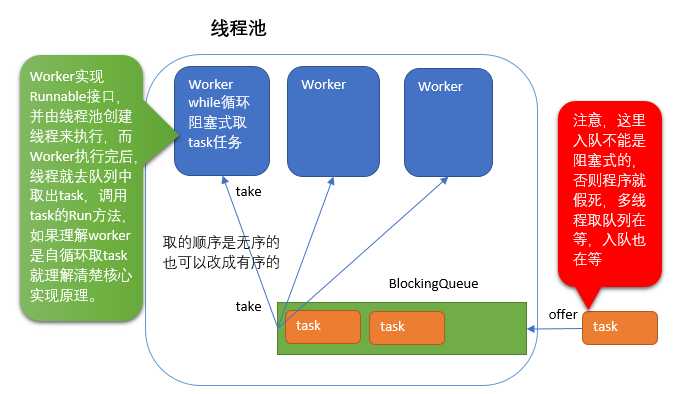
(网络盗图)
总的来说,所有的任务在BlockingQueue中进行等待,由Worker进行具体的操作,Worker才是真正的工作线程。
二、代码
1、线程池类
package com.ty.thread;
import java.util.HashSet;
import java.util.Set;
import java.util.concurrent.BlockingQueue;
import java.util.concurrent.LinkedBlockingQueue;

/**
 * @author Taoyong
 * @date 2018年5月17日
 * 天下没有难敲的代码!
 */
public class ThreadPoolExecutor {

    //维护线程的list
    private Set<Thread> threadList = new HashSet<Thread>();

    /*
     * 阻塞队列是线程安全的,主要使用在生产/消费者的场景
     */
    private BlockingQueue<Task> blockingQueue;

    //线程池的工作线程数
    private int poolSize = 0;

    //线程池的核心容量
    private int coreSize = 0;

    private boolean shutDown = false;

    public ThreadPoolExecutor(int size) {
        this.poolSize = size;
        blockingQueue = new LinkedBlockingQueue<>(poolSize);
    }

    public void execute(Task task) throws InterruptedException {
        if(shutDown == true) {
            return;
        }

        if(coreSize < poolSize) {
            blockingQueue.offer(task);
            produceWorker(task);
        }else {
            blockingQueue.put(task);
        }
    }

    private void produceWorker(Task task) throws InterruptedException {
        if(task == null) {
            throw new NullPointerException("非法参数:传入的task对象为空!");
        }

        if(shutDown == true) {
            return;
        }

        Thread thread = new Thread(new Worker());
        threadList.add(thread);
        coreSize++;
        thread.start();
    }

public void shutDown() {
        if(threadList == null || threadList.size() == 0) {
            return;
        }
        shutDown = true;
        for(Thread thread: threadList) {
            System.out.println(thread.getName() + " interrupt");
            thread.interrupt();
        }
    }

    /*
     * 此内部类是实际上的工作线 worker是实现了Runnable接口的实际工作线程,通过while(true)循环从BlockingQueue中取任务执行。
     *
     */
    class Worker implements Runnable {

        @Override
        public void run() {
            while(true && shutDown == false) {
                try {
                    blockingQueue.take().doJob();
                } catch (InterruptedException e) {
                    e.printStackTrace();
                }
            }
        }
    }
}
2、Task类(需要被线程处理的任务类)
package com.ty.thread;

/**
 * @author Taoyong
 * @date 2018年5月17日
 * 天下没有难敲的代码!
 */
public class Task {

    //通过taskId对任务进行标识
    private int taskId;

    public Task(int taskId) {
        this.taskId = taskId;
    }

    public void doJob() {
        System.out.println("线程" + Thread.currentThread().getName() + "正在处理任务!");
    }

    public int getId() {
        return taskId;
    }
}
3、测试类
package com.ty.thread;

/**
 * @author Taoyong
 * @date 2018年5月17日
 * 天下没有难敲的代码!
 */
public class ThreadPoolExecutorTest {

    public static void main(String[] args) throws InterruptedException {
        ThreadPoolExecutor threadPoolExecutor = new ThreadPoolExecutor(3);
        for(int i = 0; i < 10; i++) {
            Task task = new Task(i);
            threadPoolExecutor.execute(task);
        }

        threadPoolExecutor.shutDown();
    }
}
4、运行结果
线程Thread-0正在处理任务!
线程Thread-2正在处理任务!
线程Thread-0正在处理任务!
线程Thread-1正在处理任务!
线程Thread-2正在处理任务!
线程Thread-2正在处理任务!
线程Thread-1正在处理任务!
线程Thread-2正在处理任务!
线程Thread-0正在处理任务!
Thread-1 interrupt
Thread-0 interrupt
Thread-2 interrupt
当第十个任务待处理时,整个线程池已经被shutDown,整个流程结束。
标签:消费 img date pack over lock 处理 接口 core
原文地址:https://www.cnblogs.com/alimayun/p/9054027.html