标签:开源 数据库 c语言 cached service jpg oid line 网络
Redis是一个开源的使用ANSI C语言编写、支持网络、可基于内存亦可持久化的日志型、Key-Value数据库,和Memcached类似,它支持存储的value类型相对更多,包括string(字符串)、list(链表)、set(集合)、zset(sorted set --有序集合)和hash(哈希类型)。在此基础上,redis支持各种不同方式的排序。与memcached一样,为了保证效率,数据都是缓存在内存中。区别的是redis会周期性的把更新的数据写入磁盘或者把修改操作写入追加的记录文件,并且在此基础上实现了master-slave(主从)同步。
Redis支持主从同步。数据可以从主服务器向任意数量的从服务器上同步,从服务器可以是关联其他从服务器的主服务器。这使得Redis可执行单层树复制。存盘可以有意无意的对数据进行写操作。
Redis支持两种持久化方式:
(1):snapshotting(快照)也是默认方式.(把数据做一个备份,将数据存储到文件)
(2)Append-only file(缩写aof)的方式
快照是默认的持久化方式,这种方式是将内存中数据以快照的方式写到二进制文件中,默认的文件名称为dump.rdb.可以通过配置设置自动做快照持久化的方式。我们可以配置redis在n秒内如果超过m个key键修改就自动做快照.
aof方式:由于快照方式是在一定间隔时间做一次的,所以如果redis意外down掉的话,就会丢失最后一次快照后的所有修改。aof比快照方式有更好的持久化性,是由于在使用aof时,redis会将每一个收到的写命令都通过write函数追加到文件中,当redis重启时会通过重新执行文件中保存的写命令来在内存中重建整个数据库的内容。
以cmd安装方法:
1.下载安装包:https://github.com/dmajkic/redis/downloads
2.安装包下载后根据操作系统选择对应版本文件,里面会有几个dll分别为:
redis-server.exe:服务程序
redis-check-dump.exe:本地数据库检查
redis-check-aof.exe:更新日志检查
redis-benchmark.exe:性能测试,用以模拟同时由N个客户端发送M个 SETs/GETs 查询.
redis-cli.exe: 服务端开启后,我们的客户端就可以输入各种命令测试了
首先以管理员身份打开cmd (窗口+R),进入到安装包下载的位置。输入:redis-server.exe redis.conf 开启Redis服务。提示信息没有报错表示启动成功。
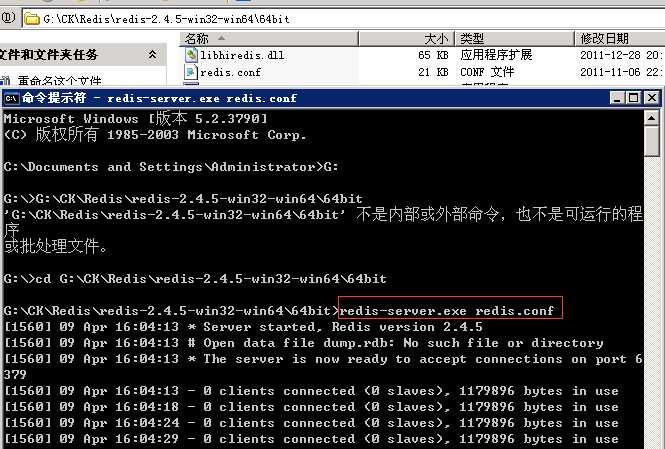
此窗口要保持开启状态,如果关闭Redis服务也会相即被关闭。使用客户端测试一下数据。
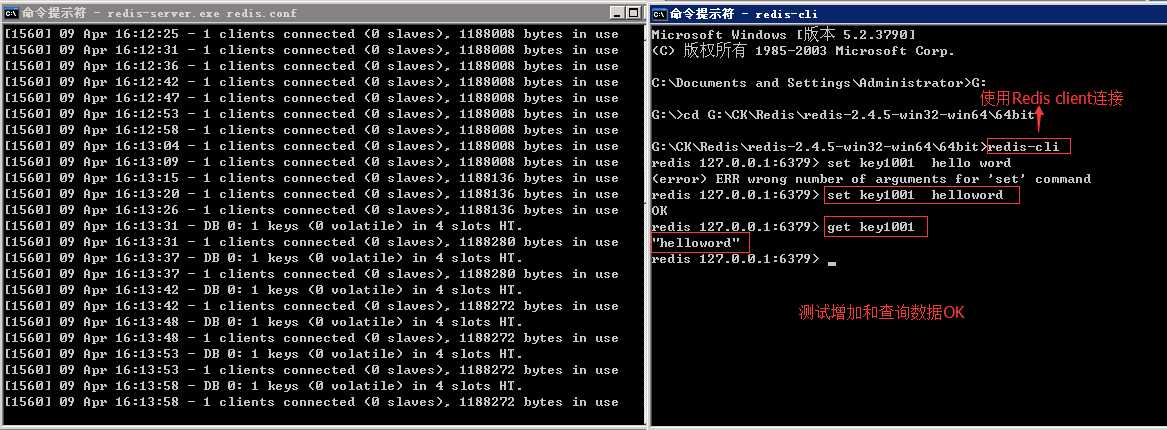
现在来观察Redis是怎么持久化存储数据到硬盘上。(快照是默认的持久化方式,默认的文件名称为dump.rdb)
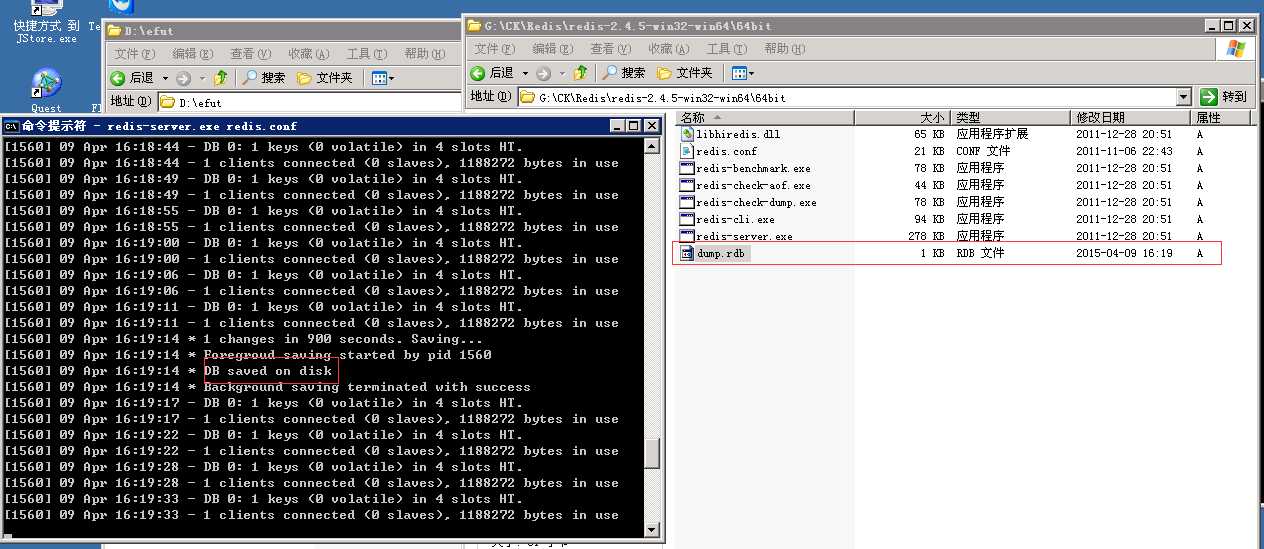
可以看到Redis服务端在一段时间后将数据库保存在磁盘上,文件为:dump.rdb。
以weindows服务安装Redis方法:
下载Redis服务安装包:https://github.com/rgl/redis/downloads
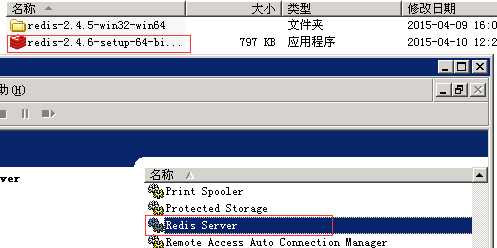
下载完成后直接点击.exe下一步下一步OK。安装完后我们会在windows服务中找到Redis Service服务。注意启动服务后在进行相关测试。
在调用Redis服务前需要准备三个DLL。下载地址:【Redis调用驱动】在项目中引用即可。
使用Redis中存储常用的5种数据类型:String,Hash,List,SetSorted set编写实例代码

static void Main(string[] args)
{
    //在Redis中存储常用的5种数据类型:String,Hash,List,SetSorted set

    RedisClient client = new RedisClient("172.21.0.192", 6379);
    client.FlushAll();

    #region string
    client.Add<string>("StringValueTime", "我已设置过期时间噢30秒后会消失", DateTime.Now.AddMilliseconds(30000));
    while (true)
    {
        if (client.ContainsKey("StringValueTime"))
        {
            Console.WriteLine("String.键:StringValue,值:{0} {1}", client.Get<string>("StringValueTime"), DateTime.Now);
            Thread.Sleep(10000);
        }
        else
        {
            Console.WriteLine("键:StringValue,值:我已过期 {0}", DateTime.Now);
            break;
        }
    }

    client.Add<string>("StringValue", " String和Memcached操作方法差不多");
    Console.WriteLine("数据类型为:String.键:StringValue,值:{0}", client.Get<string>("StringValue"));

    Student stud = new Student() { id = "1001", name = "李四" };
    client.Add<Student>("StringEntity", stud);
    Student Get_stud = client.Get<Student>("StringEntity");
    Console.WriteLine("数据类型为:String.键:StringEntity,值:{0} {1}", Get_stud.id, Get_stud.name);
    #endregion

    #region Hash
    client.SetEntryInHash("HashID", "Name", "张三");
    client.SetEntryInHash("HashID", "Age", "24");
    client.SetEntryInHash("HashID", "Sex", "男");
    client.SetEntryInHash("HashID", "Address", "上海市XX号XX室");

    List<string> HaskKey = client.GetHashKeys("HashID");
    foreach (string key in HaskKey)
    {
        Console.WriteLine("HashID--Key:{0}", key);
    }

    List<string> HaskValue = client.GetHashValues("HashID");
    foreach (string value in HaskValue)
    {
        Console.WriteLine("HashID--Value:{0}", value);
    }

    List<string> AllKey = client.GetAllKeys(); //获取所有的key。
    foreach (string Key in AllKey)
    {
        Console.WriteLine("AllKey--Key:{0}", Key);
    }
    #endregion

    #region List
    /*
     * list是一个链表结构,主要功能是push,pop,获取一个范围的所有的值等,操作中key理解为链表名字。
     * Redis的list类型其实就是一个每个子元素都是string类型的双向链表。我们可以通过push,pop操作从链表的头部或者尾部添加删除元素,
     * 这样list既可以作为栈,又可以作为队列。Redis list的实现为一个双向链表,即可以支持反向查找和遍历,更方便操作,不过带来了部分额外的内存开销,
     * Redis内部的很多实现,包括发送缓冲队列等也都是用的这个数据结构
     */
    client.EnqueueItemOnList("QueueListId", "1.张三");  //入队
    client.EnqueueItemOnList("QueueListId", "2.张四");
    client.EnqueueItemOnList("QueueListId", "3.王五");
    client.EnqueueItemOnList("QueueListId", "4.王麻子");
    int q = client.GetListCount("QueueListId");
    for (int i = 0; i < q; i++)
    {
        Console.WriteLine("QueueListId出队值:{0}", client.DequeueItemFromList("QueueListId"));   //出队(队列先进先出)
    }

    client.PushItemToList("StackListId", "1.张三");  //入栈
    client.PushItemToList("StackListId", "2.张四");
    client.PushItemToList("StackListId", "3.王五");
    client.PushItemToList("StackListId", "4.王麻子");
    int p = client.GetListCount("StackListId");
    for (int i = 0; i < p; i++)
    {
        Console.WriteLine("StackListId出栈值:{0}", client.PopItemFromList("StackListId"));   //出栈(栈先进后出)
    }


    #endregion

    #region Set无序集合
    /*
     它是string类型的无序集合。set是通过hash table实现的,添加,删除和查找,对集合我们可以取并集,交集,差集
     */
    client.AddItemToSet("Set1001", "小A");
    client.AddItemToSet("Set1001", "小B");
    client.AddItemToSet("Set1001", "小C");
    client.AddItemToSet("Set1001", "小D");
    HashSet<string> hastsetA = client.GetAllItemsFromSet("Set1001");
    foreach (string item in hastsetA)
    {
        Console.WriteLine("Set无序集合ValueA:{0}", item); //出来的结果是无须的
    }

    client.AddItemToSet("Set1002", "小K");
    client.AddItemToSet("Set1002", "小C");
    client.AddItemToSet("Set1002", "小A");
    client.AddItemToSet("Set1002", "小J");
    HashSet<string> hastsetB = client.GetAllItemsFromSet("Set1002");
    foreach (string item in hastsetB)
    {
        Console.WriteLine("Set无序集合ValueB:{0}", item); //出来的结果是无须的
    }

    HashSet<string> hashUnion = client.GetUnionFromSets(new string[] { "Set1001", "Set1002" });
    foreach (string item in hashUnion)
    {
        Console.WriteLine("求Set1001和Set1002的并集:{0}", item); //并集
    }

    HashSet<string> hashG = client.GetIntersectFromSets(new string[] { "Set1001", "Set1002" });
    foreach (string item in hashG)
    {
        Console.WriteLine("求Set1001和Set1002的交集:{0}", item);  //交集
    }

    HashSet<string> hashD = client.GetDifferencesFromSet("Set1001", new string[] { "Set1002" });  //[返回存在于第一个集合,但是不存在于其他集合的数据。差集]
    foreach (string item in hashD)
    {
        Console.WriteLine("求Set1001和Set1002的差集:{0}", item);  //差集
    }

    #endregion

    #region  SetSorted 有序集合
    /*
     sorted set 是set的一个升级版本,它在set的基础上增加了一个顺序的属性,这一属性在添加修改.元素的时候可以指定,
     * 每次指定后,zset(表示有序集合)会自动重新按新的值调整顺序。可以理解为有列的表,一列存 value,一列存顺序。操作中key理解为zset的名字.
     */
    client.AddItemToSortedSet("SetSorted1001", "1.刘仔");
    client.AddItemToSortedSet("SetSorted1001", "2.星仔");
    client.AddItemToSortedSet("SetSorted1001", "3.猪仔");
    List<string> listSetSorted = client.GetAllItemsFromSortedSet("SetSorted1001");
    foreach (string item in listSetSorted)
    {
        Console.WriteLine("SetSorted有序集合{0}", item);
    }
    #endregion
}
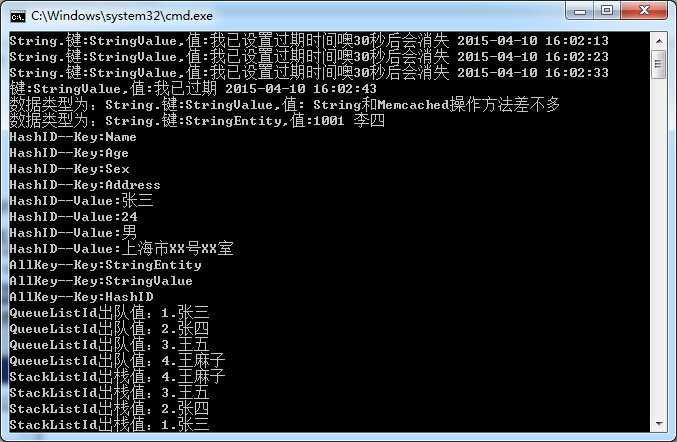
输出结果:
Redis的存储容灾性比较完善,所支持的存储数据类型比较全。比较坑的是版本2.X之下都不支持服务器集群,只能单机。在Redis 3.0中服务器集群功能才亮相。 操作起来总体感觉比较简单容易上手。
http://www.cnblogs.com/caokai520/p/4409712.html
标签:开源 数据库 c语言 cached service jpg oid line 网络
原文地址:https://www.cnblogs.com/cmblogs/p/9055313.html