标签:end world res tar 访问 ram ica tms release
在刚开始看spring boot的时候,发现这么多starter,不免觉得好奇:这些究竟是怎么工作的,每个里边源码都长啥样?今天我们手写一个starter来了解这个过程:
----talk--is--cheap--just--show--you--the--code---------------------------------------------------
首先建一个maven项目:
pom里添加如下内容:
    <dependencies>
        <dependency>
            <groupId>org.springframework.boot</groupId>
            <artifactId>spring-boot-autoconfigure</artifactId>
            <version>2.0.1.RELEASE</version>
        </dependency>

        <dependency>
            <groupId>junit</groupId>
            <artifactId>junit</artifactId>
            <version>4.12</version>
        </dependency>
    </dependencies>
属性配置类:
主要是从application.yml中取值,若不设置,默认为hell.msg = world
@ConfigurationProperties(prefix="hello")
public class HelloServiceProperties {
    private static final String MSG = "world";

    private String msg = MSG;

    public String getMsg() {
        return msg;
    }

    public void setMsg(String msg) {
        this.msg = msg;
    }
}
辅助功能类:
本例中依据此类是否存在来创建这个类的bean
public class HelloService {

    private String msg;

    public String sayHello(){

        return "Hello " + msg;
    }

    public String getMsg() {
        return msg;
    }

    public void setMsg(String msg) {
        this.msg = msg;
    }
}
自动配置类:
@Configuration
@EnableConfigurationProperties(HelloServiceProperties.class)
@ConditionalOnClass(HelloService.class)
@ConditionalOnProperty(prefix="hello",value="enabled",matchIfMissing = true)
public class HelloServiceAutoConfiguration {

    @Autowired
    private HelloServiceProperties helloServiceProperties;

    @Bean
    @ConditionalOnMissingBean(HelloService.class)
    public HelloService helloService(){
        HelloService helloService = new HelloService();
        helloService.setMsg(helloServiceProperties.getMsg());
        return helloService;
    }
}
几个注解有必要解释一下:
@EnableConfigurationProperties(HelloServiceProperties.class) 开启读取文件然后自动配置属性
@ConditionalOnClass(HelloService.class) 类路径中包含某类
@ConditionalOnProperty(prefix="hello",value="enabled",matchIfMissing = true) 配置文件hello.enabled没有时,也继续加载,而不是报错
注册配置:
若想自动配置生效,需要注册自动配置类,在src/main/resources下新建META-INF/spring.factories,文件夹没有的话自己手动创建即可,里面内容如下:
org.springframework.boot.autoconfigure.EnableAutoConfiguration= com.wisely.spring_boot_starter_hello.HelloServiceAutoConfiguration
若有多个自动配置,则用逗号(,)隔开,此处“\”是为了换行后仍能读到属性。
测试我们的starter:
刚才的程序,我们在本地mvn install一下,将其安装到本地的.m2仓库中,然后新创建spring boot项目,在pom文件中引入我们的starter:
	<dependencies>
		<dependency>
			<groupId>org.springframework.boot</groupId>
			<artifactId>spring-boot-starter-web</artifactId>
		</dependency>

		<dependency>
			<groupId>com.wisely</groupId>
			<artifactId>spring-boot-starter-hello</artifactId>
			<version>1.0-SNAPSHOT</version>
		</dependency>

		<dependency>
			<groupId>org.springframework.boot</groupId>
			<artifactId>spring-boot-starter-test</artifactId>
			<scope>test</scope>
		</dependency>
	</dependencies>
然后就是使用啦:
@RequestMapping("/startertest")
@ComponentScan("com.wisely.spring_boot_starter_hello")
@RestController
public class MyStarterTestController {

    @Autowired
    HelloService helloService;

    @RequestMapping("/test")
    public String index(){
        return helloService.sayHello();
    }
}
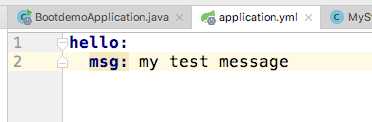
在application.yml中如下配置:
运行程序,访问,可以看到结果:
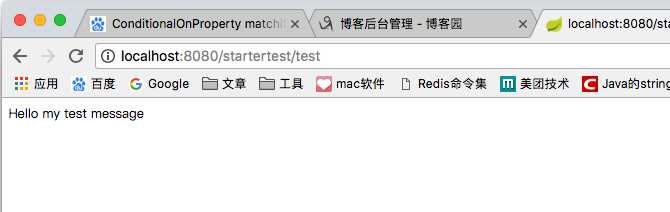
可以看到,程序读取了application.yml中的值并进行了展示
--------------------------------------------------------
over
标签:end world res tar 访问 ram ica tms release
原文地址:https://www.cnblogs.com/nevermorewang/p/9065294.html