标签:for otf ref 一个 依赖注入 uil gif ack close
创建一个SpringBoot项目即可,详情参见三少的相关博文
技巧01:引入了springSecurity相关依赖后,项目就会被SpringSecurity进行管理了;默认的登录名为user,登录密码会被打印到控制台上
技巧02:SpringSecurity默认的配置使用的是
        <!--spring-security相关-->
        <dependency>
            <groupId>org.springframework.boot</groupId>
            <artifactId>spring-boot-starter-security</artifactId>
        </dependency>
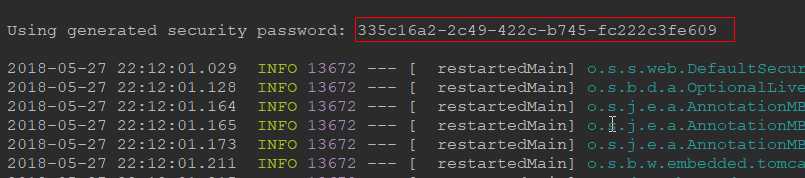
技巧01:每次启动项目所打印出来的密码都是不一样的
控制台打印的登录密码信息如下:
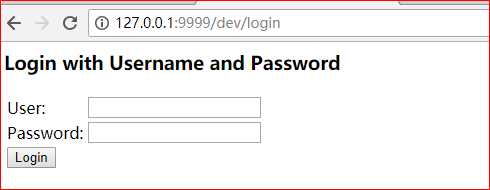
技巧01:项目启动后,前台首次访问时都会被重定向到一个默认的登录页面
技巧02:springSecurity默认的配置时使用表单进行登录
技巧03:前后端分离时也是使用表单登录,而且表单的用户名必须是username,密码必须是password(PS: 前后端分离时只需要模拟出表单提交请求即可,即:请求路径对应,请求参数和后台对应即可)
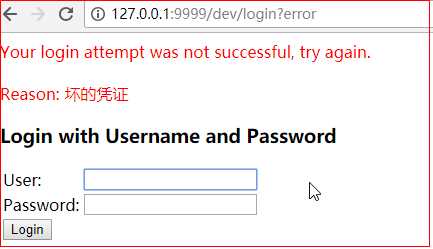
技巧01:如果用户名不是user或者密码不是控制台打印的信息,都不会通过验证
技巧02:如果登录信息成功后,SpringSecurity会默认重定向到之前访问的路径
技巧03:前后端分离时要求登录验证无论成功与否都是返回JSON格式的数据,具体怎么跳转有前端进行控制
技巧01:自定义SpringSecurity时需要重写一个UserDetaiService类,而该类需要使用一个对密码进行加密和解密的工具类,所以我们需要在自定义的SpringSecurity配置文件中指定这个密码加密解密工具的类的Bean,使得这个类会被Spring容器管理

package cn.test.demo.base_demo.config.springSecurity;

import org.springframework.beans.factory.annotation.Autowired;
import org.springframework.context.annotation.Bean;
import org.springframework.context.annotation.Configuration;
import org.springframework.security.config.annotation.web.builders.HttpSecurity;
import org.springframework.security.config.annotation.web.configuration.WebSecurityConfigurerAdapter;
import org.springframework.security.crypto.bcrypt.BCryptPasswordEncoder;
import org.springframework.security.crypto.password.PasswordEncoder;

/**
 * @author 王杨帅
 * @create 2018-05-27 21:27
 * @desc
 **/
@Configuration
public class FurySpringSecurityConfig extends WebSecurityConfigurerAdapter {

    /** 依赖注入自定义的登录成功处理器 */
    @Autowired
    private FuryAuthenticationSuccessHandler furyAuthenticationSuccessHandler;

    /** 依赖注入自定义的登录失败处理器 */
    @Autowired
    private FuryAuthenticationFailureHandler furyAuthenticationFailureHandler;

//    向spring容器中创建一个Bean
    @Bean
    public PasswordEncoder passwordEncoder() {
        return new BCryptPasswordEncoder();
    }

//    @Override
//    protected void configure(HttpSecurity http) throws Exception {
//        http.formLogin()
//                .loginProcessingUrl("/login")
//                .successHandler(furyAuthenticationSuccessHandler)
//                .failureHandler(furyAuthenticationFailureHandler)
//                .and().authorizeRequests()
//                        .antMatchers("/login").permitAll()
//                        .anyRequest()
//                        .authenticated()
//                .and().csrf().disable();
//    }
}
继承UserDetaiService的子类可以实现登录用户验证以及登录用户的权限查询
package cn.test.demo.base_demo.config.springSecurity;

import lombok.extern.slf4j.Slf4j;
import org.springframework.beans.factory.annotation.Autowired;
import org.springframework.context.annotation.Bean;
import org.springframework.security.core.authority.AuthorityUtils;
import org.springframework.security.core.userdetails.User;
import org.springframework.security.core.userdetails.UserDetails;
import org.springframework.security.core.userdetails.UserDetailsService;
import org.springframework.security.core.userdetails.UsernameNotFoundException;
import org.springframework.security.crypto.password.PasswordEncoder;
import org.springframework.stereotype.Component;

/**
 * @author 王杨帅
 * @create 2018-05-27 21:23
 * @desc
 **/
@Component
@Slf4j
public class FuryUserDetailService implements UserDetailsService {

    /**
     * 依赖注入密码加密解密工具(PS: 需要在springsecurity的配置文件中配置这个Bean)
     */
    @Autowired
    private PasswordEncoder passwordEncoder;

    @Override
    public UserDetails loadUserByUsername(String username) throws UsernameNotFoundException {

        // 打印前端传过来的用户数据
        log.info("前端闯过来的用户名为:{}", username);

        // 模拟数据库中的数据
        String pwd = passwordEncoder.encode("111");

        // 返回一个User对象(技巧01:这个User对象的密码是从数据库中取出来的密码)
//      // 技巧02:数据库中的密码是在创建用户时将用户的密码利用SpreingSecurity配置中相同的密码加密解密工具加密过的
        return new User(username, pwd, AuthorityUtils.commaSeparatedStringToAuthorityList("admin"));
    }
}
重启项目后,访问一个RestfulAPI时;控制台就不会再打印出密码信息了,继承UserDetaiService的子类会接收到前端传过来的用户名和密码,我们可以在继承UserDetaiService的子类中依赖注入先关的持久层来通过用户名到数据库中去查询用户密码,在将查到的密码和用户登录时的密码进行比对,从而判断用户登录验证是否成功;还可以根据用户名到数据库中去查询该用户的权限信息
技巧01:此时用户名可以随便输入
技巧02:由于密码是三少在后台进行硬编码的的,所以登录时密码必须是 “111”(即:用户名任意,密码只要是 111 就可以登录成功,否则就会登录失败)
需求01:修改表单的登录路径
》配置登录请求路径即可
需求01:无论登录验证成功与否都返回JSON格式字符串
技巧01:以上的需求都可以在自定义的SpringSecurity配置中实现
技巧02:前后端分离时,请求的方式必须是POST方式,而且必须传递username和password两个变量到后台
只需要分别实现两个处理接口即可:AuthenticationSuccessHandler、AuthenticationFailureHandler;这两个接口分别处理登录验证成功和失败
package cn.test.demo.base_demo.config.springSecurity;

import com.fasterxml.jackson.databind.ObjectMapper;
import lombok.extern.slf4j.Slf4j;
import org.springframework.beans.factory.annotation.Autowired;
import org.springframework.security.core.Authentication;
import org.springframework.security.web.authentication.AuthenticationSuccessHandler;
import org.springframework.stereotype.Component;

import javax.servlet.ServletException;
import javax.servlet.http.HttpServletRequest;
import javax.servlet.http.HttpServletResponse;
import java.io.IOException;

/**
 * @author 王杨帅
 * @create 2018-05-27 21:48
 * @desc
 **/
@Slf4j
@Component
public class FuryAuthenticationSuccessHandler implements AuthenticationSuccessHandler {

    @Autowired
    private ObjectMapper objectMapper; // Json转化工具

    @Override
    public void onAuthenticationSuccess(HttpServletRequest request, HttpServletResponse response, Authentication authentication) throws IOException, ServletException {
        log.info("登录验证成功");
        response.setContentType("application/json;charset=UTF-8"); // 响应类型
        response.getWriter().write(objectMapper.writeValueAsString("登录验证成功"));
    }
}
package cn.test.demo.base_demo.config.springSecurity;

import com.fasterxml.jackson.databind.ObjectMapper;
import lombok.extern.slf4j.Slf4j;
import org.springframework.beans.factory.annotation.Autowired;
import org.springframework.security.core.AuthenticationException;
import org.springframework.security.web.authentication.AuthenticationFailureHandler;
import org.springframework.stereotype.Component;

import javax.servlet.ServletException;
import javax.servlet.http.HttpServletRequest;
import javax.servlet.http.HttpServletResponse;
import java.io.IOException;

/**
 * @author 王杨帅
 * @create 2018-05-27 21:55
 * @desc
 **/
@Component
@Slf4j
public class FuryAuthenticationFailureHandler implements AuthenticationFailureHandler {

    @Autowired
    private ObjectMapper objectMapper;

    @Override
    public void onAuthenticationFailure(HttpServletRequest request, HttpServletResponse response, AuthenticationException exception) throws IOException, ServletException {
        log.info("登录验证失败");
        response.setContentType("application/json;charset=UTF-8");
        response.getWriter().write(objectMapper.writeValueAsString(exception));;
    }
}
package cn.test.demo.base_demo.config.springSecurity;

import org.springframework.beans.factory.annotation.Autowired;
import org.springframework.context.annotation.Bean;
import org.springframework.context.annotation.Configuration;
import org.springframework.security.config.annotation.web.builders.HttpSecurity;
import org.springframework.security.config.annotation.web.configuration.WebSecurityConfigurerAdapter;
import org.springframework.security.crypto.bcrypt.BCryptPasswordEncoder;
import org.springframework.security.crypto.password.PasswordEncoder;

/**
 * @author 王杨帅
 * @create 2018-05-27 21:27
 * @desc
 **/
@Configuration
public class FurySpringSecurityConfig extends WebSecurityConfigurerAdapter {

    /** 依赖注入自定义的登录成功处理器 */
    @Autowired
    private FuryAuthenticationSuccessHandler furyAuthenticationSuccessHandler;

    /** 依赖注入自定义的登录失败处理器 */
    @Autowired
    private FuryAuthenticationFailureHandler furyAuthenticationFailureHandler;

//    向spring容器中创建一个Bean
    @Bean
    public PasswordEncoder passwordEncoder() {
        return new BCryptPasswordEncoder();
    }

    @Override
    protected void configure(HttpSecurity http) throws Exception {
        http.formLogin()
                .loginProcessingUrl("/furyLogin") // 登录请求路径
                .successHandler(furyAuthenticationSuccessHandler) // 验证成功处理器
                .failureHandler(furyAuthenticationFailureHandler) // 验证失败处理器
                .and().authorizeRequests()
                        .antMatchers("/furyLogin").permitAll() // 登录请求路径不进行过滤
                        .anyRequest()
                        .authenticated()
                .and().csrf().disable(); // 取消跨站请求伪造防护
    }

}
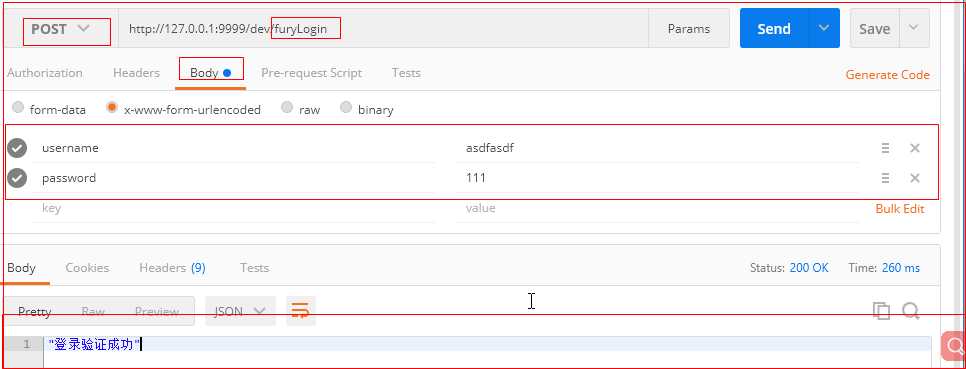
6.3 测试
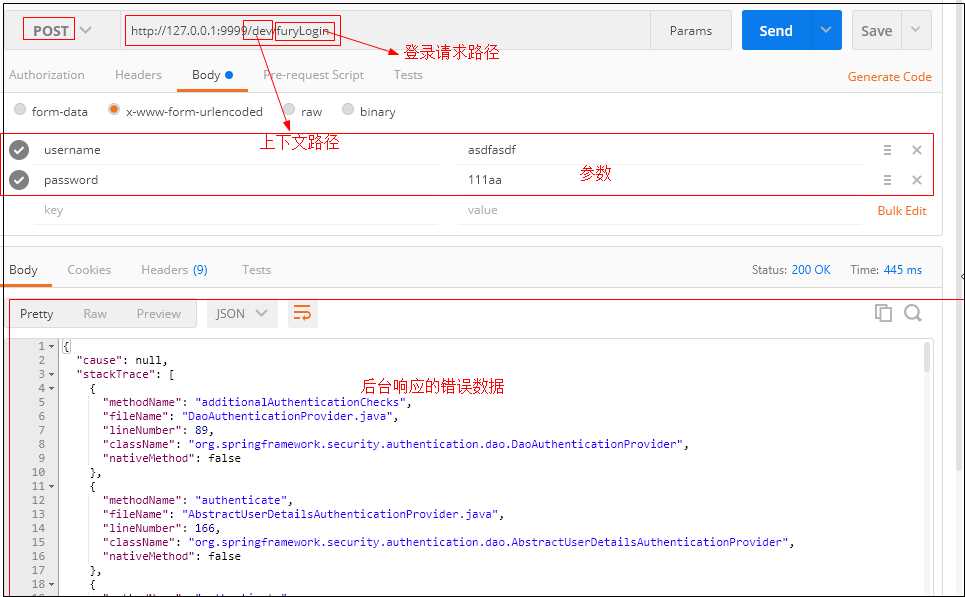
利用postman进行测试
技巧01:只需要模拟出 登录请求即可;POST请求,参数分别是username和password
坑01:虽然在springSecurity的自定义配置文件中配置的登录请求路径是 /furyLogin ,但是我们在模拟的时候必须模拟 http://127.0.0.1:9999/dev/furyLogin,因为必须加上IP、端口和应用上下文路径
7 利用Angular实现前端登录
8 登录成功后返回对应的菜单信息
9 权限问题
SpringBoot20 集成SpringSecurity02 -> 利用SpringSecurity进行前后端分离的登录验证
标签:for otf ref 一个 依赖注入 uil gif ack close
原文地址:https://www.cnblogs.com/NeverCtrl-C/p/9097947.html
