标签:git 填充 查看 盒子模型 min ever 不可 外边距 box
28 May 18
一、今日面试题
# 去重并保持原来的顺序
# 方法一
l1 = [11, 2, 3, 22, 2, 4, 11, 3]
l2 = []
for i in l1:
if i not in l2:
l2.append(i)
print(l2)
print("=" * 120)
# 方法二
l3 = list(set(l1)) # 将列表用set去重,再转换回列表(没有按照之前的顺序)
l3.sort(key=l1.index) # 将上一步得到的列表排序,按照l1中的顺序排序
print(l3)
# sort的扩展(使用lambda表达式)
l4 = [
{"name": "Alex", "age": 38},
{"name": "Egon", "age": 18},
{"name": "Nezha", "age": 19},
{"name": "Yuan", "age": 29},
{"name": "WuSir", "age": 30},
]
l4.sort(key=lambda x: x["age"])
print(l4)
二、CSS选择器复习及实例
1. CSS是什么:层叠样式表 --> 给HTML添加样式的
2. CSS的语法
选择器{
属性1:值1;
属性2:值2;
}
3. CSS引入方式
1. 直接写在HTMl标签里面
2. 写在style标签里面的
3. 写在单独的css文件中
4. CSS选择器
1. 基本选择器
1. ID选择器 --> #d1 {}
2. 类选择器 --> .c1 {}
3. 标签选择器--> a {}
4. 通用选择器--> * {}
2. 层级选择器
后代选择器 --> div .c1 {}
儿子选择器 --> div>.c1 {}
毗邻选择器 --> div+.c1 {} 同一级 紧挨着我的那个标签
弟弟选择器 --> div~.c1 {} 同一级后面所有的
3. 属性选择器
有某个属性值的 --> div["title"]
属性等于某个值的--> input["type"="button"]
4. 交集、并集选择器
交集:p.c1
并集:p,.c1
5. 伪类选择器
a:hover {
}
input:focus {
}
6. 伪元素选择器
p:before {}
p:after {}
p:first-child
p:last-child
5. CSS选择器的优先级
1. CSS选择器相同时: 距离标签越近,权重越高!
2. CSS选择器不同时:
内联> ID选择器> 类选择器> 元素选择器> 继承的样式
3. !important 火烧眉毛才用!
6. 三大特性
1. 继承
2. 层叠
3. 优先级
<!DOCTYPE html>
<html lang="en">
<head>
<meta charset="UTF-8">
<title>CSS选择器练习</title>
<style>
/*#d1~.c1 {*/
/*color: red;*/
/*}*/
/*.c3~.c1 {*/
/*color: deeppink;*/
/*}*/
div~.c1 {
color: green;
}
div+.c1 {
color: blue;
}
p:before {
content: "*";
color: red;
}
p:after {
content: "?";
color: blue;
}
</style>
</head>
<body>
<p class="c1">div前面的c1</p>
<div id="d1" class="c3"></div>
<p class="c1">div后面的c1</p>
<p class="c1">div后面的c1</p>
<p class="c2">div后面的c2</p>
<p class="c1">div后面的c1</p>
<p class="c1">div后面的c1</p>
<div style="color: chocolate">
<p>aaaaa</p>
</div>
</body>
</html>
快捷操作
ul>li*3>a[s=$]{table a}+span
<ul>
<li><a href="" s="1">table a</a><span></span></li>
<li><a href="" s="2">table a</a><span></span></li>
<li><a href="" s="3">table a</a><span></span></li>
</ul>
三、HTML标签的分类
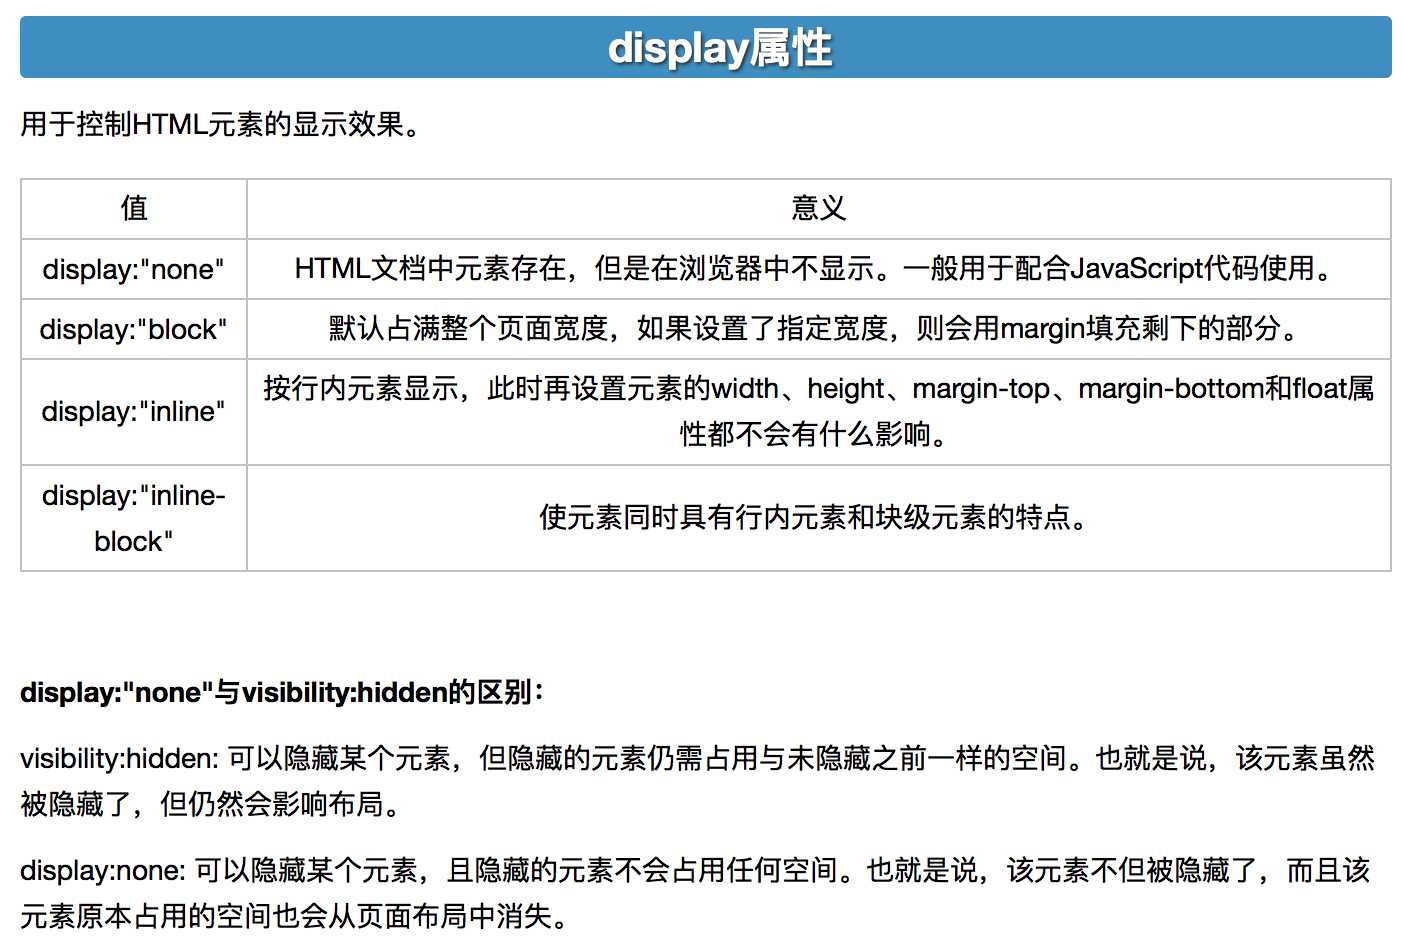
1. 块级标签(block;自占一行;只有块级标签可以识别宽和高)
1. div
2. p
3. h1~h6
4. hr
5. ul>li
6. table>tr
2. 行内标签(inline;行内标签不能识别宽和高;长度由内容决定!)
1. a
2. span
3. i, u, s ...
4. input
5. img
3. display: inline-block;
不独占一行,且可识别width和height
Blog链接:https://www.cnblogs.com/liwenzhou/p/7999532.html
四、CSS属性—字体属性
1、宽和高
width属性可以为元素设置宽度。
height属性可以为元素设置高度。
块级标签才能设置宽度,内联标签的宽度由内容来决定。
2、文字字体
font-family可以把多个字体名称作为一个“回退”系统来保存。如果浏览器不支持第一个字体,则会尝试下一个。浏览器会使用它可识别的第一个值。
body {
font-family:"Microsoft Yahei","微软雅黑", "Arial", sans-serif
}
3、字体大小
p {
font-size:14px;
}
如果设置成inherit表示继承父元素的字体大小值。
4、字重
font-weight用来设置字体的字重(粗细)。

5、文本颜色
十六进制值- 如: #FF0000
一个RGB值- 如: RGB(255,0,0)
颜色的名称- 如: red
还有rgba(255,0,0,0.3),第四个值为alpha, 指定了色彩的透明度/不透明度,它的范围为0.0到1.0之间。
/*四种选取颜色的方式*/
/*color: red;*/
/*color: #0000FF;*/
/*color: #00F;*/ #简写
/*color: rgb(74,83,149);*/
五、CSS属性—文字属性
1、文字对齐
text-align属性规定元素中的文本的水平对齐方式。
left, right, center, justify
2、文字装饰
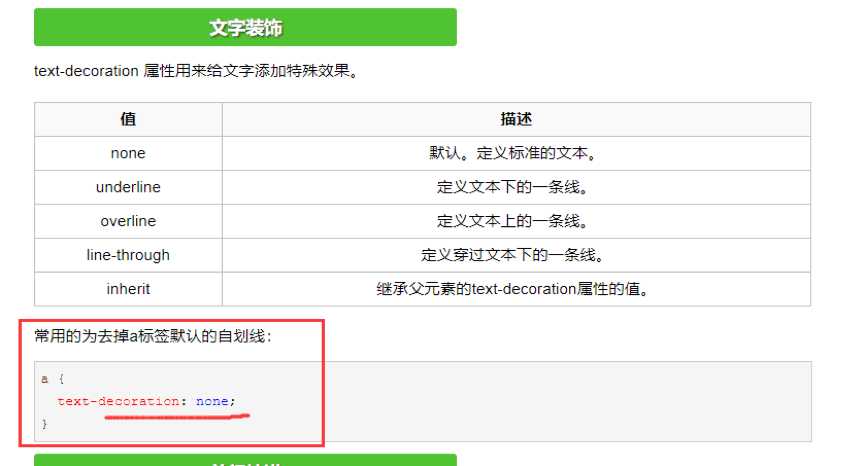
text-decoration属性用来给文字添加特殊效果。

3、首行缩进
p {
text-indent:32px;
}
<!DOCTYPE html>
<html lang="en">
<head>
<meta charset="UTF-8">
<title>Title</title>
<style>
/*a 不能识别width & height,p可以识别width & height*/
#a2,#p2 {
width:200px;
height:200px;
color:red;
}
/*font-family如果不设置,用系统默认的*/
body {
font-family:"Microsoft Yahei", "微软雅黑", "Arial", sans-serif
}
#p2 {
font-size:24px;
font-weight:bold;
/*四种选取颜色的方式*/
/*color: red;*/
/*color: #0000FF;*/
/*color: #00F;*/
/*color: rgb(74,83,149);*/
color: rgba(0,0,0,0.6);
text-align:center;
text-decoration:underline;
text-indent:48px;
}
/*取消a超链接自带的下划线效果*/
a {
text-decoration: none;
}
/*设置超链接鼠标经过时样式*/
a:hover {
text-decoration: underline;
}
</style>
</head>
<body>
<a href="">a1111111111111111111111111111111</a>
<a href="" id="a2">a2</a>
<p id="p2">上海这地方比得上希腊神话里的魔女岛,好好一个人来了就会变成畜生。--《围城》</p>
</body>
</html>
六、CSS属性—背景属性
/*背景颜色*/
background-color:red;
/*背景图片*/
background-image:url(‘1.jpg‘);
/*
背景重复
repeat(默认):背景图片平铺排满整个网页
repeat-x:背景图片只在水平方向上平铺
repeat-y:背景图片只在垂直方向上平铺
no-repeat:背景图片不平铺
*/
background-repeat:no-repeat;
/*背景位置*/
background-position:right top;
/*background-position: 200px 200px;*/
支持简写:
background:#ffffff url(‘1.png‘) no-repeat right top;
<!DOCTYPE html>
<html lang="en">
<head>
<meta charset="UTF-8">
<title>背景相关实例</title>
<style>
#d1 {
/*画圆*/
height: 300px;
width: 300px;
background-color: red;
border-radius: 150px;
/*设置边框*/
/*border-width:5px;*/
/*border-color:green;*/
/*border-style:solid;*/
border: 5px solid green;
border-left:5px solid blue;
border-right:10px dotted yellow;
}
#d2 {
height: 600px;
width: 600px;
/*background-image:url("hlw.png");*/
/*background-repeat:no-repeat;*/
/*background-position:bottom center;*/
background: url("hlw.png") no-repeat center;
}
/*设置a1不在页面显示,一般与hover连用,但鼠标游移时出现*/
#a1 {
display: none;
}
/*将div又块级标签转成行内标签*/
#d3 {
display: inline;
}
#d5 {
height: 200px;
width: 400px;
padding:50px;
/*margin:20px;*/
/*margin-left:20px;*/
/*margin-right:30px;*/
/*margin-top:40px;*/
/*margin-bottom:50px;*/
/*上右下左(顺时针)*/
margin: 40px 30px 50px 20px;
/*上下、左右*/
/*margin: 40px 30px;*/
/*上、左右、下*/
/*margin: 40px 50px 30px;*/
border: 10px solid black;
}
#d6 {
width: 50px;
height: 50px;
background-color: chartreuse;
margin: 0 auto;
}
</style>
</head>
<body>
<div id="d1"></div>
<div id="d2"></div>
<a href="" id="a1">a1</a>
<div id="d3">d3</div>
<span>span</span>
<div id="d5">
<div id="d6"></div>
</div>
</body>
</html>
七、CSS属性—背景图片固定不动
<!DOCTYPE html>
<html lang="en">
<head>
<meta charset="UTF-8">
<meta name="viewport" content="width=device-width, initial-scale=1.0">
<meta http-equiv="X-UA-Compatible" content="ie=edge">
<title>滚动背景图示例</title>
<style>
* {
margin: 0;
}
.box {
width: 100%;
height: 500px;
background:url("https://www.luffycity.com/static/img/width-bank.1c9d1b0.png") no-repeat center center;
background-attachment: fixed;
}
.d1 {
height: 500px;
background-color: tomato;
}
.d2 {
height: 500px;
background-color: steelblue;
}
.d3 {
height: 500px;
background-color: mediumorchid;
}
</style>
</head>
<body>
<div class="d1"></div>
<div class="box"></div>
<div class="d2"></div>
<div class="d3"></div>
</body>
</html>
八、CSS属性—边框属性
#i1 {
border-width:2px;
border-style:solid; (dashed, dotted,none)
border-color:red;
border-top-style:dotted;
border-top-color:red;
border-right-style:solid;
border-bottom-style:dotted;
border-left-style:none;
}
简写
#i1 {
border: 2px solid red;
}
九、CSS盒子模型
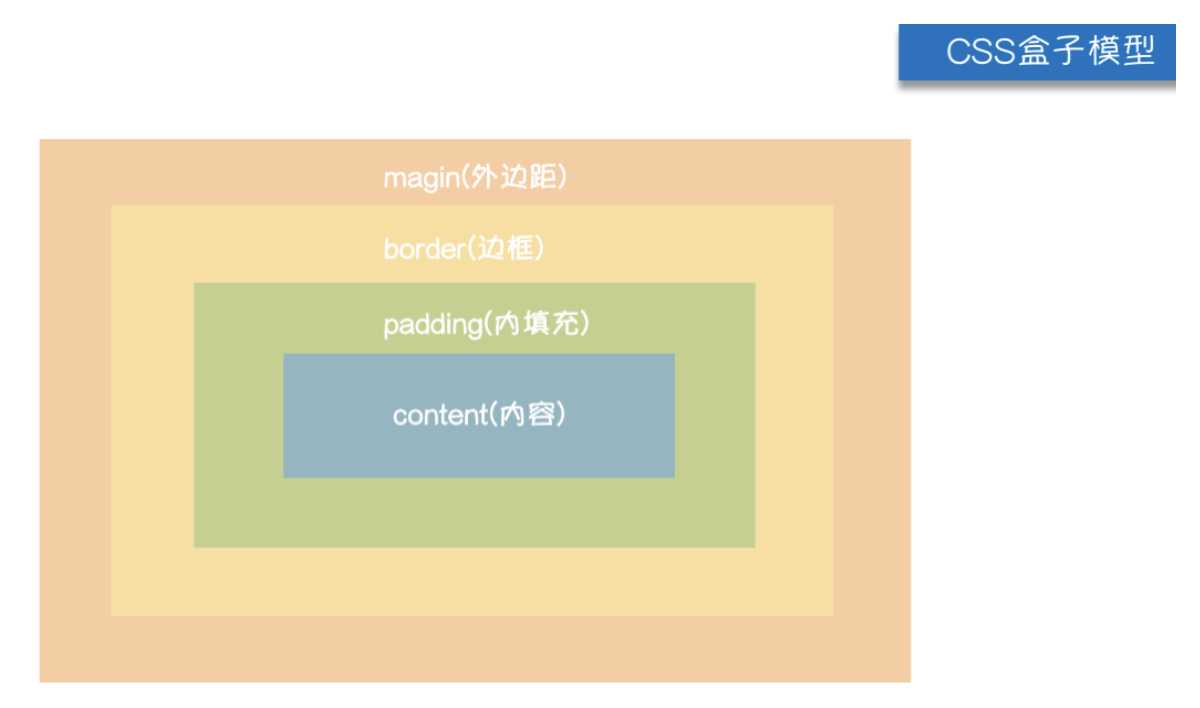
内容-->内填充-->边框-->外边距
想要调整内容和边框之间的距离用:padding
想要调整不同标签之间的距离用:margin

十、浮动实例
在CSS 中,任何元素都可以浮动。浮动元素会生成一个块级框,而不论它本身是何种元素。
关于浮动的两个特点:
浮动的框可以向左或向右移动,直到它的外边缘碰到包含框或另一个浮动框的边框为止。
由于浮动框不在文档的普通流中,所以文档的普通流中的块框表现得就像浮动框不存在一样。
left:向左浮动
right:向右浮动
none:默认值,不浮动
<!DOCTYPE html>
<html lang="en">
<head>
<meta charset="UTF-8">
<title>浮动实例</title>
<style>
body {
margin: 0;
}
.left {
width: 20%;
height: 1000px;
background-color: red;
float: left;
}
.right {
width: 80%;
height: 1000px;
background-color: green;
float: right;
}
</style>
</head>
<body>
<div class="left"></div>
<div class="right"></div>
</body>
</html>
clear属性规定元素的哪一侧不允许其他浮动元素。
left 在左侧不允许浮动元素。
right 在右侧不允许浮动元素。
both 在左右两侧均不允许浮动元素。
none 默认值。允许浮动元素出现在两侧。
inherit 规定应该从父元素继承clear 属性的值。
注意:clear属性只会对自身起作用,而不会影响其他元素。
父标签塌陷问题
.clearfix:after {
content: "";
display: block;
clear: both;
}
十一、浮动的弊端(父标签塌陷问题)
<!DOCTYPE html>
<html lang="en">
<head>
<meta charset="UTF-8">
<title>Title</title>
<style>
body {
margin: 0;
}
#d1 {
border: 1px solid black;
}
div.c1,
div.c11,
div.c111{
height: 200px;
width: 200px;
background-color: green;
border: 1px solid red;
float: left;
}
div.c11 {
height: 150px;
}
div.c111 {
height: 250px;
}
/*解决父标签塌陷问题,方式三*/
/*.c2 {*/
/*height: 100px;*/
/*width: 100px;*/
/*background-color: blue;*/
/*clear: left;*/
/*}*/
/*解决父标签塌陷问题,方式一*/
.clearfix:after {
content: "";
clear: both;
display: block;
}
</style>
</head>
<body>
<div id="d1" class="clearfix">
<div class="c1"></div>
<div class="c11"></div>
<div class="c111"></div>
<div class="c2"></div>
<!--/*解决父标签塌陷问题,方式二*/-->
<!--<div style="height: 252px"></div>-->
</div>
<div style="height: 500px;width: 500px;</div>
</body>
十二、CSS属性—Overflow溢出属性与溢出实例
visible 默认值。内容不会被修剪,会呈现在元素框之外。
hidden 内容会被修剪,并且其余内容是不可见的。
scroll 内容会被修剪,但是浏览器会显示滚动条以便查看其余的内容。
auto 如果内容被修剪,则浏览器会显示滚动条以便查看其余的内容。
inherit 规定应该从父元素继承overflow 属性的值。
overflow(水平和垂直均设置)
overflow-x(设置水平方向)
overflow-y(设置垂直方向)
<!DOCTYPE html>
<html lang="en">
<head>
<meta charset="UTF-8">
<title>溢出实例</title>
<style>
.c1 {
height: 50px;
width: 50px;
border: 1px solid black;
overflow: scroll;
}
.c2 {
height: 200px;
width: 200px;
border-radius: 100px;
border: 5px solid white;
overflow: hidden;
}
.c2>img {
max-width: 100%;
}
</style>
</head>
<body>
<div class="c1">
在苍茫的大海上,狂风卷集着乌云,在乌云和大海之间,海燕像黑色的闪电,在高傲的飞翔!
</div>
<div class="c2">
<img src="https://q1mi.github.io/Blog/asset/img/head_img.jpg" >
</div>
</body>
</html>
十三、CSS属性—定位
1. 相对定位 --> 相对自己原来在的位置
2. 绝对定位 --> 相对已经定位过的父标签
3. 固定定位 --> 相对于浏览器窗口
脱离文档流(位置会被别的标签抢去)
1. 浮动的元素
2. 绝对定位
3. 固定定位
没有脱离文档流
<!DOCTYPE html>
<html lang="en">
<head>
<meta charset="UTF-8">
<title>定位实例</title>
<style>
body {
margin: 0;
}
.c1 {
height: 100px;
width: 100px;
background-color: red;
}
.c2 {
height: 100px;
width: 100px;
background-color: green;
position: relative;
left: 100px;
}
/*C4绝对定位钱,其父标签c3必须先定位*/
.c3 {
height: 100px;
width: 60px;
background-color: blue;
position: relative;
}
.c4 {
height: 50px;
width: 100px;
background-color: orangered;
position: absolute;
top: 100px;
left: 60px;
}
/*返回顶部按钮样式示例*/
.c5 {
height: 40px;
width: 100px;
background-color: grey;
color: red;
position: fixed;
right: 10px;
bottom: 20px;
}
</style>
</head>
<body>
<div class="c1"></div>
<div class="c2"></div>
<div class="c3">
<div class="c4">空空如也~~</div>
</div>
<div class="c5">返回顶部</div>
</body>
</html>
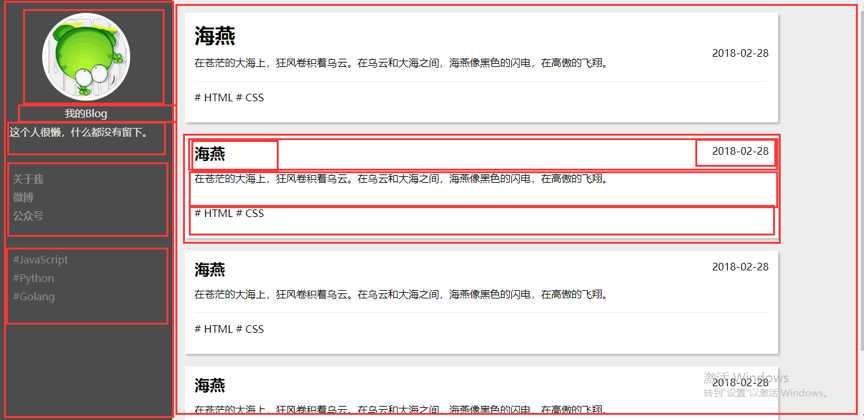
十四、blog实例

# blog.html
<!DOCTYPE html>
<html lang="en">
<head>
<meta charset="UTF-8">
<link rel="stylesheet" href="css/blog.css">
<title>Blog</title>
</head>
<body>
<div class="side-bar">
<div class="header">
<a href="#" class="logo">
<img src="https://q1mi.github.io/Blog/asset/img/head_img.jpg" >
</a>
<div class="author-name">My Blog</div>
<div class="info"> coming soon </div>
</div>
<div class="nav">
<a href="">about me</a>
<a href="">weibo</a>
<a href="">public account</a>
</div>
<div class="tag-list">
<a href="">#JavaScript</a>
<a href="">#Python</a>
<a href="">#Golang</a>
</div>
</div>
<div class="main">
<div class="article-list">
<div class="article">
<div class="article-header">
<a href="" class="article-title">legend of 1900</a>
<span class="article-date">2018-05-28</span>
</div>
<div class="content">
I could stay here for years, but the sea never speak to me. If i get off, live on land for a couple of years, I‘d be normal, just like all the others.
</div>
<div class="article-tag">
<a href=""># HTML</a>
<a href=""># CSS</a>
</div>
</div>
</div>
<div></div>
<div></div>
<div></div>
<div></div>
</div>
</body>
</html>
# blog.css
/*设置页面margin*/
*{
margin:0;
}
/*设置背景颜色和行间距*/
body{
background-color:#eee;
line-height:1.2;
}
/*超链接去掉下划线,链接颜色和主体一致*/
a{text-decoration: none;
color:inherit;
}
/* 左侧边栏样式 开始*/
/*.side-bar {*/
/*width: 20%;*/
/*position: fixed;*/
/*height: 100%;*/
/*float: left;*/
/*color: #eee;*/
/*background-color: #4d4d4d;*/
/*}*/
.side-bar {
width: 20%;
position: fixed;
height: 100%;
float: left;
color: #eee;
background-color: #4d4d4d;
}
/*.side-bar>* {*/
/*padding: 20px 15px;*/
/*}*/
.side-bar>* {
padding: 20px 15px;
}
/*.header>* {*/
/*margin: 10px 0;*/
/*}*/
.header>* {
margin: 10px 0;
}
/*.header .logo {*/
/*display: block;*/
/*border: 5px solid #fff;*/
/*margin: 0 auto;*/
/*position: relative;*/
/*overflow: hidden;*/
/*width: 128px;*/
/*height: 128px;*/
/*border-radius: 50%;*/
/*}*/
.header .logo {
display: block;
border: 5px solid #fff;
margin: 0 auto;
position: relative;
overflow: hidden;
width: 128px;
height: 128px;
border-radius: 50%;
}
/*.header .author-name {*/
/*text-align: center*/
/*}*/
.header .author-name {
text-align: center;
}
/*.logo>img {*/
/*max-width: 100%;*/
/*}*/
.logo>img {
max-width: 100%;
}
/*.side-bar .nav a,*/
/*.side-bar .tag-list a {*/
/*display: block;*/
/*padding: 5px;*/
/*color: #888;*/
/*transition: color 200ms;*/
/*}*/
.side-bar .nav a,
.side-bar .tag-list a {
display: block;
padding: 5px;
color: #888;
transition: color 200ms;
}
/*.side-bar .nav a:hover,*/
/*.side-bar .tag-list a:hover {*/
/*color: #eee*/
/*}*/
.side-bar .nav a:hover,
.side-bar .tag-list a:hover{
color: #444;
}
/*.side-bar .nav a {*/
/*font-weight: bold;*/
/*}*/
.side-bar .nav a {
font-weight: bold;
}
/* 左侧边栏样式 结束*/
/* 右侧内容区*/
.main {
width: 80%;
float: right;
color: black;
}
.main .article {
background-color: white;
padding: 15px;
margin-bottom: 20px;
box-shadow: 3px 3px 3px rgba(0,0,0,0.2);
}
.article-header {
padding-bottom: 15px;
}
.article-title {
font-size: 24px;
font-weight: bold;
}
.article-date {
float: right;
}
.article-tag {
margin-top: 20px;
border-top: 1px solid #eee;
padding: 15px 0;
}
标签:git 填充 查看 盒子模型 min ever 不可 外边距 box
原文地址:https://www.cnblogs.com/zhangyaqian/p/py20180528.html