标签:官网 样式 范围 close 查看 列表 [1] 使用 邻居
一.networkx
1.用于图论和复杂网络
2.官网:http://networkx.github.io/
3.networkx常常结合numpy等数据处理相关的库一起使用,通过matplot来可视化图
二.绘制图
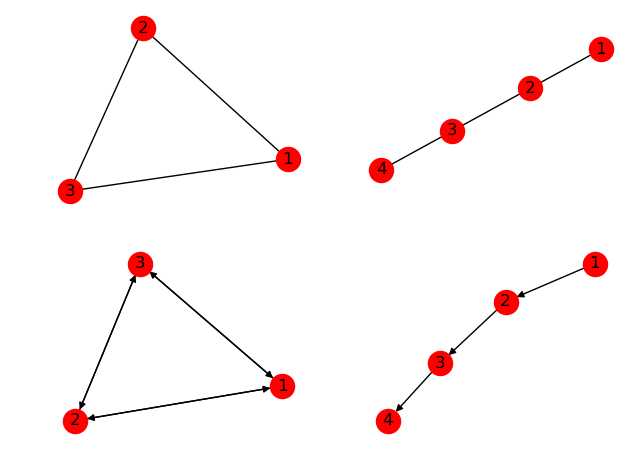
1.创建图

 1 import networkx as nx
 2 import matplotlib.pyplot as plt
 3
 4 G=nx.Graph()#创建空图,无向图
 5 # G1=nx.DiGraph(e)#创建空图,有向图
 6 # G = nx.Graph(name=‘my graph‘)#指定图的属性(name) 的值(my graph)
 7 G.add_edges_from(([1,2],[2,3],[3,1]))
 8
 9 e = [(1, 2), (2, 3), (3, 4)]  # 边的列表
10 G2 = nx.Graph(e)#根据e来创建图
11
12 F=G.to_directed()#把无向图转换为有向图
13
14 #创建多图,类MultiGraph和类MultiDiGraph允许添加相同的边两次,这两条边可能附带不同的权值
15 # H=nx.MultiGraph(e)
16 H=nx.MultiDiGraph(e)
17
18 plt.subplot(2,2,1)
19 nx.draw(G,with_labels=True)
20 plt.subplot(2,2,2)
21 nx.draw(G2,with_labels=True)
22 plt.subplot(2,2,3)
23 nx.draw(F,with_labels=True)
24 plt.subplot(2,2,4)
25 nx.draw(H,with_labels=True)
26
27 plt.show()

2.无向图

 1 import networkx as nx
 2 import matplotlib.pyplot as plt
 3
 4 G=nx.Graph()#创建空图
 5
 6 #添加节点
 7 G.add_node(‘a‘)
 8 G.add_node(1)                  #添加单个节点
 9 G.add_nodes_from([2,3,4])      #添加一些节点,容器,(可以是list, dict, set,)
10
11 #添加边,如果点不在图中,会自动创建点
12 G.add_edge(1,‘a‘,weight=1.2)   #添加单条边,连接1,‘a’的边,可以赋予边属性以及他的值
13 G.add_edges_from([(2,3),(3,4)])#添加一些边(列表)
14 G.add_weighted_edges_from([(1,‘a‘,0.1),(4,2,0.5)])#给边赋予权重
15
16 #移除边
17 G.remove_edge(2,4)             #移除一条边
18 G.remove_edges_from([(3,4),])  #移除一些边
19
20 #移除节点,同时移除他对应的边
21 G.remove_node(1)               #移除单个节点
22 G.remove_nodes_from([4,])      #移除一些节点
23
24 #绘图
25 nx.draw(G,                          # 图
26         pos=nx.circular_layout(G),  # 图的布局
27         alpha=0.5,                  # 图的透明度(默认1.0不透明,0完全透明)
28
29         with_labels=True,           # 节点是否带标签
30         font_size=18,               # 节点标签字体大小
31         node_size=400,              # 指定节点的尺寸大小
32         node_color=‘blue‘,          # 指定节点的颜色
33         node_shape=‘o‘,             # 节点的形状
34
35         edge_color=‘r‘,             # 边的颜色
36         width=0.8,                  # 边的宽度
37         style=‘solid‘,              # 边的样式
38
39         ax=None,                    # Matplotlib Axes对象,可选在指定的Matplotlib轴中绘制图形。
40         )
41
42 plt.show()

绘图布局

3.有向图和无向图的最大差别在于:有向图中的边是有顺序的,前一个表示开始节点,后一个表示结束节点。
三.图
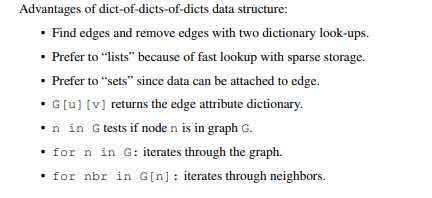
数据结构


1.图的属性

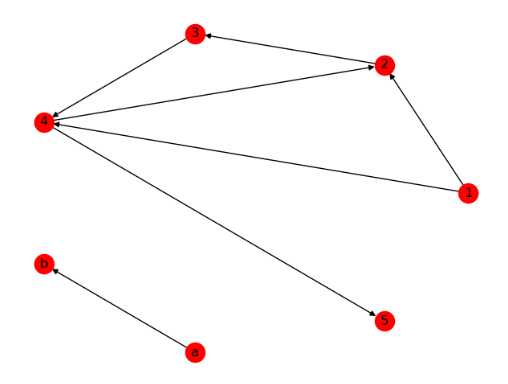
 1 #像color,label,weight或者其他Python对象的属性都可以被设置为graph,node,edge的属性
 2 # 每个graph,node,edge都能够包含key/value这样的字典数据
 3 import networkx as nx
 4 import matplotlib.pyplot as plt
 5
 6 G=nx.DiGraph([(1,2),(2,3),(3,4),(1,4),(4,2)],name=‘my digraph‘,a=‘b‘)
 7 #创建一个有向图,赋予边,点,权重,以及有向图的属性name的值my digraph
 8
 9 #属性都可以在定义时赋予,或者通过直接赋值来添加修改
10 #图属性
11 print(G)#图的名称
12 print(G.graph)#图的属性,字典
13 G.graph[‘b‘]=19#赋予属性
14 print(G.graph)
15 print(‘#‘*60)
16
17 #节点属性
18 print(‘图的节点:‘,G.nodes)#列表
19 print(‘节点个数:‘,G.number_of_nodes())
20 G.add_node(‘b‘,time=‘0.2‘)
21 print(G.node[‘b‘])#显示单个节点的信息
22 G.node[‘b‘][‘time‘]=0.3#修改属性
23 print(G.node[‘b‘])
24 print(‘#‘*60)
25
26 #边属性
27 print(‘图的边:‘,G.edges)#列表
28 print (‘边的个数:‘,G.number_of_edges())
29 G.add_edge(‘a‘,‘b‘,weight=0.6)
30 G.add_edges_from( [ (2,3),(3,4) ], color="red")
31 G.add_edges_from( [(1,2,{"color":"blue"}),(4,5,{"weight":8})])
32 G[1][2]["width"]=4.7#添加或修改属性
33 print(G.get_edge_data(1, 2))#获取某条边的属性
34 print(‘#‘*60)
35
36 nx.draw(G,pos = nx.circular_layout(G),with_labels=True)
37
38 plt.show
39 --------------------------------------------------------------------------
40 my digraph
41 {‘name‘: ‘my digraph‘, ‘a‘: ‘b‘}
42 {‘name‘: ‘my digraph‘, ‘a‘: ‘b‘, ‘b‘: 19}
43 ############################################################
44 图的节点: [1, 2, 3, 4]
45 节点个数: 4
46 {‘time‘: ‘0.2‘}
47 {‘time‘: 0.3}
48 {2: {}, 4: {}}
49 ############################################################
50 图的边: [(1, 2), (1, 4), (2, 3), (3, 4), (4, 2)]
51 边的个数: 5
52 {‘color‘: ‘blue‘, ‘width‘: 4.7}
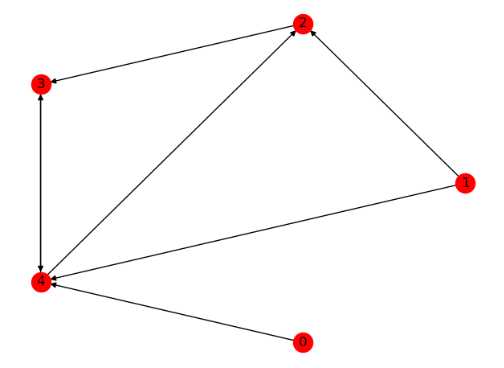
2.边和节点

 1 import networkx as nx
 2 import matplotlib.pyplot as plt
 3
 4 G=nx.DiGraph([(1,2,{‘weight‘:10}),(2,3),(3,4),(1,4),(4,2)])
 5
 6 nx.add_path(G, [0, 4,3])#在图中添加路径
 7
 8 # 对1节点进行分析
 9 print(G.node[1])#节点1的信息
10 G.node[1][‘time‘]=1#赋予节点属性
11 print(G.node[1])
12 print(G[1])  # 1相关的节点的信息,他的邻居和对应的边的属性
13 print(G.degree(1))  # 1节点的度
14 print(‘#‘*60)
15
16 # 对【1】【2】边进行分析
17 print(G[1][2])  # 查看某条边的属性
18 G[1][2][‘weight‘] = 0.4  # 重新设置边的权重
19 print(G[1][2][‘weight‘])  # 查看边的权重
20 G[1][2][‘color‘] = ‘blue‘  # 添加属性
21 print(G[1][2])
22
23 nx.draw(G,pos = nx.circular_layout(G),with_labels=True)
24
25 plt.show()
26 ------------------------------------------------------------------
27 {}
28 {‘time‘: 1}
29 {2: {‘weight‘: 10}, 4: {}}
30 2
31 ############################################################
32 {‘weight‘: 10}
33 0.4
34 {‘weight‘: 0.4, ‘color‘: ‘blue‘}
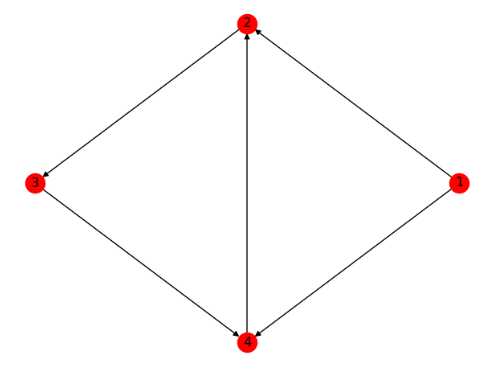
3.有向图

 1 import networkx as nx
 2 import matplotlib.pyplot as plt
 3
 4 G=nx.DiGraph([(1,2,{‘weight‘:10}),(2,3),(3,4),(1,4),(4,2)])
 5 print(‘#‘*60)
 6 print(G.edges)#An OutEdgeView of the DiGraph as G.edges or G.edges().
 7 print(G.out_edges)#An OutEdgeView of the DiGraph as G.edges or G.edges().
 8 print(G.in_edges)#An InEdgeView of the Graph as G.in_edges or G.in_edges()
 9 print(‘#‘*60)
10
11 print(G.degree)#图的度
12 print(G.out_degree)#图的出度
13 print(G.in_degree)#图的入度
14 print(‘#‘*60)
15
16 print(G.adj)#Graph adjacency object holding the neighbors of each node
17 print(G.neighbors(2))#节点2的邻居
18 print(G.succ)#Graph adjacency object holding the successors of each node
19 print(G.successors(2))#节点2的后继节点
20 print(G.pred)#Graph adjacency object holding the predecessors of each node
21 print(G.predecessors(2))#节点2的前继节点
22 #以列表形式打印
23 print([n for n in G.neighbors(2)])
24 print([n for n in G.successors(2)])
25 print([n for n in G.predecessors(2)])
26
27 nx.draw(G,pos = nx.circular_layout(G),with_labels=True)
28
29 plt.show()
30 --------------------------------------------------------
31 ############################################################
32 [(1, 2), (1, 4), (2, 3), (3, 4), (4, 2)]
33 [(1, 2), (1, 4), (2, 3), (3, 4), (4, 2)]
34 [(1, 2), (4, 2), (2, 3), (3, 4), (1, 4)]
35 ############################################################
36 [(1, 2), (2, 3), (3, 2), (4, 3)]
37 [(1, 2), (2, 1), (3, 1), (4, 1)]
38 [(1, 0), (2, 2), (3, 1), (4, 2)]
39 ############################################################
40 {1: {2: {‘weight‘: 10}, 4: {}}, 2: {3: {}}, 3: {4: {}}, 4: {2: {}}}
41 <dict_keyiterator object at 0x0DA2BF00>
42 {1: {2: {‘weight‘: 10}, 4: {}}, 2: {3: {}}, 3: {4: {}}, 4: {2: {}}}
43 <dict_keyiterator object at 0x0DA2BF00>
44 {1: {}, 2: {1: {‘weight‘: 10}, 4: {}}, 3: {2: {}}, 4: {3: {}, 1: {}}}
45 <dict_keyiterator object at 0x0DA2BF00>
46 [3]
47 [3]
48 [1, 4]
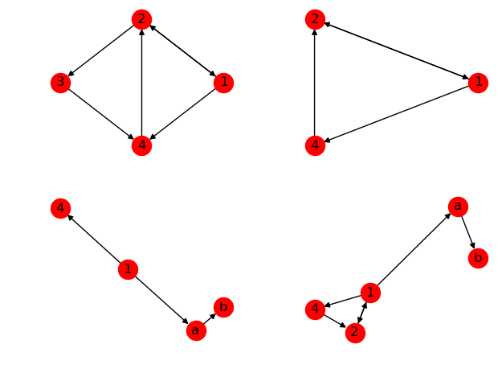
4.图的操作
Applying classic graph operations


 1 import networkx as nx
 2 import matplotlib.pyplot as plt
 3
 4 G=nx.DiGraph([(1,2,{‘weight‘:10}),(2,1,{‘weight‘:1}),(2,3),(3,4),(1,4),(4,2)])
 5 G2=nx.DiGraph([(1,‘a‘),(‘a‘,‘b‘),(1,4)])
 6
 7 H=G.subgraph([1,2,4])#产生关于节点的子图
 8
 9 G3=nx.compose(H,G2)#结合两个图并表示两者共同的节点
10
11 plt.subplot(221)
12 nx.draw(G,pos = nx.circular_layout(G),with_labels=True,name=‘G‘)
13
14 plt.subplot(222)
15 nx.draw(H,pos = nx.circular_layout(G),with_labels=True)
16
17 plt.subplot(223)
18 nx.draw(G2,with_labels=True)
19
20 plt.subplot(224)
21 nx.draw(G3,with_labels=True)
22
23 plt.show()
4.算法
...
四.简单根据数据画图

 1 import networkx as nx
 2 import matplotlib.pyplot as plt
 3
 4 #1.导入数据:
 5 # networkx支持的直接处理的数据文件格式adjlist/edgelist/gexf/gml/pickle/graphml/json/lead/yaml/graph6/sparse6/pajek/shp/
 6 #根据实际情况,把文件变为gml文件
 7 G1 = nx.DiGraph()
 8 with open(‘file.txt‘) as f:
 9     for line in f:
10         cell = line.strip().split(‘,‘)
11         G1.add_weighted_edges_from([(cell[0],cell[1],cell[2])])
12     nx.write_gml(G1,‘file.gml‘)#写网络G进GML文件
13
14 G=nx.read_gml("file.gml") #读取gml文件
15 # parse_gml(lines[,relael]) 从字符串中解析GML图
16 # generate_gml(G)  以gml格式生成一个简单条目的网络G
17
18 print(G.nodes)
19 print(G.edges)
20
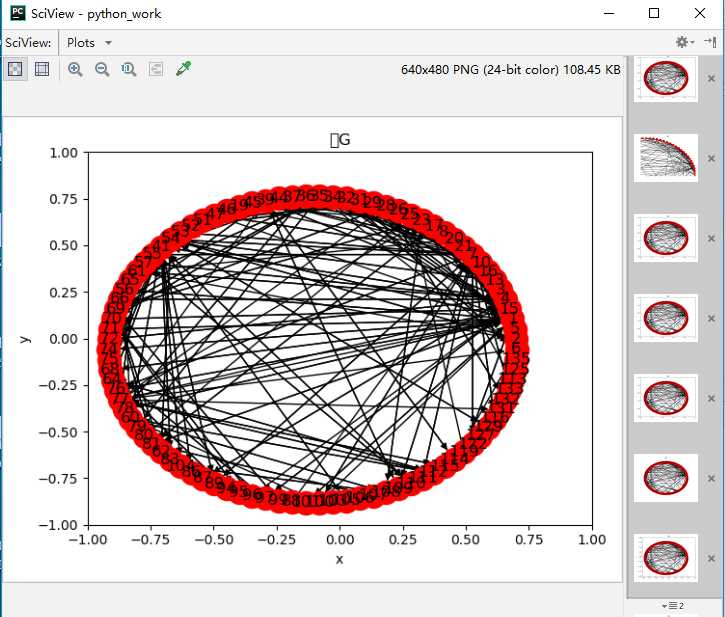
21 #2.在figure上先设置坐标
22 plt.title("图G")
23 plt.ylabel("y")
24 plt.xlabel("x")
25 plt.xlim(-1,1)
26 plt.ylim(-1,1)
27
28 #再在坐标轴里面调节图形大小
29 #整个figure按照X与Y轴横竖来平均切分,以0到1之间的数值来表示
30 #axes([x,y,xs,ys]),如果不设置
31 #其中x代表在X轴的位置,y代表在Y轴的位置,xs代表在X轴上向右延展的范围大小,yx代表在Y轴中向上延展的范围大小
32 plt.axes([0.1, 0.1, 0.8, 0.8])
33
34 #3.在axes中绘图
35 nx.draw(G,pos = nx.circular_layout(G),with_labels=True,)
36
37 #4.保存图形
38 plt.savefig("file.png")#将图像保存到一个文件
39
40 plt.show()
41 -----------------------------------------------------
42 [‘6‘, ‘2‘, ‘5‘, ‘1‘, ‘15‘, ‘4‘, ‘3‘, ‘13‘, ‘16‘, ‘10‘, ‘7‘, ‘21‘, ‘20‘, ‘8‘, ‘17‘, ‘23‘, ‘25‘, ‘26‘, ‘28‘, ‘29‘, ‘31‘, ‘32‘, ‘34‘, ‘35‘, ‘36‘, ‘37‘, ‘44‘, ‘39‘, ‘45‘, ‘19‘, ‘46‘, ‘47‘, ‘51‘, ‘52‘, ‘53‘, ‘54‘, ‘41‘, ‘55‘, ‘57‘, ‘61‘, ‘65‘, ‘56‘, ‘66‘, ‘69‘, ‘70‘, ‘71‘, ‘72‘, ‘74‘, ‘75‘, ‘68‘, ‘64‘, ‘76‘, ‘77‘, ‘78‘, ‘60‘, ‘79‘, ‘80‘, ‘81‘, ‘62‘, ‘83‘, ‘104‘, ‘86‘, ‘87‘, ‘89‘, ‘94‘, ‘95‘, ‘96‘, ‘97‘, ‘99‘, ‘88‘, ‘101‘, ‘100‘, ‘103‘, ‘105‘, ‘106‘, ‘107‘, ‘108‘, ‘109‘, ‘110‘, ‘111‘, ‘112‘, ‘115‘, ‘114‘, ‘119‘, ‘122‘, ‘127‘, ‘129‘, ‘116‘, ‘131‘, ‘132‘, ‘133‘, ‘113‘, ‘125‘, ‘135‘]
43 [(‘6‘, ‘2‘), (‘6‘, ‘5‘), (‘6‘, ‘4‘), (‘6‘, ‘7‘), (‘6‘, ‘114‘), (‘6‘, ‘32‘), (‘2‘, ‘21‘), (‘2‘, ‘20‘), (‘2‘, ‘4‘), (‘2‘, ‘54‘), (‘2‘, ‘132‘), (‘5‘, ‘1‘), (‘5‘, ‘6‘), (‘5‘, ‘7‘), (‘1‘, ‘15‘), (‘1‘, ‘5‘), (‘1‘, ‘32‘), (‘1‘, ‘34‘), (‘1‘, ‘17‘), (‘1‘, ‘31‘), (‘1‘, ‘13‘), (‘1‘, ‘20‘), (‘1‘, ‘54‘), (‘1‘, ‘56‘), (‘1‘, ‘71‘), (‘1‘, ‘74‘), (‘1‘, ‘78‘), (‘1‘, ‘68‘), (‘1‘, ‘81‘), (‘1‘, ‘101‘), (‘1‘, ‘119‘), (‘1‘, ‘2‘), (‘1‘, ‘76‘), (‘1‘, ‘23‘), (‘15‘, ‘97‘), (‘15‘, ‘70‘), (‘4‘, ‘3‘), (‘4‘, ‘26‘), (‘4‘, ‘6‘), (‘4‘, ‘31‘), (‘4‘, ‘57‘), (‘4‘, ‘61‘), (‘4‘, ‘66‘), (‘4‘, ‘72‘), (‘4‘, ‘41‘), (‘4‘, ‘87‘), (‘4‘, ‘39‘), (‘13‘, ‘16‘), (‘13‘, ‘10‘), (‘13‘, ‘17‘), (‘13‘, ‘29‘), (‘13‘, ‘1‘), (‘13‘, ‘34‘), (‘13‘, ‘7‘), (‘13‘, ‘54‘), (‘10‘, ‘1‘), (‘10‘, ‘6‘), (‘10‘, ‘21‘), (‘10‘, ‘8‘), (‘10‘, ‘25‘), (‘10‘, ‘2‘), (‘10‘, ‘3‘), (‘7‘, ‘5‘), (‘7‘, ‘34‘), (‘7‘, ‘6‘), (‘7‘, ‘29‘), (‘7‘, ‘13‘), (‘7‘, ‘3‘), (‘7‘, ‘36‘), (‘7‘, ‘53‘), (‘7‘, ‘55‘), (‘7‘, ‘20‘), (‘7‘, ‘28‘), (‘7‘, ‘76‘), (‘7‘, ‘19‘), (‘7‘, ‘89‘), (‘7‘, ‘109‘), (‘7‘, ‘111‘), (‘7‘, ‘100‘), (‘7‘, ‘47‘), (‘7‘, ‘122‘), (‘7‘, ‘116‘), (‘7‘, ‘133‘), (‘7‘, ‘54‘), (‘21‘, ‘2‘), (‘21‘, ‘1‘), (‘21‘, ‘10‘), (‘21‘, ‘8‘), (‘21‘, ‘3‘), (‘21‘, ‘36‘), (‘21‘, ‘39‘), (‘21‘, ‘7‘), (‘8‘, ‘1‘), (‘17‘, ‘3‘), (‘17‘, ‘23‘), (‘17‘, ‘28‘), (‘17‘, ‘13‘), (‘17‘, ‘20‘), (‘17‘, ‘1‘), (‘17‘, ‘81‘), (‘17‘, ‘39‘), (‘23‘, ‘17‘), (‘23‘, ‘19‘), (‘23‘, ‘32‘), (‘23‘, ‘20‘), (‘23‘, ‘69‘), (‘23‘, ‘7‘), (‘23‘, ‘108‘), (‘26‘, ‘4‘), (‘28‘, ‘7‘), (‘28‘, ‘69‘), (‘28‘, ‘132‘), (‘29‘, ‘13‘), (‘29‘, ‘51‘), (‘29‘, ‘52‘), (‘29‘, ‘7‘), (‘31‘, ‘4‘), (‘31‘, ‘1‘), (‘32‘, ‘6‘), (‘32‘, ‘1‘), (‘32‘, ‘23‘), (‘34‘, ‘7‘), (‘34‘, ‘1‘), (‘34‘, ‘13‘), (‘35‘, ‘6‘), (‘35‘, ‘1‘), (‘35‘, ‘65‘), (‘35‘, ‘69‘), (‘35‘, ‘70‘), (‘35‘, ‘79‘), (‘36‘, ‘37‘), (‘36‘, ‘46‘), (‘36‘, ‘41‘), (‘36‘, ‘21‘), (‘36‘, ‘7‘), (‘36‘, ‘78‘), (‘37‘, ‘36‘), (‘37‘, ‘44‘), (‘44‘, ‘37‘), (‘44‘, ‘39‘), (‘39‘, ‘45‘), (‘39‘, ‘7‘), (‘39‘, ‘44‘), (‘39‘, ‘21‘), (‘39‘, ‘69‘), (‘39‘, ‘17‘), (‘39‘, ‘4‘), (‘39‘, ‘109‘), (‘39‘, ‘114‘), (‘45‘, ‘39‘), (‘45‘, ‘53‘), (‘45‘, ‘54‘), (‘46‘, ‘36‘), (‘47‘, ‘1‘), (‘47‘, ‘7‘), (‘51‘, ‘29‘), (‘52‘, ‘29‘), (‘53‘, ‘45‘), (‘53‘, ‘7‘), (‘54‘, ‘45‘), (‘54‘, ‘1‘), (‘54‘, ‘62‘), (‘54‘, ‘129‘), (‘54‘, ‘13‘), (‘54‘, ‘2‘), (‘54‘, ‘7‘), (‘41‘, ‘36‘), (‘41‘, ‘75‘), (‘41‘, ‘60‘), (‘41‘, ‘4‘), (‘41‘, ‘83‘), (‘41‘, ‘104‘), (‘41‘, ‘86‘), (‘41‘, ‘89‘), (‘41‘, ‘70‘), (‘41‘, ‘105‘), (‘41‘, ‘110‘), (‘41‘, ‘68‘), (‘41‘, ‘64‘), (‘55‘, ‘7‘), (‘57‘, ‘4‘), (‘57‘, ‘110‘), (‘61‘, ‘4‘), (‘61‘, ‘20‘), (‘61‘, ‘2‘), (‘61‘, ‘77‘), (‘65‘, ‘35‘), (‘56‘, ‘1‘), (‘66‘, ‘4‘), (‘69‘, ‘39‘), (‘69‘, ‘35‘), (‘69‘, ‘23‘), (‘69‘, ‘28‘), (‘69‘, ‘62‘), (‘69‘, ‘81‘), (‘69‘, ‘99‘), (‘70‘, ‘95‘), (‘70‘, ‘41‘), (‘70‘, ‘35‘), (‘70‘, ‘96‘), (‘70‘, ‘15‘), (‘71‘, ‘1‘), (‘72‘, ‘4‘), (‘74‘, ‘1‘), (‘68‘, ‘64‘), (‘68‘, ‘1‘), (‘68‘, ‘97‘), (‘68‘, ‘41‘), (‘64‘, ‘68‘), (‘64‘, ‘80‘), (‘64‘, ‘94‘), (‘64‘, ‘112‘), (‘64‘, ‘41‘), (‘76‘, ‘7‘), (‘76‘, ‘1‘), (‘77‘, ‘39‘), (‘77‘, ‘15‘), (‘77‘, ‘6‘), (‘77‘, ‘1‘), (‘77‘, ‘23‘), (‘77‘, ‘28‘), (‘77‘, ‘115‘), (‘77‘, ‘112‘), (‘77‘, ‘131‘), (‘77‘, ‘61‘), (‘78‘, ‘1‘), (‘78‘, ‘60‘), (‘78‘, ‘36‘), (‘60‘, ‘41‘), (‘60‘, ‘78‘), (‘60‘, ‘87‘), (‘60‘, ‘108‘), (‘60‘, ‘112‘), (‘60‘, ‘56‘), (‘79‘, ‘35‘), (‘80‘, ‘25‘), (‘81‘, ‘17‘), (‘81‘, ‘69‘), (‘81‘, ‘1‘), (‘81‘, ‘107‘), (‘62‘, ‘69‘), (‘62‘, ‘54‘), (‘83‘, ‘41‘), (‘104‘, ‘41‘), (‘104‘, ‘108‘), (‘86‘, ‘41‘), (‘87‘, ‘4‘), (‘87‘, ‘60‘), (‘89‘, ‘41‘), (‘89‘, ‘7‘), (‘94‘, ‘64‘), (‘95‘, ‘70‘), (‘96‘, ‘70‘), (‘96‘, ‘106‘), (‘96‘, ‘107‘), (‘96‘, ‘15‘), (‘97‘, ‘15‘), (‘97‘, ‘68‘), (‘99‘, ‘69‘), (‘88‘, ‘7‘), (‘101‘, ‘1‘), (‘101‘, ‘103‘), (‘100‘, ‘101‘), (‘100‘, ‘60‘), (‘100‘, ‘1‘), (‘100‘, ‘7‘), (‘105‘, ‘41‘), (‘106‘, ‘96‘), (‘107‘, ‘81‘), (‘107‘, ‘96‘), (‘108‘, ‘60‘), (‘108‘, ‘23‘), (‘108‘, ‘104‘), (‘109‘, ‘7‘), (‘109‘, ‘39‘), (‘110‘, ‘57‘), (‘110‘, ‘41‘), (‘111‘, ‘7‘), (‘112‘, ‘64‘), (‘112‘, ‘77‘), (‘112‘, ‘115‘), (‘112‘, ‘60‘), (‘115‘, ‘77‘), (‘114‘, ‘39‘), (‘119‘, ‘1‘), (‘119‘, ‘127‘), (‘119‘, ‘25‘), (‘122‘, ‘7‘), (‘127‘, ‘119‘), (‘127‘, ‘132‘), (‘129‘, ‘54‘), (‘116‘, ‘7‘), (‘132‘, ‘127‘), (‘132‘, ‘2‘), (‘132‘, ‘28‘), (‘133‘, ‘7‘), (‘113‘, ‘125‘), (‘113‘, ‘23‘), (‘113‘, ‘135‘), (‘125‘, ‘113‘), (‘135‘, ‘113‘)]
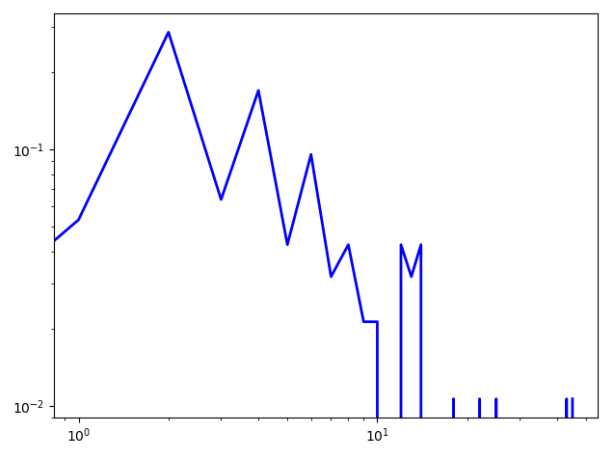
5.分析图

 1 import networkx as nx
 2 import matplotlib.pyplot as plt
 3
 4 G=nx.read_gml("file.gml")
 5 UG=G.to_undirected()
 6
 7 #网络信息
 8 print(nx.info(G))
 9 eccen = nx.eccentricity(UG)#节点离心度
10 print(eccen)
11 print(max(eccen.values()))
12 print(min(eccen.values()))
13 # print(nx.diameter(G)) # 网络直径
14 # print(nx.radius(G)) #网络半径
15 print(nx.average_shortest_path_length(G)) # 网络平均最短距离
16 print(nx.average_shortest_path_length(UG)) # 网络平均最短距离
17
18 #度分布
19 degree=nx.degree_histogram(G)#所有节点的度分布序列
20 print(degree)
21 x=range(len(degree)) #生成x轴序列
22 y=[z/float(sum(degree))for z in degree]#将频次转换为频率
23 plt.loglog(x,y,color=‘blue‘,linewidth=2)#在双对数坐标轴上绘制分布曲线
24
25 #度中心度
26 print(nx.degree_centrality(G))#计算每个点的度中心性
27 print(nx.in_degree_centrality(G))#计算每个点的入度中心性
28 print(nx.out_degree_centrality(G))#计算每个点的出度中心性
29
30 #紧密中心度
31 print(nx.closeness_centrality(G))
32
33 #介数中心度
34 print(nx.betweenness_centrality(G))
35
36 #特征向量中心度
37 print(nx.eigenvector_centrality(G))
38
39 #网络密度
40 print(nx.density(G))
41
42 #网络传递性
43 print(nx.transitivity(G))
44
45 #网络群聚系数
46 print(nx.average_clustering(UG))
47 print(nx.clustering(UG))
48
49 #节点度的匹配性
50 print(nx.degree_assortativity_coefficient(UG))
51
52 plt.show()
53 ------------------------------------------------------------------
标签:官网 样式 范围 close 查看 列表 [1] 使用 邻居
原文地址:https://www.cnblogs.com/yu-liang/p/9117643.html