标签:ima png 传递 简单 ror 不同 内置函数 .so soft
1. 函数基本语法及特性
2. 参数与局部变量
3. 返回值
嵌套函数
4.递归
5.匿名函数
6.函数式编程介绍
7.高阶函数
8.内置函数
函数与函数式编程
1、面向对象: 华山派---->类----> class
2、面向过程: 少林派---->过程---->def
3、函数式编程:逍遥派---->函数---->def
函数与函数式编程
1.介绍:
在过去的十年间,大家广为熟知的编程方法无非两种:面向对象和面向过程,其实,无论哪种,都是一种编程的规范或者是如何编程的方法论。而如今,一种更为古老的编程方式:函数式编程,以其不保存状态,不修改变量等特性重新进入人们的视野。下面我们就来依次了解这一传统的编程理念,让我们从基本的函数概念开始。
2.函数定义:
初中数学函数定义:一般的,在一个变化过程中,如果有两个变量x和y,并且对于x的每一个确定的值,y都有唯一确定的值与其对应,那么我们就把x称为自变量,把y称为因变量,y是x的函数。自变量x的取值范围叫做这个函数的定义域,编程语言中函数定义:函数是逻辑结构化和过程化的一种编程方法。
函数定义规范
def:定义函数的关键字
test:函数名
():内可定义形参
"":文档描述(非必要,但是强烈建议为你的函数添加描述信息)
x+=1:泛指代码块或程序处理逻辑
return:定义返回值
补充:
函数式编程就是:先定义一个数学函数,然后按照这个数学模型用编程语言去实现它。至于具体如何实现和这么做的好处,后续我会详细介绍。
ps:
python中函数定义方法:

 1 #!/usr/bin/env python
 2 # -*- coding:utf-8 -*-
 3 #Author: nulige
 4
 5 #函数
 6 def func1():
 7     ‘‘‘testing‘‘‘
 8     print(‘in the func1‘)
 9     return 0
10
11 #过程
12 def func2():
13     ‘‘‘testing‘‘‘
14     print(‘in the func2‘)
15
16 x=func1()
17 y=func2()
18
19 print(‘from func1 return is %s‘ %x)
20 print(‘from func2 return is %s‘ %y)
执行结果:
1 in the func1
2 in the func2
3 from func1 return is 0
4 from func2 return is None
3.为何使用函数:
没有函数的编程只是在写逻辑(功能),想脱离函数,重用你的逻辑,唯一的方法就是拷贝
例一:
假设我们编写好了一个逻辑(功能),用来以追加的方式写日志:
 1 #!/usr/bin/env python
 2 # -*- coding:utf-8 -*-
 3 #Author: nulige
 4
 5 #假设我们编写好了一个逻辑(功能),用来以追加的方式写日志:
 6 with open(‘a.txt‘,‘a+‘) as f:
 7       f.write(‘end action‘)
 8
 9
10 #现在有三个函数,每个函数在处理完自己的逻辑后,都需要使用上面这个逻辑,那么唯一的方法就是,拷贝三次这段逻辑
11 def test1():
12     print(‘in the test1‘)
13 with open(‘a.txt‘,‘a+‘) as f:
14       f.write(‘end action‘)
15
16 def test2():
17     print(‘in the test2‘)
18 with open(‘a.txt‘,‘a+‘) as f:
19       f.write(‘end action‘)
20
21 def test3():
22     print(‘in the test3‘)
23 with open(‘a.txt‘,‘a+‘) as f:
24       f.write(‘end action‘)
25
26 test1()
27 test2()
28 test3()
29
30 #那么假设有>N个函数都需要使用这段逻辑,你可以拷贝N次吗?
执行结果:
1 in the test1
2 in the test2
3 in the test3
接着会生成一个a.txt的文件,里面内容如下:
1 end action
2 end action
3 end action
例二:
优化后的代码,用函数的方法来实现
 1 #!/usr/bin/env python
 2 # -*- coding:utf-8 -*-
 3 #Author: nulige
 4
 5 #假设我们编写好了一个逻辑(功能),用来以追加的方式写日志:
 6
 7 #下面用函数的方法来实现
 8 def logger():
 9     with open(‘a.txt‘,‘a+‘) as f:
10         f.write(‘end action\n‘)
11
12 def test1():
13     print(‘in the test1‘)
14
15     logger()
16 def test2():
17     print(‘in the test2‘)
18
19     logger()
20
21 def test3():
22     print(‘in the test3‘)
23
24     logger()
25
26 test1()
27 test2()
28 test3()
执行结果:
1 in the test1
2 in the test2
3 in the test3
接着会生成一个a.txt的文件,里面内容如下:
1 end action
2 end action
3 end action
例三:
需求变了(让我们来为日志加上时间吧)
 1 #!/usr/bin/env python
 2 # -*- coding:utf-8 -*-
 3 #Author: nulige
 4
 5 #假设我们编写好了一个逻辑(功能),用来以追加的方式写日志:
 6 #下面用函数的方法来实现
 7
 8 import time
 9 def logger():
10     time_format=‘%Y-%m-%d %X‘
11     time_current=time.strftime(time_format)
12     with open(‘a.txt‘,‘a+‘) as f:
13         f.write(‘%s end action\n‘ %time_current)
14
15 def test1():
16     print(‘in the test1‘)
17
18     logger()
19 def test2():
20     print(‘in the test2‘)
21
22     logger()
23
24 def test3():
25     print(‘in the test3‘)
26
27     logger()
28
29 test1()
30 test2()
31 test3()
执行结果:
1 in the test1
2 in the test2
3 in the test3
接着会生成一个a.txt的文件,里面内容如下:
1 2016-11-15 15:55:56 end action
2 2016-11-15 15:55:56 end action
3 2016-11-15 15:55:56 end action
总结例二和例三可概括使用函数的三大优点
1.代码重用
2.保持一致性
3.可扩展性
4.函数和过程:
过程定义:过程就是简单特殊没有返回值的函数
这么看来我们在讨论为何使用函数的的时候引入的函数,都没有返回值,没有返回值就是过程,没错,但是在python中有比较神奇的事情
 1 def test01():
 2     msg=‘hello The little green frog‘
 3     print msg
 4
 5 def test02():
 6     msg=‘hello WuDaLang‘
 7     print msg
 8     return msg
 9
10
11 t1=test01()
12
13 t2=test02()
14
15
16 print ‘from test01 return is [%s]‘ %t1
17 print ‘from test02 return is [%s]‘ %t2
总结:当一个函数/过程没有使用return显示的定义返回值时,python解释器会隐式的返回None,
所以在python中即便是过程也可以算作函数。
5.函数返回值:
ps1:
1 def test1():
2     print(‘in the test1‘)
3     return 0
4     print(‘test end‘)
5
6 test1()
执行结果:
1 in the test1
ps2:
 1 #!/usr/bin/env python
 2 # -*- coding:utf-8 -*-
 3 #Author: nulige
 4
 5 def test1():
 6     print(‘in the test1‘)
 7     return 0
 8
 9 x=test1()
10 print(x)
执行结果:
1 0
ps3:
 1 #!/usr/bin/env python
 2 # -*- coding:utf-8 -*-
 3 #Author: nulige
 4
 5 def test1():
 6     print(‘in the test1‘)
 7
 8 def test2():
 9     print(‘in the test2‘)
10     return 0
11
12 def test3():
13     print(‘in the test3‘)
14     return 1,‘hello‘,[‘alex‘,‘wupeiqi‘],{‘name‘:‘alex‘}
15
16 x=test1()
17 y=test2()
18 z=test3()
19 print(x)
20 print(y)
21 print(z)
执行结果:
1 in the test1
2 in the test2
3 in the test3
4 None
5 0
6 (1, ‘hello‘, [‘alex‘, ‘wupeiqi‘], {‘name‘: ‘alex‘})
总结:
返回值数=0:返回None
返回值数=1:返回object
返回值数>1:返回tuple (元组)
ps4:
 1 def test01():
 2     pass
 3
 4 def test02():
 5     return 0
 6
 7 def test03():
 8     return 0,10,‘hello‘,[‘alex‘,‘lb‘],{‘WuDaLang‘:‘lb‘}
 9
10 t1=test01()
11 t2=test02()
12 t3=test03()
13
14
15 print ‘from test01 return is [%s]: ‘ %type(t1),t1
16 print ‘from test02 return is [%s]: ‘ %type(t2),t2
17 print ‘from test03 return is [%s]: ‘ %type(t3),t3
总结:
返回值数=0:返回None
返回值数=1:返回object
返回值数>1:返回tuple
说明一下return可以返回任何参数?
答案是可以的
ps:
 1 #!/usr/bin/env python
 2 # -*- coding:utf-8 -*-
 3 #Author: nulige
 4
 5 def test1():
 6     print(‘in the test1‘)
 7
 8 def test2():
 9     print(‘in the test2‘)
10     return 0
11
12 def test3():
13     print(‘in the test3‘)
14    # return 1,‘hello‘,[‘alex‘,‘wupeiqi‘],{‘name‘:‘alex‘}
15     return test2     #可以return任何值,返回的是内存地址
16
17 x=test1()
18 y=test2()
19 z=test3()
20 print(x)
21 print(y)
22 print(z)
执行结果:
1 in the test1
2 in the test2
3 in the test3
4 None
5 0
6 <function test2 at 0x01C34C90>    #返回的是内存地址
6.函数调用:
调用方法:
1.test()执行,()表示调用函数test,()内可以有参数也可没有
参数:
1.形参和实参
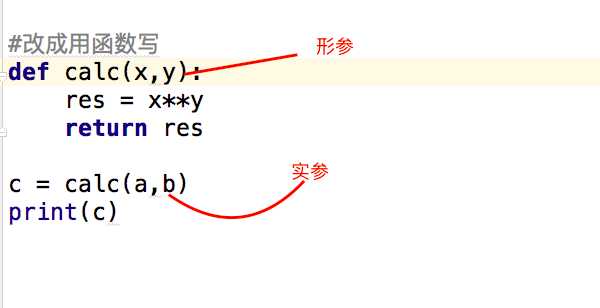
形参:形式参数,不是实际存在,是虚拟变量。在定义函数和函数体的时候使用形参,目的是在函数调用时接收实参(记住:实参个数,类型应与实参必须一一对应,不能超,否则会报错)
实参:实际参数,调用函数时传给函数的参数,可以是常量,变量,表达式,函数,传给形参
区别:形参是虚拟的,不占用内存空间,.形参变量只有在被调用时才分配内存单元,实参是一个变量,占用内存空间,数据传送单向,实参传给形参,不能形参传给实参
形参和实参示例
1 #!/usr/bin/env python
2 # -*- coding:utf-8 -*-
3 #Author: nulige
4
5 def test(x,y):
6     print(x)
7     print(y)
8
9 test(1,2)
执行结果:
1 1
2 2
实参和形参必须一一对应,不能超否则会报错。
1 #!/usr/bin/env python
2 # -*- coding:utf-8 -*-
3 #Author: nulige
4
5 def test(x,y):
6     print(x)
7     print(y)
8
9 test(2,1,3)
执行结果:
1 Traceback (most recent call last):
2   File "D:/python/day4/func_test5.py", line 9, in <module>
3     test(2,1,3)
4 TypeError: test() takes 2 positional arguments but 3 were given
2.位置参数和关键字(标准调用:实参与形参位置一一对应;关键字调用:位置无需固定)
ps1:
1 #!/usr/bin/env python
2 # -*- coding:utf-8 -*-
3 #Author: nulige
4
5 def test(x,y):
6     print(x)
7     print(y)
8
9 test(y=2,x=1)
执行结果:
1 1
2 2
ps2:
 1 #!/usr/bin/env python
 2 # -*- coding:utf-8 -*-
 3 #Author: nulige
 4
 5 def test(x,y,z):
 6     print(x)
 7     print(y)
 8     print(z)
 9
10 #test(y=2,x=1)   #与形参顺序无关
11 #test(1,2)       #与形参一一对应
12
13 #test(x=2,3)   #错误用法,会报错
14 #test(3,x=2)   #错误用法,会报错,先给了x一个3,又给了一个2,y就变得没有值了,所以报错了。
15 #test(3,y=2)
16
17 #即有关键字调用,又有位置参数调用,按照位置参数的来。
18 #test(3,y=2,6)   #注意:关键参数,不能写在位置参数前面。
19
20 test(3,6,z=2)
执行结果:
1 3
2 6
3 2
3.默认参数
ps1:
 1 #!/usr/bin/env python
 2 # -*- coding:utf-8 -*-
 3 #Author: nulige
 4
 5 def test(x,y=2):
 6
 7     print(x)
 8     print(y)
 9
10 test(1,y=3)
11
12 #默认参数特点:调用函数的时候,默认参数非必须传递
执行结果:
1 1
2 3
ps2:
 1 #!/usr/bin/env python
 2 # -*- coding:utf-8 -*-
 3 #Author: nulige
 4
 5 def test(x,soft1=True,soft2=True):
 6     print(x)
 7 test(1,3)
 8
 9 #默认参数特点:调用函数的时候,默认参数非必须传递
10 #用途:1、默认安装值
执行结果:
1 1
ps3:
连接mysql数据库,设置固定值
1 #!/usr/bin/env python
2 # -*- coding:utf-8 -*-
3 #Author: nulige
4
5 def conn(host,prot=3306):
6     pass
7
8 conn()
4.参数组
ps1:
 1 #!/usr/bin/env python
 2 # -*- coding:utf-8 -*-
 3 #Author: nulige
 4
 5 def test(x,y,z=2):
 6     print(x)
 7     print(y)
 8
 9 test(1,2)
10 #test(1,2,3)   #传值的时候,不能多,可以少,最少不能少于print的值(这里是2个),否则会报错
执行结果:
1 1
2 2
ps2:
 1 #!/usr/bin/env python
 2 # -*- coding:utf-8 -*-
 3 #Author: nulige
 4
 5 #多个实参,放到一个元组里面,以*开头,可以传多个参数
 6 #*代表接受的参数不固定
 7 def test(*args):
 8     print(args)
 9
10 test(1,2,3,4,5,6)
11 test(*[1,2,4,5,6])    #args=tuple([1,2,3,4,5,6])
执行结果:
1 (1, 2, 3, 4, 5, 6)
2 (1, 2, 4, 5, 6)
ps3:
 1 #!/usr/bin/env python
 2 # -*- coding:utf-8 -*-
 3 #Author: nulige
 4
 5 #位置参数传值的时候不参超
 6 def test1(x,*args):
 7     print(x)
 8     print(args)
 9
10 test1(1,2,3,4,5,6,7)
执行结果:
1 1
2 (2, 3, 4, 5, 6, 7)
ps4:
1 #!/usr/bin/env python
2 # -*- coding:utf-8 -*-
3 #Author: nulige
4
5 # **kwargs把N个关键字参数,转换为字典的方式
6 def test2(**kwargs):
7     print(kwargs)
8
9 test2(name=‘alex‘,age=8,sex=‘F‘)
执行结果:
1 {‘sex‘: ‘F‘, ‘name‘: ‘alex‘, ‘age‘: 8}
ps5:
 1 #!/usr/bin/env python
 2 # -*- coding:utf-8 -*-
 3 #Author: nulige
 4
 5 # **kwargs把N个关键字参数,转换为字典的方式
 6 def test2(**kwargs):
 7     print(kwargs)
 8     print(kwargs[‘name‘])
 9     print(kwargs[‘age‘])
10     print(kwargs[‘sex‘])
11
12 test2(name=‘alex‘,age=8,sex=‘F‘)
执行结果:
1 {‘age‘: 8, ‘sex‘: ‘F‘, ‘name‘: ‘alex‘}
2 alex
3 8
4 F
ps6:
 1 #!/usr/bin/env python
 2 # -*- coding:utf-8 -*-
 3 #Author: nulige
 4
 5 def test4(name,age=18,**kwargs):
 6     print(name)
 7     print(age)
 8     print(kwargs)
 9
10 test4(‘alex‘,age=34,sex=‘m‘,hobby=‘tesla‘)
执行结果:
1 alex
2 34
3 {‘hobby‘: ‘tesla‘, ‘sex‘: ‘m‘}
ps7:
非固定参数
若你的函数在定义时不确定用户想传入多少个参数,就可以使用非固定参数
 1 #!/usr/bin/env python
 2 # -*- coding:utf-8 -*-
 3 #Author: nulige
 4
 5 def test4(name,age=18,**kwargs):
 6     print(name)
 7     print(age)
 8     print(kwargs)
 9
10 test4(‘alex‘,age=34,sex=‘m‘,hobby=‘tesla‘)
执行结果:
1 alex     #传给name
2 34       #age=34 传给age=18,并覆盖他的内容
3 {‘hobby‘: ‘tesla‘, ‘sex‘: ‘m‘}     # 传给字典 sex=‘m‘,hobby=‘tesla‘
ps8:
用函数调用的方法
 1 #!/usr/bin/env python
 2 # -*- coding:utf-8 -*-
 3 #Author: nulige
 4
 5 def test4(name,age=18,**kwargs):
 6     print(name)
 7     print(age)
 8     print(kwargs)
 9
10 def logger(source):    #用函数调用的方法
11     print("from %s" % source)
12
13 test4(‘alex‘,age=34,sex=‘m‘,hobby=‘tesla‘)
执行结果:
1 alex
2 34
3 {‘hobby‘: ‘tesla‘, ‘sex‘: ‘m‘}
全局与局部变量
局部变量
ps1:
 1 #!/usr/bin/env python
 2 # -*- coding:utf-8 -*-
 3 #Author: nulige
 4
 5 def change_name(name):
 6     print("before change",name)
 7     name="Alex li"   #这个函数就是这个变量的作用域(只在局部生效)
 8     print(‘after change‘,name)
 9
10 name = "alex"
11 change_name(name)
12 print(name)
执行结果:
1 before change alex
2 after change Alex li
3 alex
全局变量
ps1:
 1 #!/usr/bin/env python
 2 # -*- coding:utf-8 -*-
 3 #Author: nulige
 4
 5 school = "Oldboy edu."   #全局变量
 6
 7 def change_name(name):
 8     global school          #声明(必须先声明,才能把Oldboy改成Mage Linux。大家忘记这种方法吧! 记住这句话:不应该在函数里面改全局变量)
 9     school = "Mage Linux"
10     print("before change",name,school)
11     name="Alex li"   #这个函数就是这个变量的作用域(只在局部生效)
12     age =23
13     print("after change",name)
14
15 name = "alex"
16 change_name(name)
17 print(name)
18 print("school:",school)
执行结果:
1 before change alex Mage Linux
2 after change Alex li
3 alex
4 school: Mage Linux     #声明后就把Oldboy 改成了Mage Linux
ps2:
 1 #!/usr/bin/env python
 2 # -*- coding:utf-8 -*-
 3 #Author: nulige
 4
 5 school = "Oldboy edu."
 6 names = ["Alex","Jack","Rain"]
 7 def change_name():
 8
 9     names[0] = "金角大王"
10     print("inside func",names)
11
12 change_name()
13 print(names)
14
15 #注意事项:只有字符串和单独的整数,不能在函数里面改。其它列表,字典,集合、类都可以在局部变量里面更改的。
执行结果:
1 inside func [‘金角大王‘, ‘Jack‘, ‘Rain‘]
2 [‘金角大王‘, ‘Jack‘, ‘Rain‘]
在函数内部,可以调用其他函数。如果一个函数在内部调用自身本身,这个函数就是递归函数。
ps1:
1 def calc(n):
2     print(n)
3     if int(n/2) ==0:
4         return n
5     return calc(int(n/2))
6
7 calc(10)
执行结果:
1 10
2 5
3 2
4 1
ps2:
1 #!/usr/bin/env python
2 # -*- coding:utf-8 -*-
3 #Author: nulige
4
5 def calc(n):
6     print(n)
7     return calc(n+1)
8 calc(0)    #最大递归999层
执行结果:
1 0
2 1
3 2
4 3
5 ......  中间省略
6 999
7
8 RecursionError: maximum recursion depth exceeded while calling a Python object
ps3:
 1 #!/usr/bin/env python
 2 # -*- coding:utf-8 -*-
 3 #Author: nulige
 4
 5 def calc(n):
 6     print(n)
 7     if int(n/2) >0:
 8         return calc(int(n/2))
 9     print("->",n)
10
11 calc(10)
执行结果:
1 10000000000
ps4:
阶乘 n! = n * (n-1) * (n-2) * ... * 2 * 1
阶乘拥有相同的子模式 n * (n-1)
随着运算的进行,乘数越来越少(问题规模递减)
当n=1时,运算结束(结束条件n=1)
如计算5!,则种子值为5
1 def factorial(n):
2      print(n)
3     if n == 1:
4         return n
5     else:
6         ret = n * factorial(n-1)
7         print(ret)
8         return ret
执行结果:
 1 5
 2 4
 3 3
 4 2
 5 1
 6 2
 7 6
 8 24
 9 120
10 120
递归特性:
1. 必须有一个明确的结束条件
2. 每次进入更深一层递归时,问题规模相比上次递归都应有所减少
3. 递归效率不高,递归层次过多会导致栈溢出(在计算机中,函数调用是通过栈(stack)这种数据结构实现的,每当进入一个函数调用,栈就会加一层栈帧,每当函数返回,栈就会减一层栈帧。由于栈的大小不是无限的,所以,递归调用的次数过多,会导致栈溢出)
堆栈扫盲http://www.cnblogs.com/lln7777/archive/2012/03/14/2396164.html
递归函数实际应用案例,二分查找
 1 data = [1, 3, 6, 7, 9, 12, 14, 16, 17, 18, 20, 21, 22, 23, 30, 32, 33, 35]
 2
 3
 4 def binary_search(dataset,find_num):
 5     print(dataset)
 6
 7     if len(dataset) >1:
 8         mid = int(len(dataset)/2)
 9         if dataset[mid] == find_num:  #find it
10             print("找到数字",dataset[mid])
11         elif dataset[mid] > find_num :# 找的数在mid左面
12             print("\033[31;1m找的数在mid[%s]左面\033[0m" % dataset[mid])
13             return binary_search(dataset[0:mid], find_num)
14         else:# 找的数在mid右面
15             print("\033[32;1m找的数在mid[%s]右面\033[0m" % dataset[mid])
16             return binary_search(dataset[mid+1:],find_num)
17     else:
18         if dataset[0] == find_num:  #find it
19             print("找到数字啦",dataset[0])
20         else:
21             print("没的分了,要找的数字[%s]不在列表里" % find_num)
22
23
24 binary_search(data,66)
匿名函数就是不需要显式的指定函数
1 #这段代码
2 def calc(n):
3     return n**n
4 print(calc(10))
5
6 #换成匿名函数
7 calc = lambda n:n**n
8 print(calc(10))
你也许会说,用上这个东西没感觉有毛方便呀, 。。。。呵呵,如果是这么用,确实没毛线改进,不过匿名函数主要是和其它函数搭配使用的呢,如下
1 res = map(lambda x:x**2,[1,5,7,4,8])
2 for i in res:
3     print(i)
输出
1 1
2 25
3 49
4 16
5 64
6
7
函数是Python内建支持的一种封装,我们通过把大段代码拆成函数,通过一层一层的函数调用,就可以把复杂任务分解成简单的任务,这种分解可以称之为面向过程的程序设计。函数就是面向过程的程序设计的基本单元。
函数式编程中的函数这个术语不是指计算机中的函数(实际上是Subroutine),而是指数学中的函数,即自变量的映射。也就是说一个函数的值仅决定于函数参数的值,不依赖其他状态。比如sqrt(x)函数计算x的平方根,只要x不变,不论什么时候调用,调用几次,值都是不变的。
ps:
 1 y=2+4
 2
 3 y=f(2,4)
 4
 5         6
 6
 7 y=f(2,6)
 8
 9         if  x+y>7
10
11                 return 0
Python对函数式编程提供部分支持。由于Python允许使用变量,因此,Python不是纯函数式编程语言。
一、定义
简单说,"函数式编程"是一种"编程范式"(programming paradigm),也就是如何编写程序的方法论。
主要思想是把运算过程尽量写成一系列嵌套的函数调用。举例来说,现在有这样一个数学表达式:
(1 + 2) * 3 - 4
传统的过程式编程,可能这样写:
var a = 1 + 2;
var b = a * 3;
var c = b - 4;
函数式编程要求使用函数,我们可以把运算过程定义为不同的函数,然后写成下面这样:
var result = subtract(multiply(add(1,2), 3), 4);
这段代码再演进以下,可以变成这样
add(1,2).multiply(3).subtract(4)
这基本就是自然语言的表达了。再看下面的代码,大家应该一眼就能明白它的意思吧:
merge([1,2],[3,4]).sort().search("2")
因此,函数式编程的代码更容易理解。
要想学好函数式编程,不要玩py,玩Erlang,Haskell,lisp 好了,我只会这么多了。。。
高阶函数
变量可以指向函数,函数的参数能接收变量,那么一个函数就可以接收另一个函数作为参数,这种函数就称之为高阶函数。
1 #!/usr/bin/env python
2 # -*- coding:utf-8 -*-
3 #Author: nulige
4
5 def add(a,b,f):
6     return f(a)+f(b)
7
8 res = add(3,-6,abs)   #6+3=9
9 print(res)
执行结果:
1 9
 1 >>> b = ‘‘‘ {
 2 ...             ‘bakend‘: ‘www.oldboy.org‘,
 3 ...             ‘record‘:{
 4 ...                 ‘server‘: ‘100.1.7.9‘,
 5 ...                 ‘weight‘: 20,
 6 ...                 ‘maxconn‘: 30
 7 ...             }
 8 ...         }‘‘‘
 9 >>> b
10 " {\n            ‘bakend‘: ‘www.oldboy.org‘,\n            ‘record‘:{\n                ‘server‘: ‘100.1.7.9‘,\n                ‘weight‘: 20,\n                ‘maxconn‘: 30\n            }\n        }"
11 >>> b[1]
12 ‘{‘
13 >>> eval(b)
14 {‘bakend‘: ‘www.oldboy.org‘, ‘record‘: {‘weight‘: 20, ‘maxconn‘: 30, ‘server‘: ‘100.1.7.9‘}}
15 >>> b=eval(b)
16 >>> b
17 {‘bakend‘: ‘www.oldboy.org‘, ‘record‘: {‘weight‘: 20, ‘maxconn‘: 30, ‘server‘: ‘100.1.7.9‘}}
18 >>> b[‘record‘]
19 {‘weight‘: 20, ‘maxconn‘: 30, ‘server‘: ‘100.1.7.9‘}
标签:ima png 传递 简单 ror 不同 内置函数 .so soft
原文地址:https://www.cnblogs.com/trunkslisa/p/9191519.html