标签:port 模式 ppc 进制 .com 分享 sys.path 多点 ops
模块
1.定义
包:从逻辑上组织模块,本质就是一个目录(必须带有一个__init__.py文件)
模块:
本质就是.py结尾的python文件(例:test.py 使用时用test)
用来从逻辑上组织python代码(变量、函数、类、逻辑--实现一个功能)
#创建一个.py文件当作模块 module
name = "python"
def sayhi():
    print("hello python")

#调用创建的module模块
import module
print(module.name)
module.sayhi()
2.导入方法
import module_name
import module_name,module_name2 导入多个模块
from module_name improt * 导入模块module_name中所有的变量
#import * 会产生冲突,建议慎用
#模块中代码
def sayhi():
    print("hello python")

def logger():
    print("In the module")

#调用代码
#当在调用代码中有相同名时会产生冲突,会覆盖掉模块中相同部分
from module import *
sayhi()

def logger():
    print("In the logger")

logger()

#执行i结果为
hello python
In the logger
from module_name import logger as module_logger
#当导入模块与现有代码有冲突时采用别名
#module
def logger():
    print("In the module")

#import module
from module import logger as module_logger
def logger():
    print("In the logger")
logger()
module_logger()

#result
In the logger
In the module
3.import本质(路径搜索和搜索路径)
import 将所有代码解释一遍赋值给一个变量 使用时需要前缀
from...import... 把模块中的部分代码解释到当前位置执行 使用时直接使用
导入模块的本质就是把python文件解释一遍
--需要搜索到路径,先在当前位置找文件,从sys.path路径中找文件
如何将其他路径下的文件加载到sys.path路径下
#将import的文件路径加载到sys.path路径下
import sys,os
print(os.path.abspath(__file__)) #当前路径
print(os.path.dirname(os.path.abspath(__file__))) #返回上一级目录
base_dir = os.path.dirname(os.path.dirname(os.path.abspath(__file__)))
sys.path.append(base_dir)
import module
导入包的本质就是解释执行该包下的__init_.py文件
#创建一个包package01 在__init__.py 文中中输入
print("from the package")

#调用包
import package01

#result
from the package01
4.导入优化
import module_test #重复的找
from module_test import test #代码拿到当前执行一遍
def logger():
    module_test.test()
    print("In the logger")
def search():
    module_test.test()
    print("In the search")
5.模块的分类
标准库(内置模块python自带的)
时间模块time与datatime
时间戳
>>> time.time()
1528723454.278052
>>> time.time()/3600/24/365
48.475503168413255
>>> time.time()/3600/24/365+1970
2018.4755034574007
格式化时间字符串
‘2018-06-11 13:12:25‘
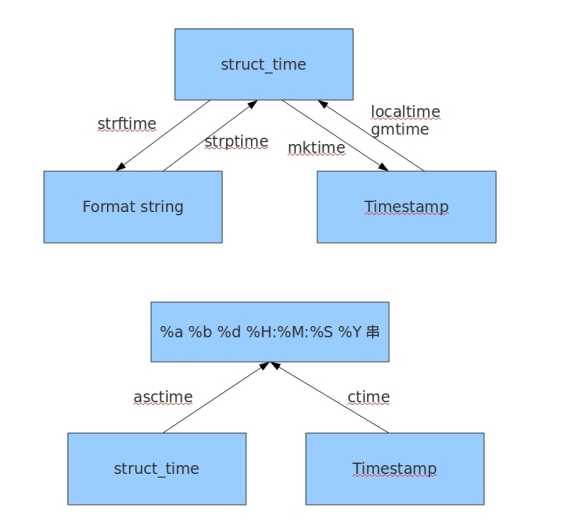
元祖 (struct_time时间对象)共九个元素
>>> import time
>>> time.localtime()
time.struct_time(tm_year=2018, tm_mon=6, tm_mday=10, tm_hour=17, tm_min=33, tm_sec=53, tm_wday=6, tm_yday=161, tm_isdst=0)
time模块
#time和datatime模块
>>> import time
>>> time.process_time() #测量处理器运算
0.046875
>>> time.altzone #返回与utc时间的时间差,以秒计算
-32400
>>> time.asctime() #返回时间格式
‘Mon Jun 11 20:55:24 2018‘
>>> time.ctime()
‘Mon Jun 11 21:39:17 2018‘
>>> time.localtime() #返回本地时间的struct time对象格式
time.struct_time(tm_year=2018, tm_mon=6, tm_mday=11, tm_hour=20, tm_min=56, tm_sec=3, tm_wday=0, tm_yday=162, tm_isdst=0)
>>> time.gmtime(time.time()-800000) #返回utc时间的struc时间对象格式
time.struct_time(tm_year=2018, tm_mon=6, tm_mday=2, tm_hour=6, tm_min=44, tm_sec=19, tm_wday=5, tm_yday=153, tm_isdst=0)
>>> time.sleep(1) #沉睡时间
#相互转换
#日期字符串转成struct时间对象
>>> time.strptime("2018-06-11","%Y-%m-%d")
time.struct_time(tm_year=2018, tm_mon=6, tm_mday=11, tm_hour=0, tm_min=0, tm_sec=0, tm_wday=0, tm_yday=162, tm_isdst=-1)
#将struct转换为时间戳
>>> struct = time.strptime("2018-06-11","%Y-%m-%d")
>>> time.mktime(struct)
1528646400.0
#将时间戳转为字符串格式
#utc转换为struct_time格式
>>> time.gmtime(time.time()-86640)
time.struct_time(tm_year=2018, tm_mon=6, tm_mday=10, tm_hour=13, tm_min=4, tm_sec=41, tm_wday=6, tm_yday=161, tm_isdst=0)
#将struct_time格式转换为字符串
>>> time.strftime("%Y-%m-%d %H:%M:%S",time.gmtime())
‘2018-06-11 13:12:25‘
>>> time.strftime("%Y-%m-%d %H:%M:%S",time.localtime())
‘2018-06-11 21:16:20‘
#字符串转为struct_time格式
>>> str = time.strftime("%Y-%m-%d %H:%M:%S",time.localtime())
>>> time.strptime(str,"%Y-%m-%d %H:%M:%S")
time.struct_time(tm_year=2018, tm_mon=6, tm_mday=11, tm_hour=21, tm_min=18, tm_sec=23, tm_wday=0, tm_yday=162, tm_isdst=-1)
时间关系转换
格式参照
%a    本地(locale)简化星期名称
%A    本地完整星期名称
%b    本地简化月份名称
%B    本地完整月份名称
%c    本地相应的日期和时间表示
%d    一个月中的第几天(01 - 31)
%H    一天中的第几个小时(24小时制,00 - 23)
%I    第几个小时(12小时制,01 - 12)
%j    一年中的第几天(001 - 366)
%m    月份(01 - 12)
%M    分钟数(00 - 59)
%p    本地am或者pm的相应符    一
%S    秒(01 - 61)    二
%U    一年中的星期数。(00 - 53星期天是一个星期的开始。)第一个星期天之前的所有天数都放在第0周。    三
%w    一个星期中的第几天(0 - 6,0是星期天)    三
%W    和%U基本相同,不同的是%W以星期一为一个星期的开始。
%x    本地相应日期
%X    本地相应时间
%y    去掉世纪的年份(00 - 99)
%Y    完整的年份
%Z    时区的名字(如果不存在为空字符)
%%    ‘%’字符
datatime模块
#时间加减
>>> datetime.datetime.now() #获取当前时间
datetime.datetime(2018, 6, 11, 21, 41, 6, 641078)
>>> datetime.datetime.now()+datetime.timedelta(3) #获取当前时间后3天
datetime.datetime(2018, 6, 14, 21, 42, 33, 845810)
>>> datetime.datetime.now()+datetime.timedelta(-3) #获取当前时间前3天时间
datetime.datetime(2018, 6, 8, 21, 43, 15, 274049)
>>> datetime.datetime.now()+datetime.timedelta(hours=3) #当前时间3小时以后
datetime.datetime(2018, 6, 12, 0, 44, 6, 993009)
>>> datetime.datetime.now()+datetime.timedelta(minutes=30) #当前时间30分钟后
datetime.datetime(2018, 6, 11, 22, 15, 9, 670386)
>>> current_time = datetime.datetime.now() #时间替换
>>> current_time.replace(minute=30,hour=22)
datetime.datetime(2018, 6, 11, 22, 30, 2, 570106)
random模块
>>> import random
>>> random.random() #随机0-1的浮点数
0.7846525527479006
>>> random.randint(1,3) #随机1-3的整数
3
>>> random.randrange(1,10) #随机 顾头不顾尾
9
>>> random.choice(‘hello‘) #随机字符
‘o‘
>>> random.choice([1,2,3])
1
>>> random.choice((‘a‘,‘b‘,‘c‘))
‘c‘
>>> random.sample(‘hello‘,2) #随机取两位 多个字符中随机取特定数量的字符
[‘e‘, ‘l‘]
>>> random.randrange(0,101,2) #随机0-00间的偶数
98
>>> random.uniform(1,10) #随机1-10间的浮点数
2.5293769846614502
#随机打乱顺序
>>> items = [1,2,3,4,5]
>>> items
[1, 2, 3, 4, 5]
>>> random.shuffle(items)
>>> items
[1, 2, 5, 3, 4]

#随机验证码
import random
checkcode = ‘‘
for i in range(4):
    current = random.randrange(0,4) #与上面一样循环并看当前循环与上一次循环是否一致
    if current != i :
        temp = chr(random.randint(65,90)) #将十进制数字转换为字母 65-90为大写字母
    else:
        temp = random.randint(0,9) #超过10会变成五位
    checkcode += str(temp)
print(checkcode)
os模块 提供对操作系统进行调用的接口
>>> os.getcwd() #获取当前工作目录,即当前python脚本工作的目录路径
‘C:\\Users\\Thinkpa‘
>>> os.chdir("C:\\Users")
>>> os.chdir(r"C:\Users\Thinkpa")
os.chdir("dirname") #改变当前脚本工作目录,相当于shell下cd
>>> os.curdir #返回当前目录
‘.‘
>>> os.pardir #获取当前目录的父目录字符串名
‘..‘
>>> os.makedirs(r"C:\a\b") #可创建多层递归目录
>>> os.removedirs(r"C:\a\b") #若目录为空,则删除,并递归到上一级目录,如若也为空,则删除,依此类推
>>> os.mkdir(r"C:\a") #生成单级目录;相当于shell中mkdir dirname
>>> os.rmdir(r"C:\a") #删除单级空目录,若目录不为空则无法删除,报错;相当于shell中rmdir dirname
>>> os.listdir(‘..‘) #列出指定目录下的所有文件和子目录,包括隐藏文件,并以列表方式打印
[‘All Users‘, ‘Default‘, ‘Default User‘, ‘defaultuser0‘, ‘desktop.ini‘, ‘Public‘, ‘Thinkpa‘]
os.remove()  #删除一个文件
os.rename("oldname","newname")   #重命名文件/目录
os.stat(‘path/filename‘)  # 获取文件/目录信息
>>> os.sep #输出操作系统特定的路径分隔符,win下为"\\",Linux下为"/"
‘\\‘
>>> os.linesep #输出当前平台使用的行终止符,win下为"\t\n",Linux下为"\n"
‘\r\n‘
>>> os.environ #查看系统的环境变量
>>> os.pathsep #输出用于分割文件路径的字符串
‘;‘
>>> os.name #输出字符串指示当前使用平台。win->‘nt‘; Linux->‘posix‘
‘nt‘
>>> os.system("dir") #运行命令,直接显示
os.path.abspath(path)  #返回path规范化的绝对路径
os.path.split(path)  #将path分割成目录和文件名二元组返回
os.path.dirname(path)  #返回path的目录。其实就是os.path.split(path)的第一个元素
os.path.basename(path)  #返回path最后的文件名。如何path以/或\结尾,那么就会返回空值
os.path.exists(path)  #如果path存在,返回True;如果path不存在,返回False
os.path.isabs(path) # 如果path是绝对路径,返回True
os.path.isfile(path)  #如果path是一个存在的文件,返回True。否则返回False
os.path.isdir(path)  #如果path是一个存在的目录,则返回True。否则返回False
os.path.join(path1[, path2[, ...]])  #将多个路径组合后返回,第一个绝对路径之前的参数将被忽略
os.path.getatime(path)  #返回path所指向的文件或者目录的最后存取时间
os.path.getmtime(path)  #返回path所指向的文件或者目录的最后修改时间
更多点击这里
sys模块
sys.argv           #命令行参数List,第一个元素是程序本身路径
sys.exit(n)        #退出程序,正常退出时exit(0)
sys.version        #获取Python解释程序的版本信息
sys.maxint         #最大的Int值
sys.path           #返回模块的搜索路径,初始化时使用PYTHONPATH环境变量的值
sys.platform      # 返回操作系统平台名称
sys.stdout.write(‘please:‘)
val = sys.stdin.readline()[:-1]
shutil模块(copy文件)
#将文件内容拷贝到另一个文件中
import shutil
f_source = open("note",encoding="utf-8")
f_new = open("note_new","w",encoding="utf-8")
shutil.copyfileobj(f_source,f_new)

def copyfileobj(fsrc, fdst, length=16*1024):
    while 1:
        buf = fsrc.read(length)
        if not buf:
            break
        fdst.write(buf)

#拷贝文件
shutil.copyfile("note_new","note_new1")

#仅拷贝权限。内容、组、用户均不变
def copymode(src, dst):
    """Copy mode bits from src to dst"""
    if hasattr(os, ‘chmod‘):
        st = os.stat(src)
        mode = stat.S_IMODE(st.st_mode)
        os.chmod(dst, mode)

#shutil.copystat(src, dst)
#拷贝状态的信息,包括:mode bits, atime, mtime, flags
def copystat(src, dst):
    """Copy all stat info (mode bits, atime, mtime, flags) from src to dst"""
    st = os.stat(src)
    mode = stat.S_IMODE(st.st_mode)
    if hasattr(os, ‘utime‘):
        os.utime(dst, (st.st_atime, st.st_mtime))
    if hasattr(os, ‘chmod‘):
        os.chmod(dst, mode)
    if hasattr(os, ‘chflags‘) and hasattr(st, ‘st_flags‘):
        try:
            os.chflags(dst, st.st_flags)
        except OSError, why:
            for err in ‘EOPNOTSUPP‘, ‘ENOTSUP‘:
                if hasattr(errno, err) and why.errno == getattr(errno, err):
                    break
            else:
                raise

#shutil.copy(src, dst)
#拷贝文件和权限
def copy(src, dst):
    """Copy data and mode bits ("cp src dst").

    The destination may be a directory.

    """
    if os.path.isdir(dst):
        dst = os.path.join(dst, os.path.basename(src))
    copyfile(src, dst)
    copymode(src, dst)

#shutil.copy2(src, dst)
#拷贝文件和状态信息
def copy2(src, dst):
    """Copy data and all stat info ("cp -p src dst").

    The destination may be a directory.

    """
    if os.path.isdir(dst):
        dst = os.path.join(dst, os.path.basename(src))
    copyfile(src, dst)
    copystat(src, dst)


shutil.ignore_patterns(*patterns)
shutil.copytree(src, dst, symlinks=False, ignore=None)
递归的去拷贝文件
例如:copytree(source, destination, ignore=ignore_patterns(‘*.pyc‘, ‘tmp*‘))

shutil.rmtree(path[, ignore_errors[, onerror]])
递归的去删除文件

shutil.move(src, dst)
递归的去移动文件

shutil.make_archive(base_name, format,...)
创建压缩包并返回文件路径,例如:zip、tar
base_name: 压缩包的文件名,也可以是压缩包的路径。只是文件名时,则保存至当前目录,否则保存至指定路径,
如:www                        =>保存至当前路径
如:/Users/wupeiqi/www =>保存至/Users/wupeiqi/
format: 压缩包种类,“zip”, “tar”, “bztar”,“gztar”
root_dir: 要压缩的文件夹路径(默认当前目录)
owner: 用户,默认当前用户
group: 组,默认当前组
logger: 用于记录日志,通常是logging.Logger对象

shutil 对压缩包的处理是调用 ZipFile 和 TarFile 两个模块来进行的,详细:
import zipfile
#将 /Users/wupeiqi/Downloads/test 下的文件打包放置当前程序目录import shutilret = shutil.make_archive("wwwwwwwwww", ‘gztar‘, root_dir=‘/Users/wupeiqi/Downloads/test‘)#将 /Users/wupeiqi/Downloads/test 下的文件打包放置 /Users/wupeiqi/目录import shutilret = shutil.make_archive("/Users/wupeiqi/wwwwwwwwww", ‘gztar‘, root_dir=‘/Users/wupeiqi/Downloads/test‘)
# 压缩
z = zipfile.ZipFile(‘laxi.zip‘, ‘w‘)
z.write(‘a.log‘)
z.write(‘data.data‘)
z.close()

# 解压
z = zipfile.ZipFile(‘laxi.zip‘, ‘r‘)
z.extractall()
z.close()

import tarfile

# 压缩
tar = tarfile.open(‘your.tar‘,‘w‘)
tar.add(‘/Users/wupeiqi/PycharmProjects/bbs2.zip‘, arcname=‘bbs2.zip‘)
tar.add(‘/Users/wupeiqi/PycharmProjects/cmdb.zip‘, arcname=‘cmdb.zip‘)
tar.close()

# 解压
tar = tarfile.open(‘your.tar‘,‘r‘)
tar.extractall()  # 可设置解压地址
tar.close()
shelve模块
shelve模块是一个简单的k,v将内存数据通过文件持久化的模块,可以持久化任何pickle可支持的python数据格式
#写入数据
import shelve,datetime
d = shelve.open(‘shelve_test‘) #打开一个文件
info = {‘age‘:33,‘job‘:‘it‘}
name = [‘python‘,‘test‘]
d["name"] = name #持久化列
d["info"] = info
d["date"] = datetime.datetime.now()
d.close()

#读取数据
import shelve,datetime
d = shelve.open(‘shelve_test‘) #打开一个文件
print(d.get("name"))
print(d.get("info"))
print(d.get("date"))
xml处理模块
xml是实现不同语言或程序之间进行数据交换的协议,跟json差不多,但json使用起来更简单
xml的格式如下,就是通过<>节点来区别数据结构的:

<?xml version="1.0"?>
<data>
    <country name="Liechtenstein">
        <rank updated="yes">2</rank>
        <year>2008</year>
        <gdppc>141100</gdppc>
        <neighbor name="Austria" direction="E"/>
        <neighbor name="Switzerland" direction="W"/>
    </country>
    <country name="Singapore">
        <rank updated="yes">5</rank>
        <year>2011</year>
        <gdppc>59900</gdppc>
        <neighbor name="Malaysia" direction="N"/>
    </country>
    <country name="Panama">
        <rank updated="yes">69</rank>
        <year>2011</year>
        <gdppc>13600</gdppc>
        <neighbor name="Costa Rica" direction="W"/>
        <neighbor name="Colombia" direction="E"/>
    </country>
</data>
xml协议在各个语言里的都 是支持的,在python中可以用以下模块操作xml
#在python中可以用以下模块操作xml
import xml.etree.ElementTree as ET
tree = ET.parse("xmltest.xml")
root = tree.getroot()
print(root.tag)
#遍历xml文档
for child in root:
    print(child.tag, child.attrib)
    for i in child:
            print(i.tag,i.text)
#只遍历year 节点
for node in root.iter(‘year‘):
    print(node.tag,node.text)
修改和删除xml文档内容
import xml.etree.ElementTree as ET
tree = ET.parse("xmltest.xml")
root = tree.getroot()
#修改
for node in root.iter(‘year‘):
    new_year = int(node.text) + 1
    node.text = str(new_year)
    node.set("updated","yes")
tree.write("xmltest.xml")

#删除node
for country in root.findall(‘country‘):
    rank = int(country.find(‘rank‘).text)
    if rank > 50:
        root.remove(country)
tree.write(‘output.xml‘)
自己创建xml文档
import xml.etree.ElementTree as ET

new_xml = ET.Element("namelist")
name = ET.SubElement(new_xml,"name",attrib={"enrolled":"yes"})
age = ET.SubElement(name,"age",attrib={"checked":"no"})
sex = ET.SubElement(name,"sex")
age.text = ‘33‘
name2 = ET.SubElement(new_xml,"name",attrib={"enrolled":"no"})
age = ET.SubElement(name2,"age")
age.text = ‘19‘

et = ET.ElementTree(new_xml) #生成文档对象
et.write("test.xml", encoding="utf-8",xml_declaration=True)

ET.dump(new_xml) #打印生成的格式
PyYAML模块 主要做配置文件
文档地址:http://pyyaml.org/wiki/PyYAMLDocumentation
ConfigParser模块
#配置文件
[DEFAULT]
ServerAliveInterval = 45
Compression = yes
CompressionLevel = 9
ForwardX11 = yes

[bitbucket.org]
User = hg

[topsecret.server.com]
Port = 50022
ForwardX11 = no
#用python生成一个文件
import configparser
config = configparser.ConfigParser()
config["DEFAULT"] = {‘ServerAliveInterval‘: ‘45‘,
                           ‘Compression‘: ‘yes‘,
                         ‘CompressionLevel‘: ‘9‘}
config[‘bitbucket.org‘] = {}
config[‘bitbucket.org‘][‘User‘] = ‘hg‘
config[‘topsecret.server.com‘] = {}
topsecret = config[‘topsecret.server.com‘]
topsecret[‘Host Port‘] = ‘50022‘# mutates the parser
topsecret[‘ForwardX11‘] = ‘no‘# same here
config[‘DEFAULT‘][‘ForwardX11‘] = ‘yes‘
with open(‘example.ini‘, ‘w‘) as configfile:
    config.write(configfile)
# 读
>>> import configparser
>>> config = configparser.ConfigParser()
>>> config.sections()
[]
>>> config.read(‘example.ini‘)
[‘example.ini‘]
>>> config.sections()
[‘bitbucket.org‘, ‘topsecret.server.com‘]
>>> ‘bitbucket.org‘ in config
True
>>> ‘bytebong.com‘ in config
False
>>> config[‘bitbucket.org‘][‘User‘]
‘hg‘
>>> config[‘DEFAULT‘][‘Compression‘]
‘yes‘
>>> topsecret = config[‘topsecret.server.com‘]
>>> topsecret[‘ForwardX11‘]
‘no‘
>>> topsecret[‘Port‘]
‘50022‘
>>> for key in config[‘bitbucket.org‘]: print(key)
...
user
compressionlevel
serveraliveinterval
compression
forwardx11
>>> config[‘bitbucket.org‘][‘ForwardX11‘]
‘yes‘
#增删改
[section1]
k1 = v1
k2:v2

[section2]
k1 = v1

import ConfigParser

config = ConfigParser.ConfigParser()
config.read(‘i.cfg‘)

# ########## 读 ##########
#secs = config.sections()
#print secs
#options = config.options(‘group2‘)
#print options

#item_list = config.items(‘group2‘)
#print item_list

#val = config.get(‘group1‘,‘key‘)
#val = config.getint(‘group1‘,‘key‘)

# ########## 改写 ##########
#sec = config.remove_section(‘group1‘)
#config.write(open(‘i.cfg‘, "w"))

#sec = config.has_section(‘wupeiqi‘)
#sec = config.add_section(‘wupeiqi‘)
#config.write(open(‘i.cfg‘, "w"))


#config.set(‘group2‘,‘k1‘,11111)
#config.write(open(‘i.cfg‘, "w"))

#config.remove_option(‘group2‘,‘age‘)
#config.write(open(‘i.cfg‘, "w"))
hashlib模块
用于加密的模块,主要提供 SHA1, SHA224, SHA256, SHA384, SHA512 ,MD5 算法
import hashlib
m = hashlib.md5()
m.update(b"Hello")
m.update(b"It‘s me")
print(m.digest())
m.update(b"It‘s been a long time since last time we ...")
print(m.digest()) #2进制格式hash
print(len(m.hexdigest())) #16进制格式hash

#md5
import hashlib
hash = hashlib.md5()
hash.update(b‘admin‘)
print(hash.hexdigest())

#sha1
hash = hashlib.sha1()
hash.update(b‘admin‘)
print(hash.hexdigest())

#sha256
hash = hashlib.sha256()
hash.update(b‘admin‘)
print(hash.hexdigest())

#sha384
hash = hashlib.sha384()
hash.update(b‘admin‘)
print(hash.hexdigest())

#sha512
hash = hashlib.sha512()
hash.update(‘admin‘)
print(hash.hexdigest())
hamc模块
散列消息鉴别码,简称HMAC,是一种基于消息鉴别码MAC(Message Authentication Code)的鉴别机制。使用HMAC时,消息通讯的双方,通过验证消息中加入的鉴别密钥K来鉴别消息的真伪;
一般用于网络通信中消息加密,前提是双方先要约定好key,就像接头暗号一样,然后消息发送把用key把消息加密,接收方用key + 消息明文再加密,拿加密后的值 跟 发送者的相对比是否相等,这样就能验证消息的真实性,及发送者的合法性了。
import hmac
h = hmac.new(b"123",b"python")
print(h.digest())

import hmac
h = hmac.new(b"123","python学习".encode(encoding="utf-8"))
print(h.digest())
re模块
匹配想要的字符串
#‘.‘     默认匹配除\n之外的任意一个字符,若指定flag DOTALL,则匹配任意字符,包括换行
#‘^‘     匹配字符开头
>>> import re
>>> re.match("^.\d","Python123")
>>> re.match("^.+\d","Python123")
<_sre.SRE_Match object; span=(0, 9), match=‘Python123‘>

#[a-z]匹配一个字符 后面加上+号匹配多个字符
>>> re.search("P[a-z]","Python123")
<_sre.SRE_Match object; span=(0, 2), match=‘Py‘>

>>> re.search("P[a-z]+","Python123")
<_sre.SRE_Match object; span=(0, 6), match=‘Python‘>

#‘$‘     匹配字符结尾
>>> re.search("P[a-zA-Z]+n$","PythonPython123Python")
<_sre.SRE_Match object; span=(15, 21), match=‘Python‘>

#‘*‘     匹配*号前的字符0次或多次
#‘+‘     匹配前一个字符1次或多次
#‘?‘     匹配前一个字符1次或0次
>>> re.search("a?","java")
<_sre.SRE_Match object; span=(0, 0), match=‘‘>
>>> re.search("av?","java")
<_sre.SRE_Match object; span=(1, 3), match=‘av‘>
>>> re.search("aa?","java")
<_sre.SRE_Match object; span=(1, 2), match=‘a‘>

#‘{m}‘   匹配前一个字符m次
>>> re.search("[0-9]{3}","Python123456java")
<_sre.SRE_Match object; span=(6, 9), match=‘123‘>
>>> re.search("[0-9]{1,3}","Python123456java")
<_sre.SRE_Match object; span=(6, 9), match=‘123‘>

#findall
>>> re.findall("[0-9]{1,3}","Python123456java")
[‘123‘, ‘456‘]

#‘{n,m}‘ 匹配前一个字符n到m次
>>> re.findall("ab{1,3}","abb abc abbcbbb")
[‘abb‘, ‘ab‘, ‘abb‘]

#‘|‘     匹配|左或|右的字符
>>> re.search("abc|ABC","ABCBabcCD").group()
‘ABC‘

#‘(...)‘ 分组匹配
>>> re.search("(abc){2}a(123|456)c", "abcabca456c").group()
‘abcabca456c‘

#‘\A‘    只从字符开头匹配
>>> re.search("\A[0-9]+[a-z]\Z","123a")
<_sre.SRE_Match object; span=(0, 4), match=‘123a‘>

#‘\Z‘    匹配字符结尾,同$
#‘\d‘    匹配数字0-9
#‘\D‘    匹配非数字
>>> re.search("\D+","de34 #d")
<_sre.SRE_Match object; span=(0, 2), match=‘de‘>
>>> re.search("\D+","34 #d")
<_sre.SRE_Match object; span=(2, 5), match=‘ #d‘>
>>> re.search("\D+","34 #d 33 dd")
<_sre.SRE_Match object; span=(2, 6), match=‘ #d ‘>

#‘\w‘    匹配[A-Za-z0-9]
#‘\W‘    匹配非[A-Za-z0-9]
>>> re.search("\W+","34 #d 33 dd")
<_sre.SRE_Match object; span=(2, 4), match=‘ #‘>

#‘s‘     匹配空白字符
>>> re.search("\s+","1abAB$- \r\n        ")
<_sre.SRE_Match object; span=(7, 12), match=‘ \r\n\t ‘>

#‘(?P<name>...)‘ 分组匹配
>>> re.search("(?P<id>[0-9]+)","abcd1234daf&34")
<_sre.SRE_Match object; span=(4, 8), match=‘1234‘>
>>> re.search("(?P<id>[0-9]+)","abcd1234daf&34").group()
‘1234‘
>>> re.search("(?P<id>[0-9]+)","abcd1234daf&34").groupdict()
{‘id‘: ‘1234‘}

>>> re.search("(?P<id>[0-9]+)(?P<name>[a-zA-Z]+)","abcd1234daf&34").groupdict()
{‘id‘: ‘1234‘, ‘name‘: ‘daf‘}

>>> a = re.search("(?P<id>[0-9]+)(?P<name>[a-zA-Z]+)","abcd1234daf&34").groupdict()
>>> a[‘id‘]
‘1234‘


#匹配方法
re.match 从头开始匹配
re.search 匹配包含
re.findall 把所有匹配到的字符放到以列表中的元素返回
re.splitall 以匹配到的字符当做列表分隔符
>>> re.split("[0-9]","abc12ef3g")
[‘abc‘, ‘‘, ‘ef‘, ‘g‘]
>>> re.split("[0-9]+","abc12ef3g")
[‘abc‘, ‘ef‘, ‘g‘]

re.sub      匹配字符并替换
>>> re.sub("[0-9]+","|","abc12def234H")
‘abc|def|H‘

>>> re.sub("[0-9]+","|","abc12def234H66KK")
‘abc|def|H|KK‘
>>> re.sub("[0-9]+","|","abc12def234H66KK",count=2)
‘abc|def|H66KK‘

#转义字符 \
>>> re.search(r"\\",‘abc123\\123‘)
<_sre.SRE_Match object; span=(6, 7), match=‘\\‘>

>>> re.search(r"\\",r‘abc123\123‘)
<_sre.SRE_Match object; span=(6, 7), match=‘\\‘>


#re.I(re.IGNORECASE): 忽略大小写(括号内是完整写法,下同)
>>> re.search("[a-z]+",‘abcABC‘,flags=re.I)
<_sre.SRE_Match object; span=(0, 6), match=‘abcABC‘>

#M(MULTILINE): 多行模式,改变‘^‘和‘$‘的行为(参见上图)
#S(DOTALL): 点任意匹配模式,改变‘.‘的行为
标签:port 模式 ppc 进制 .com 分享 sys.path 多点 ops
原文地址:https://www.cnblogs.com/wangzihong/p/9160303.html
