标签:string 设置 log dep email loading float return 图片
引入依赖:
        <dependency>
            <groupId>org.springframework.boot</groupId>
            <artifactId>spring-boot-starter-activemq</artifactId>
        </dependency>

        <dependency>
            <groupId>org.springframework.boot</groupId>
            <artifactId>spring-boot-starter-mail</artifactId>
        </dependency>

        <dependency>
            <groupId>org.springframework.boot</groupId>
            <artifactId>spring-boot-starter-freemarker</artifactId>
        </dependency>
配置文件:
spring:
  activemq:
    broker-url: tcp://127.0.0.1:61616
    in-memory: true
    pool:
      enabled: false
  mail:
    host: smtp.163.com
    username: 你的邮箱
    password: 你的密码
    properties:
      mail:
        smtp: true
        starttls:
          enable: true
          required: true
  freemarker:
    allow-request-override: false
    cache: true
    check-template-location: true
    charset: UTF-8
    content-type: text/html
    expose-request-attributes: false
    expose-session-attributes: false
    expose-spring-macro-helpers: false

mail:
  fromMail:
    addr: dandingdedanding@163.com
邮件服务:
public interface MailService {

    boolean sendEmail(String to, String subject, String content);

    boolean sendEmailByTemplate(String to, String subject, String templateFile, Map<String, String> content);

}
@Service
public class MailServiceImpl implements MailService {

    @Autowired
    private JavaMailSender mailSender;

    @Value("${mail.fromMail.addr}")
    private String from; // 邮件发送者

    @Override
    public boolean sendEmail(String to, String subject, String content) {
        MimeMessage message = mailSender.createMimeMessage();
        MimeMessageHelper helper = new MimeMessageHelper(message);
        try {
            helper.setFrom(from); // 邮件发送者
            helper.setTo(to); // 邮件接收者
            helper.setSubject(subject); // 邮件主题
            helper.setText(content, true); // 邮件正文,是否支持html格式
            mailSender.send(message); // 发送邮件
        } catch (MessagingException e) {
            e.printStackTrace();
            return false;
        }
        return true;
    }

    @Override
    public boolean sendEmailByTemplate(String to, String subject, String templateFile, Map<String, String> content) {
        Configuration cfg = new Configuration(Configuration.VERSION_2_3_23);
        cfg.setClassForTemplateLoading(this.getClass(), "/templates");
        try {
            Template template = cfg.getTemplate(templateFile);
            String html = FreeMarkerTemplateUtils.processTemplateIntoString(template, content);
            return this.sendEmail(to, subject, html);
        } catch (Exception e) {
            e.printStackTrace();
            return false;
        }
    }

}
模板文件:
<html>
 <body>
   <h3>你好,这是绿茵狙击手的测试邮件,我是${name}</h3>
 </body>
</html>
spring boot启动类:
@SpringBootApplication
@EnableJms
public class Application {

    @Bean("emailQueue")
    public Queue emailQueue() {
        return new ActiveMQQueue("email.queue");
    }

    public static void main(String[] args) {
        SpringApplication.run(Application.class, args);
    }

}
email rest 接口:
/**
 * 邮件服务暴露给外部的rest接口
 */
@RestController
@RequestMapping("/mail")
public class MailRestController {

    @Autowired
    private MailProducer mailProducer;

    /**
     * 发送简单邮件消息缓存在activeMq队列中
     */
    @PostMapping("/send")
    public String send(@RequestParam String to,
                       @RequestParam String subject,
                       @RequestParam String content) {
        Map<String, String> map = new HashMap<>();
        map.put("to", to);
        map.put("subject", subject);
        map.put("content", content);
        String msg = JSONObject.toJSONString(map);

        mailProducer.send(msg);
        return "success";
    }

}
通过请求 /test/send 接口,通过调用邮件消息生产者,将想要发送的邮件信息缓存在activeMq的email.queue队列中,
由邮件消息消费者调用邮件服务类发送邮件
邮件消息生产者:
/**
 * 邮件消息生产者
 */
@Component
public class MailProducer {

    @Autowired
    private JmsMessagingTemplate jmsMessagingTemplate;

    @Autowired
    @Qualifier("emailQueue")
    private Queue emailQueue;

    public void send(String msg) {
        this.jmsMessagingTemplate.convertAndSend(this.emailQueue, msg);
    }

}
邮件消息消费者:
/**
 * 邮件消息消费者
 */
@Component
public class MailConsumer {

    @Autowired
    private MailService mailService;

    @JmsListener(destination = "email.queue")
    public void receiveQueue(String text) {
        System.out.println("消费邮件消息:" + text);
        // 将activeMq email.queue队列中的邮件消息发送至接收者邮箱
        JSONObject jsonObject = JSONObject.parseObject(text);
        String to = jsonObject.getString("to");
        String subject = jsonObject.getString("subject");
        String content = jsonObject.getString("content");
        mailService.sendEmail(to, subject, content);
    }

}
启动项目测试接口:
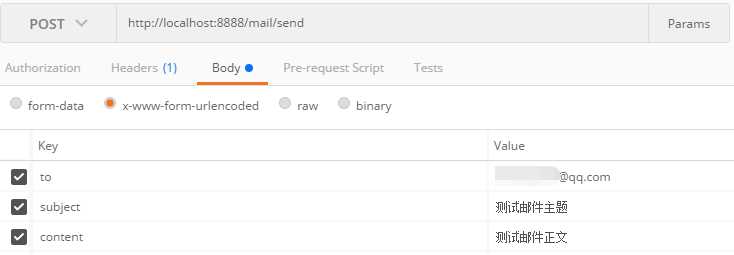
发送post请求

初次调用接口会报这个错误:邮箱不可用 550 User has no permission
可以参考这篇文章解决问题:https://blog.csdn.net/Hughnes/article/details/52070878
当传入发送邮箱正确的用户名和密码时,总是收到到:550 User has no permission这样的错误,
其实我们用Java发送邮件时相当于自定义客户端根据用户名和密码进行登录,然后使用SMTP服务发送邮件。但新注册的163邮件默认是不开启客户端授权验证的(对自定的邮箱大师客户端默认开启),
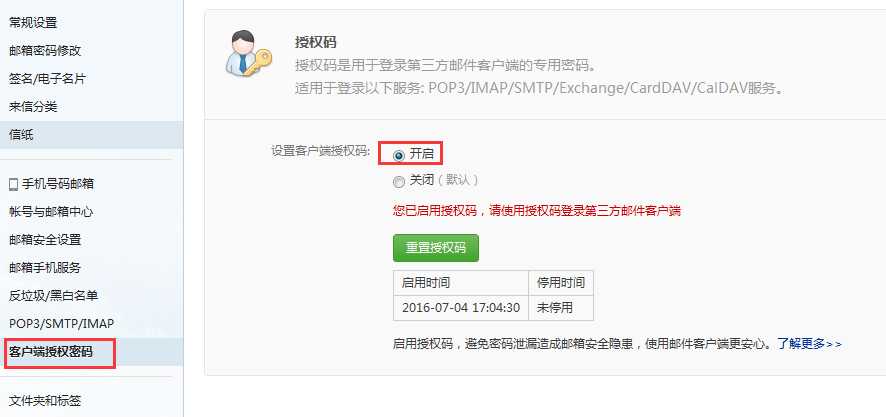
因此登录总是会被拒绝,验证没有权限。解决办法是进入163邮箱,进入邮箱中心——客户端授权密码,选择开启即可,如下截图

设置完毕后,在代码中用使用客户端授权密码代替原始的邮箱密码,这样就可以正确的发送邮件了。
继续发送post请求,观察结果

邮箱收到邮件:

标签:string 设置 log dep email loading float return 图片
原文地址:https://www.cnblogs.com/tangzhe/p/9213517.html