标签:字段 microsoft 失败 dia tor opened back count() 版本号
Java 5新增了AtomicInteger类,该类包含方法getAndIncrement()以及getAndDecrement(),这两个方法实现了原子加以及原子减操作,但是比较不同的是这两个操作没有使用任何加锁机制,属于无锁操作。
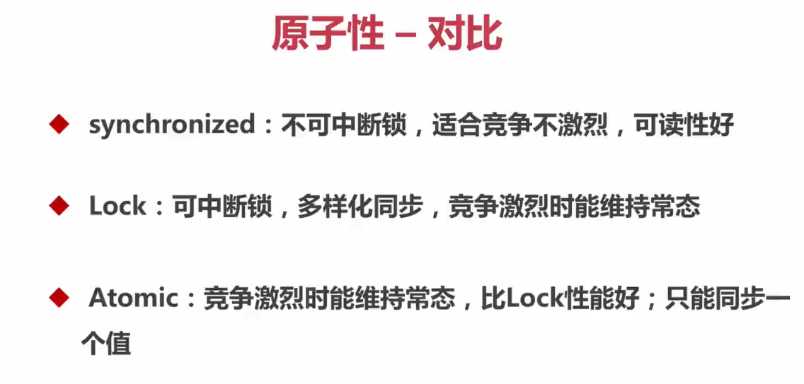
在JDK 5之前Java语言是靠synchronized关键字保证同步的,这会导致有锁(后面的章节还会谈到锁)。
锁机制存在以下问题:
(1)在多线程竞争下,加锁、释放锁会导致比较多的上下文切换和调度延时,引起性能问题。
(2)一个线程持有锁会导致其它所有需要此锁的线程挂起。
(3)如果一个优先级高的线程等待一个优先级低的线程释放锁会导致优先级倒置,引起性能风险。
volatile是不错的机制,但是volatile不能保证原子性。因此对于同步最终还是要回到锁机制上来。
独占锁是一种悲观锁,synchronized就是一种独占锁,会导致其它所有需要锁的线程挂起,等待持有锁的线程释放锁。而另一个更加有效的锁就是乐观锁。所谓乐观锁就是,每次不加锁而是假设没有冲突而去完成某项操作,如果因为冲突失败就重试,直到成功为止。
CAS 操作
上面的乐观锁用到的机制就是CAS,Compare and Swap。
CAS有3个操作数,内存值V,旧的预期值A,要修改的新值B。当且仅当预期值A和内存值V相同时,将内存值V修改为B,否则什么都不做。

package com.xidian.example;

import java.util.concurrent.CountDownLatch;
import java.util.concurrent.ExecutorService;
import java.util.concurrent.Executors;
import java.util.concurrent.Semaphore;
import java.util.concurrent.atomic.AtomicInteger;

import com.xidian.annotations.ThreadSafe;

import lombok.extern.slf4j.Slf4j;

@Slf4j
@ThreadSafe
public class AtomicExample1 {

    // 请求总数
    public static int clientTotal = 5000;

    // 同时并发执行的线程数
    public static int threadTotal = 200;

    public static AtomicInteger count = new AtomicInteger(0);

    public static void main(String[] args) throws Exception {
        ExecutorService executorService = Executors.newCachedThreadPool();
        final Semaphore semaphore = new Semaphore(threadTotal);
        final CountDownLatch countDownLatch = new CountDownLatch(clientTotal);
        for (int i = 0; i < clientTotal ; i++) {
            executorService.execute(() -> {
                try {
                    semaphore.acquire();
                    add();
                    semaphore.release();
                } catch (Exception e) {
                    log.error("exception", e);
                }
                countDownLatch.countDown();
            });
        }
        countDownLatch.await();
        executorService.shutdown();
        log.info("count:{}", count.get());
    }

    private static void add() {
        count.incrementAndGet();
        // count.getAndIncrement();
    }
}

package com.xidian.example;

import java.util.concurrent.CountDownLatch;
import java.util.concurrent.ExecutorService;
import java.util.concurrent.Executors;
import java.util.concurrent.Semaphore;
import java.util.concurrent.atomic.AtomicLong;

import com.xidian.annotations.ThreadSafe;

import lombok.extern.slf4j.Slf4j;

@Slf4j
@ThreadSafe
public class AtomicExample2 {

    // 请求总数
    public static int clientTotal = 5000;

    // 同时并发执行的线程数
    public static int threadTotal = 200;

    public static AtomicLong count = new AtomicLong(0);

    public static void main(String[] args) throws Exception {
        ExecutorService executorService = Executors.newCachedThreadPool();
        final Semaphore semaphore = new Semaphore(threadTotal);
        final CountDownLatch countDownLatch = new CountDownLatch(clientTotal);
        for (int i = 0; i < clientTotal ; i++) {
            executorService.execute(() -> {
                try {
                    semaphore.acquire();
                    add();
                    semaphore.release();
                } catch (Exception e) {
                    log.error("exception", e);
                }
                countDownLatch.countDown();
            });
        }
        countDownLatch.await();
        executorService.shutdown();
        log.info("count:{}", count.get());
    }

    private static void add() {
        count.incrementAndGet();
        // count.getAndIncrement();
    }
}

package com.xidian.example;

import java.util.concurrent.CountDownLatch;
import java.util.concurrent.ExecutorService;
import java.util.concurrent.Executors;
import java.util.concurrent.Semaphore;
import java.util.concurrent.atomic.LongAdder;

import com.xidian.annotations.ThreadSafe;

import lombok.extern.slf4j.Slf4j;

@Slf4j
@ThreadSafe
public class AtomicExample3 {

    // 请求总数
    public static int clientTotal = 5000;

    // 同时并发执行的线程数
    public static int threadTotal = 200;

    public static LongAdder count = new LongAdder();

    public static void main(String[] args) throws Exception {
        ExecutorService executorService = Executors.newCachedThreadPool();
        final Semaphore semaphore = new Semaphore(threadTotal);
        final CountDownLatch countDownLatch = new CountDownLatch(clientTotal);
        for (int i = 0; i < clientTotal ; i++) {
            executorService.execute(() -> {
                try {
                    semaphore.acquire();
                    add();
                    semaphore.release();
                } catch (Exception e) {
                    log.error("exception", e);
                }
                countDownLatch.countDown();
            });
        }
        countDownLatch.await();
        executorService.shutdown();
        log.info("count:{}", count);
    }

    private static void add() {
        count.increment();
    }
}
LongAdder的设计思想:核心是将热点数据分离,将内部数据value分成一个数组,每个线程访问时,通过hash等算法映射到其中一个数字进行技术,而最终计数结果为这个数组的求和累加,
其中热点数据value会被分离成多个热点单元的数据cell,每个cell独自维护内部的值,当前value的实际值由所有的cell累积合成,从而使热点进行了有效的分离,提高了并行度。相当于AtomicLong单点数据更新的压力分散到各个节点上。
LongAdder 在低并发的时候通过直接操作base,可以很好的保证和Atomic的性能基本一致,在高并发的场景,通过热点分区来提高并行度。
LongAddr缺点:在统计的时候如果有并发更新,可能会导致统计的数据有误差。
AtomicReference
package com.xidian.example;

import java.util.concurrent.atomic.AtomicReference;

import com.xidian.annotations.ThreadSafe;

import lombok.extern.slf4j.Slf4j;

@Slf4j
@ThreadSafe
public class AtomicExample4 {

    private static AtomicReference<Integer> count = new AtomicReference<>(0);

    public static void main(String[] args) {
        count.compareAndSet(0, 2); // 2
        count.compareAndSet(0, 1); // no
        count.compareAndSet(1, 3); // no
        count.compareAndSet(2, 4); // 4
        count.compareAndSet(3, 5); // no
        log.info("count:{}", count.get());
    }
}
AtomicReferenceFieldUpdater
* AtomicIntegerFieldUpdater 核心是原子性的去更新某一个类的实例的指定的某一个字段
* 构造函数第一个参数为类定义,第二个参数为指定字段的属性名,必须是volatile修饰并且非static的字段
package com.xidian.example;

import java.util.concurrent.atomic.AtomicIntegerFieldUpdater;

import com.xidian.annotations.ThreadSafe;

import lombok.Getter;
import lombok.extern.slf4j.Slf4j;

@Slf4j
@ThreadSafe
public class AtomicExample5 {

    //泛型表示要更新的对象AtomicExample5,更新AtomicExample5.class类中的count字段
    private static AtomicIntegerFieldUpdater<AtomicExample5> updater =
            AtomicIntegerFieldUpdater.newUpdater(AtomicExample5.class, "count");

    //这个count必须要通过volatile来修饰
    @Getter
    public volatile int count = 100;

    public static void main(String[] args) {

        AtomicExample5 example5 = new AtomicExample5();

        if (updater.compareAndSet(example5, 100, 120)) {
            log.info("update success 1, {}", example5.getCount());
        }

        if (updater.compareAndSet(example5, 100, 120)) {
            log.info("update success 2, {}", example5.getCount());
        } else {
            log.info("update failed, {}", example5.getCount());
        }
    }
}
ABA问题:在CAS操作的时候,其他线程将变量的值A改成了B由改成了A,本线程使用期望值A与当前变量进行比较的时候,发现A变量没有变,于是CAS就将A值进行了交换操作,这个时候实际上A值已经被其他线程改变过,这与设计思想是不符合的
解决思路:每次变量更新的时候,把变量的版本号加一,这样只要变量被某一个线程修改过,该变量版本号就会发生递增操作,从而解决了ABA变化.

/**
     * Atomically sets the value of both the reference and stamp
     * to the given update values if the
     * current reference is {@code ==} to the expected reference
     * and the current stamp is equal to the expected stamp.
     *
     * @param expectedReference the expected value of the reference
     * @param newReference the new value for the reference
     * @param expectedStamp the expected value of the stamp(上面提到的版本号)
     * @param newStamp the new value for the stamp
     * @return {@code true} if successful
     */
    public boolean compareAndSet(V   expectedReference,
                                 V   newReference,
                                 int expectedStamp,
                                 int newStamp) {
        Pair<V> current = pair;
        return
            expectedReference == current.reference &&
            expectedStamp == current.stamp &&
            ((newReference == current.reference &&
              newStamp == current.stamp) ||
             casPair(current, Pair.of(newReference, newStamp)));
    }
可以指定更新一个数组指定索引位置的值。

/**
     * Atomically sets the element at position {@code i} to the given value
     * and returns the old value.
     *
     * @param i the index
     * @param newValue the new value
     * @return the previous value
     */
    public final long getAndSet(int i, long newValue) {
        return unsafe.getAndSetLong(array, checkedByteOffset(i), newValue);
    }
...
...
/**
     * Atomically sets the element at position {@code i} to the given
     * updated value if the current value {@code ==} the expected value.
     *
     * @param i the index
     * @param expect the expected value
     * @param update the new value
     * @return {@code true} if successful. False return indicates that
     * the actual value was not equal to the expected value.
     */
    public final boolean compareAndSet(int i, long expect, long update) {
        return compareAndSetRaw(checkedByteOffset(i), expect, update);
    }
 View Code
测试发现test()只会执行一次,所以我们如果要控制某个程序在并发环境下只执行一次,可以用这个类。
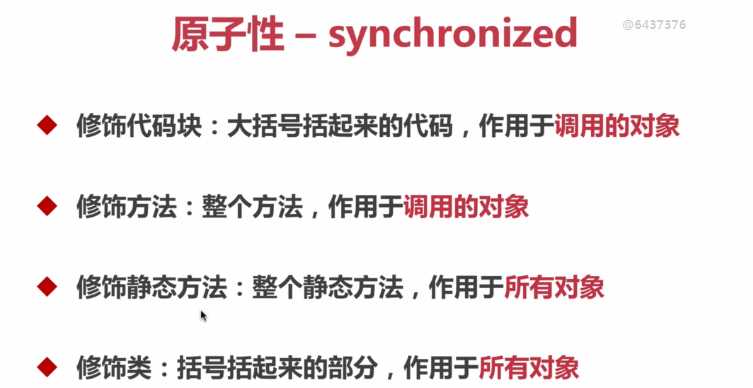
原子性—锁(Synchronize、Lock)


修饰代码块和方法:

@Slf4j
public class SyncronizedExample1 {
    /**
     * 修饰一个代码块,作用范围为大括号括起来的
     */
    public void test1(){
        synchronized (this){
            for (int i = 0; i < 10; i++) {
                log.info("test1-{}",i);
            }
        }
    }

    /**
     * 修改方法,作用范围是整个方法,作用对象为调用这个方法的对象
     * 若子类继承父类调用父类的synchronized方法,是带不上synchronized关键字的
     * 原因:synchronized 不属于方法声明的一部分
     * 如果子类也想使用同步需要在方法上声明
     */
    public synchronized void test2(){
        for (int i = 0; i < 10; i++) {
            log.info("test2-{}",i);
        }
    }

    public static void main(String[] args) {
        SyncronizedExample1 example1 = new SyncronizedExample1();
        SyncronizedExample1 example2 = new SyncronizedExample1();

        // 使用线程池模拟一个对象的两个进程同时调用一段sync代码的执行过程
        ExecutorService executorService = Executors.newCachedThreadPool();

        // 线程pool-1-thread-1,pool-1-thread-2 交叉输出
        executorService.execute(()-> example1.test1());
        executorService.execute(()-> example2.test1());


        // 线程pool-1-thread-1 先从0-9输出,然后pool-1-thread-2 从0到9顺序输出
        // executorService.execute(()-> example1.test1());
        // executorService.execute(()-> example1.test1());

    }
}
使用同步代码块和修饰方法同步它作用的对象是调用的对象,因此我们使用两个不同的对象调用同步代码块的时候,它俩互相不影响。它俩是交叉执行的。
修饰静态方法和修饰类:

@Slf4j
public class SyncronizedExample2 {

    /**
     * 修饰类,括号包起来的代码
     * 作用对象为这个类的所有对象
     */
    public static void test1(){
        synchronized (SyncronizedExample2.class){
            for (int i = 0; i < 10; i++) {
                log.info("test1-{}",i);
            }
        }
    }


    /**
     * 修饰一个静态方法,作用对象为这个类的所有对象
     */
    public static synchronized void test2(){
        for (int i = 0; i < 10; i++) {
            log.info("test2-{}",i);
        }
    }

    public static void main(String[] args) {
        SyncronizedExample2 example1 = new SyncronizedExample2();
        SyncronizedExample2 example2 = new SyncronizedExample2();

        // 使用线程池模拟一个对象的两个进程同时调用一段sync代码的执行过程
        ExecutorService executorService = Executors.newCachedThreadPool();

        // 线程pool-1-thread-1 先从0-9输出,然后pool-1-thread-2 从0到9顺序输出
        executorService.execute(()-> example1.test1());
        executorService.execute(()-> example1.test1());

        // 线程pool-1-thread-1 先从0-9输出,然后pool-1-thread-2 从0到9顺序输出
//        executorService.execute(()-> example1.test2());
//        executorService.execute(()-> example2.test2());
    }
}
可以看见,修饰静态方法和修饰类作用对象是这个类的所有对象,虽然使用一个类的两个对象调用同一个方法,但是它们依然可以做到同步。

标签:字段 microsoft 失败 dia tor opened back count() 版本号
原文地址:https://www.cnblogs.com/xiangkejin/p/9248656.html