标签:pack void i++ int swing 文章 oca top main
/*文章中用到的代码只是一部分,需要源码的可通过邮箱联系我 1978702969@qq.com*/
在上篇博客中提到了JAVA图形界面开发时的两种布局,流式布局和边框布局。
在实际使用中可能会发现,往容器中添加组件往往并不能得到想要的结果。比如想上下对齐两个组件,而流式布局是从左到右的,此时就很难实现上下对齐,此篇文章将介绍两个方法。
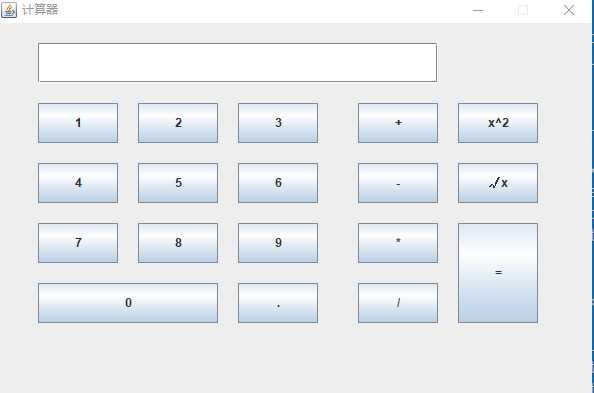
1.直接使用坐标贴图
如下面这个计算器的制作


 1 package Graphic;
 2
 3 import java.awt.BorderLayout;
 4 import java.awt.Dimension;
 5 import java.awt.FlowLayout;
 6
 7 import javax.swing.JButton;
 8 import javax.swing.JFrame;
 9 import javax.swing.JLabel;
10 import javax.swing.JPanel;
11 import javax.swing.JTextField;
12
13 public class Calculator {
14
15     public static void main(String[] args) {
16         Calculator login = new Calculator();
17         login.Init();
18     }
19
20     public void Init()
21     {
22         String arr[] = {"1","2","3","4","5","6","7","8","9","0","+","-","*","/","="};
23
24         JFrame frame = new JFrame();
25         frame.setTitle("计算器");
26         frame.setSize(600,400);
27         frame.setLocationRelativeTo(null);
28         frame.setDefaultCloseOperation(3);
29         frame.setResizable(false);
30
31         frame.setLayout(null);
32
33         JTextField text1 = new     JTextField();
34         text1.setBounds(40, 20, 400, 40);
35         frame.add(text1);
36
37
38         for(int i=0;i<9;i++)
39         {
40             JButton button = new JButton();
41             button.setText(arr[i]);
42             button.setBounds((i%3)*100+40, (i/3)*60+80, 80, 40);
43             frame.add(button);
44         }
45
46         JButton button = new JButton();
47         button.setText("0");
48         button.setBounds(40, 260, 180, 40);
49         frame.add(button);
50
51         JButton button1 = new JButton();
52         button1.setText(".");
53         button1.setBounds(240, 260, 80, 40);
54         frame.add(button1);
55
56         for(int i=10;i<arr.length - 1;i++)
57         {
58             JButton button2 = new JButton();
59             button2.setText(arr[i]);
60             button2.setBounds(360, (i-10)*60+80, 80, 40);
61             frame.add(button2);
62         }
63
64
65         JButton button2 = new JButton();
66         button2.setText("x^2");
67         button2.setBounds(460, 80, 80, 40);
68         frame.add(button2);
69
70         JButton button3 = new JButton();
71         button3.setText("√x");
72         button3.setBounds(460, 140, 80, 40);
73         frame.add(button3);
74
75         JButton button4 = new JButton();
76         button4.setText("=");
77         button4.setBounds(460, 200, 80, 100);
78         frame.add(button4);
79
80         frame.setVisible(true);
81     }
82 }
2.设置组件大小
下面这个界面的制作


 1 package Graphic;
 2
 3 import java.awt.BorderLayout;
 4 import java.awt.Dimension;
 5 import java.awt.FlowLayout;
 6
 7 import javax.swing.ImageIcon;
 8 import javax.swing.JButton;
 9 import javax.swing.JCheckBox;
10 import javax.swing.JFrame;
11 import javax.swing.JLabel;
12 import javax.swing.JPanel;
13 import javax.swing.JPasswordField;
14 import javax.swing.JTextField;
15
16 public class Login1 {
17
18     public static void main(String[] args) {
19         // TODO Auto-generated method stub
20         Login1 login = new Login1();
21         login.Init();
22     }
23
24     public void Init()
25     {
26         JFrame frame = new JFrame();
27         frame.setTitle("QQ");
28         frame.setSize(430,330);
29         frame.setLocationRelativeTo(null);
30         frame.setDefaultCloseOperation(3);
31         frame.setResizable(false);
32
33         BorderLayout b1 = new BorderLayout();
34         frame.setLayout(b1);
35         //添加图片 北
36         ImageIcon icon = new ImageIcon("C:\\Users\\long452a\\Desktop\\a1.jpg");
37         JLabel labIcon = new JLabel(icon);
38         frame.add(labIcon,BorderLayout.NORTH);
39
40         //添加面板容器:账号、密码
41         JPanel centerPanel = new JPanel();
42         centerPanel.setLayout(new FlowLayout(FlowLayout.CENTER,10,5));
43
44         JLabel labName = new JLabel("账号:");
45         labName.setHorizontalAlignment(JLabel.RIGHT);//这步很关键,通过设置右对齐的方式在前面补空
46         labName.setPreferredSize(new Dimension(110,30));
47         centerPanel.add(labName);
48
49         JTextField textName = new JTextField();
50         textName.setPreferredSize(new Dimension(180,30));
51         centerPanel.add(textName);
52
53
54         JLabel labPassowrd = new JLabel("密码 :");
55         labPassowrd.setHorizontalAlignment(JLabel.RIGHT);
56         labPassowrd.setPreferredSize(new Dimension(110,30));
57         centerPanel.add(labPassowrd);
58
59         JPasswordField textPassword = new JPasswordField();
60         textPassword.setPreferredSize(new Dimension(180,30));
61         centerPanel.add(textPassword,labPassowrd);
62
63
64         JPanel centerPanel1 = new JPanel();
65         centerPanel1.setLayout(new FlowLayout(FlowLayout.CENTER,5,5));
66         JCheckBox rememberBox = new JCheckBox();
67         rememberBox.setText("记住密码");
68         rememberBox.setHorizontalAlignment(JLabel.RIGHT);
69         rememberBox.setPreferredSize(new Dimension(140,30));
70         centerPanel.add(rememberBox);
71
72         JCheckBox rememberBox2 = new JCheckBox();
73         rememberBox2.setText("自动登录");
74         rememberBox2.setHorizontalAlignment(JLabel.RIGHT);
75         rememberBox2.setPreferredSize(new Dimension(100,30));
76         centerPanel.add(rememberBox2);
77
78         JButton southButton = new JButton();
79         southButton.setPreferredSize(new Dimension(120,40));
80         southButton.setText("登录");
81         centerPanel1.add(southButton);
82
83         frame.add(centerPanel1, BorderLayout.SOUTH);
84         frame.add(centerPanel,BorderLayout.CENTER);
85         frame.setVisible(true);
86     }
87 }
标签:pack void i++ int swing 文章 oca top main
原文地址:https://www.cnblogs.com/csu-lmw/p/9251916.html