标签:条件 登陆 sch 管理员 图片 开头 post tar and
在前面例子中,登陆页面都是用的Spring Security自己提供的,这明显不符合实际开发场景,同时也没有退出和注销按钮,因此在每次测试的时候都要通过关闭浏览器来注销达到清除session的效果。
<%@ page language="java" contentType="text/html; charset=UTF-8" pageEncoding="UTF-8"%>
<!DOCTYPE html PUBLIC "-//W3C//DTD HTML 4.01 Transitional//EN" "http://www.w3.org/TR/html4/loose.dtd">
<html>
    <head>
        <meta http-equiv="Content-Type" content="text/html; charset=UTF-8">
        <title>自定义登陆页面</title>
    </head>
    <body>
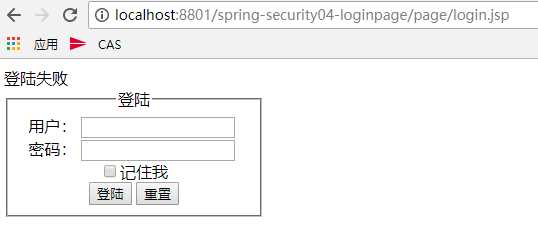
        <div class="error ${param.error == true ? ‘‘ : ‘hide‘}">
                登陆失败<br>
            ${sessionScope[‘SPRING_SECURITY_LAST_EXCEPTION‘].message}
        </div>
        <form method="post" action="${pageContext.request.contextPath}/j_spring_security_check" style="width:260px; text-align: center">
            <fieldset>
                <legend>登陆</legend>
                用户: <input type="text" name="j_username" style="width: 150px;" value="${sessionScope[‘SPRING_SECURITY_LAST_USERNAME‘]}" />
                <br/>
                密码: <input type="password" name="j_password" style="width: 150px;" />
                <br/>
                <input type="checkbox" name="_spring_security_remember_me" />记住我<br/>
                <input type="submit" value="登陆" />
                <input type="reset" value="重置" />
            </fieldset>
       </form>
    </body>
</html>
说明:
j_username,输入登陆名的参数名称,j_password,输入密码的参数名称,这两个正常情况下也不会修改。
<?xml version="1.0" encoding="UTF-8"?>
<beans:beans xmlns="http://www.springframework.org/schema/security"
    xmlns:beans="http://www.springframework.org/schema/beans" xmlns:xsi="http://www.w3.org/2001/XMLSchema-instance"
    xsi:schemaLocation="http://www.springframework.org/schema/beans
                        http://www.springframework.org/schema/beans/spring-beans-3.0.xsd
                        http://www.springframework.org/schema/context
                        http://www.springframework.org/schema/context/spring-context-3.1.xsd
                        http://www.springframework.org/schema/tx
                        http://www.springframework.org/schema/tx/spring-tx-3.0.xsd
                        http://www.springframework.org/schema/security
                        http://www.springframework.org/schema/security/spring-security.xsd">
    <!--
    1.http部分配置如何拦截用户请求。auto-config=‘true‘将自动配置几种常用的权限控制机制,包括form, anonymous, rememberMe。
    2.利用intercept-url来判断用户需要具有何种权限才能访问对应的url资源,可以在pattern中指定一个特定的url资源,也可以使用通配符指定一组
    类似的url资源。例子中定义的两个intercepter-url,第一个用来控制对/admin.jsp的访问,第二个使用了通配符/**,说明它将控制对系统中所有
    url资源的访问。
    3.在实际使用中,Spring Security采用的是一种就近原则,就是说当用户访问的url资源满足多个intercepter-url时,系统将使用第一个符合
    条件的intercept-url进行权限控制。在我们这个例子中就是,当用户访问/admin.jsp时,虽然两个intercept-url都满足要求,但因为第一个
    intercept-url排在上面,所以Spring Security会使用第一个intercept-url中的配置处理对/adminPage.jsp的请求,也就是说
    只有那些拥有了ROLE_ADMIN权限的用户才能访问/admin.jsp。
    4.access指定的权限都是以ROLE_开头的,实际上这与Spring Security中的Voter机制有着千丝万缕的联系,只有包含了特定前缀的字符串才会
    被Spring Security处理。
     -->
    <http auto-config=‘true‘>
        <!-- IS_AUTHENTICATED_ANONYMOUSLY表示允许匿名访问 -->
        <intercept-url pattern="/page/login.jsp" access="IS_AUTHENTICATED_ANONYMOUSLY"/>
        <!-- ROLE_ADMIN角色允许访问 -->
        <intercept-url pattern="/page/admin.jsp" access="ROLE_ADMIN" />
        <!-- ROLE_USER角色允许访问任何页面,但不包括上面配置的页面,因为SpringSecurity采用就近原则 -->
        <intercept-url pattern="/**" access="ROLE_USER" />
        <!-- 登录页面配置,default-target-url登录成功页面,authentication-failure-url失败页面 -->
        <form-login login-page="/page/login.jsp" default-target-url="/user.jsp" authentication-failure-url="/page/login.jsp?error=true"/>
        <!-- 注销配置,invalidate-session是否清除缓存,logout-success-url注销后跳转页面,logout-url提交地址 -->
        <logout invalidate-session="true" logout-success-url="/page/login.jsp" logout-url="/j_spring_security_logout"/>
    </http>

    <!-- 默认数据库对用户进行存储 -->
    <authentication-manager>
        <authentication-provider>
            <jdbc-user-service data-source-ref="dataSource"
                users-by-username-query="select username,password,status as enabled from user where username = ?"
                authorities-by-username-query="select user.username,role.name from user,role,user_role
                                       where user.id=user_role.user_id and
                                       user_role.role_id=role.id and user.username=?"/>
           </authentication-provider>
    </authentication-manager>
</beans:beans>


  <http auto-config="false" use-expressions="true">
        <intercept-url pattern="/page/login.jsp" access="permitAll" />
        <intercept-url pattern="/page/user.jsp" access="hasRole(‘ROLE_ADMIN‘)" />
        <intercept-url pattern="/**" access="hasRole(‘ROLE_USER‘)" />
        <form-login login-page="/page/login.jsp" default-target-url="/page/user.jsp" authentication-failure-url="/login.jsp?error=true" />
        <logout invalidate-session="true" logout-success-url="/page/login.jsp" logout-url="/j_spring_security_logout"/>
    </http>
user.jsp
<%@ page language="java" contentType="text/html; charset=UTF-8" pageEncoding="UTF-8"%>
<!DOCTYPE html PUBLIC "-//W3C//DTD HTML 4.01 Transitional//EN" "http://www.w3.org/TR/html4/loose.dtd">
<html>
    <head>
        <meta http-equiv="Content-Type" content="text/html; charset=UTF-8">
        <title>Insert title here</title>
    </head>
    <body>
        <h1>User Page</h1>
        <a href="${pageContext.request.contextPath}/j_spring_security_logout">退出登陆</a>
    </body>
</html>
admin.jsp
<%@ page language="java" contentType="text/html; charset=UTF-8" pageEncoding="UTF-8"%>
<!DOCTYPE html PUBLIC "-//W3C//DTD HTML 4.01 Transitional//EN" "http://www.w3.org/TR/html4/loose.dtd">
<html>
    <head>
        <meta http-equiv="Content-Type" content="text/html; charset=UTF-8">
        <title>Insert title here</title>
    </head>
    <body>
        <h1>Admin Page</h1>
        <a href="${pageContext.request.contextPath}/j_spring_security_logout">退出登陆</a>
    </body>
</html>
<?xml version="1.0" encoding="UTF-8"?>
<web-app xmlns:xsi="http://www.w3.org/2001/XMLSchema-instance"
    xmlns="http://java.sun.com/xml/ns/javaee"
    xmlns:web="http://java.sun.com/xml/ns/javaee"
    xsi:schemaLocation="http://java.sun.com/xml/ns/javaee http://java.sun.com/xml/ns/javaee/web-app_3_0.xsd"
    version="3.0">
    <display-name>SpringSecurity</display-name>
    <context-param>
        <param-name>contextConfigLocation</param-name>
        <param-value>classpath:spring-*.xml</param-value>
    </context-param>
    <filter>
        <filter-name>springSecurityFilterChain</filter-name>
        <filter-class>org.springframework.web.filter.DelegatingFilterProxy
        </filter-class>
    </filter>
    <filter-mapping>
        <filter-name>springSecurityFilterChain</filter-name>
        <url-pattern>/*</url-pattern>
  </filter-mapping>
  <listener>
    <listener-class>org.springframework.web.context.ContextLoaderListener</listener-class>
  </listener>
  <welcome-file-list>
    <welcome-file>/page/login.jsp</welcome-file>
  </welcome-file-list>
</web-app>


当输入普通用户的用户名和密码,同时勾选2周不用登陆后,因为admin.jsp页面要有管理员权限才能访问,所以普通用户访问失败,user.jsp页面就可以访问;这时关闭页面后,再次访问资源,因为勾选了2周不用登陆,所以可以成功访问;但是当点击退出登录后,再次访问是就会跳转到登陆页面,要求登陆才能访问。
当输入管理员名和密码,同时勾选2周不用登陆,验证成功后,跳转到user.jsp,同时adminPage.jsp也可以访问,这时把一个页面关闭再重新访问资源时,因为勾选2周不用登陆,所以可以成功访问;然后注销,这是再访问资源时,就会跳转到登陆页面,要求登陆才能访问。
标签:条件 登陆 sch 管理员 图片 开头 post tar and
原文地址:https://www.cnblogs.com/sunny3096/p/9260043.html