标签:表示 ack 技术分享 计数 int height ada ram round
承接Python设计模式(2):创建型
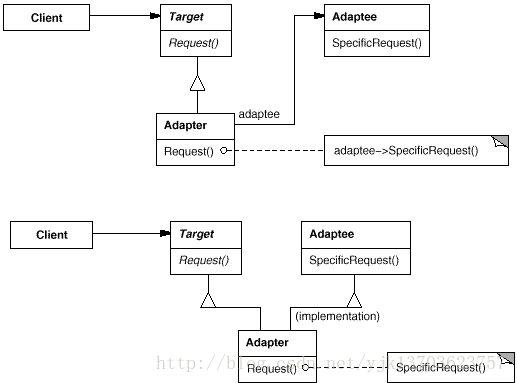
意图:将一个类的接口转换成客户希望的另外一个接口。Adapter 模式使得原本由于接口不兼容而不能一起工作的那些类可以一起工作。
适用性:
你想使用一个已经存在的类,而它的接口不符合你的需求。
你想创建一个可以复用的类,该类可以与其他不相关的类或不可预见的类(即那些接口可能不一定兼容的类)协同工作。
(仅适用于对象Adapter )你想使用一些已经存在的子类,但是不可能对每一个都进行子类化以匹配它们的接口。对象适配器可以适配它的父类接口。
#!/usr/bin/python
#coding:utf8
‘‘‘
Adapter
‘‘‘

import os


class Dog(object):
    def __init__(self):
        self.name = "Dog"

    def bark(self):
        return "woof!"


class Cat(object):
    def __init__(self):
        self.name = "Cat"

    def meow(self):
        return "meow!"


class Human(object):
    def __init__(self):
        self.name = "Human"

    def speak(self):
        return "‘hello‘"


class Car(object):
    def __init__(self):
        self.name = "Car"

    def make_noise(self, octane_level):
        return "vroom%s" % ("!" * octane_level)


class Adapter(object):
    """
    Adapts an object by replacing methods.
    Usage:
    dog = Dog
    dog = Adapter(dog, dict(make_noise=dog.bark))
    """
    def __init__(self, obj, adapted_methods):
        """We set the adapted methods in the object‘s dict"""
        self.obj = obj
        self.__dict__.update(adapted_methods)

    def __getattr__(self, attr):
        """All non-adapted calls are passed to the object"""
        return getattr(self.obj, attr)


def main():
    objects = []
    dog = Dog()
    objects.append(Adapter(dog, dict(make_noise=dog.bark)))
    cat = Cat()
    objects.append(Adapter(cat, dict(make_noise=cat.meow)))
    human = Human()
    objects.append(Adapter(human, dict(make_noise=human.speak)))
    car = Car()
    car_noise = lambda: car.make_noise(3)
    objects.append(Adapter(car, dict(make_noise=car_noise)))

    for obj in objects:
        print "A", obj.name, "goes", obj.make_noise()


if __name__ == "__main__":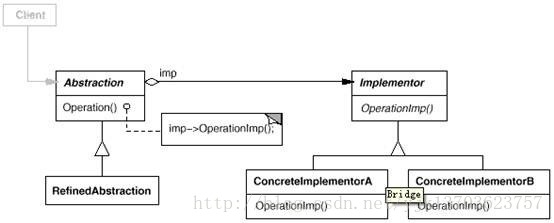
main()意图:将抽象部分与它的实现部分分离,使它们都可以独立地变化。
适用性:
你不希望在抽象和它的实现部分之间有一个固定的绑定关系。例如这种情况可能是因为,在程序运行时刻实现部分应可以被选择或者切换。
类的抽象以及它的实现都应该可以通过生成子类的方法加以扩充。这时Bridge 模式使你可以对不同的抽象接口和实现部分进行组合,并分别对它们进行扩充。
对一个抽象的实现部分的修改应对客户不产生影响,即客户的代码不必重新编译。
(C++)你想对客户完全隐藏抽象的实现部分。在C++中,类的表示在类接口中是可见的。
有许多类要生成。这样一种类层次结构说明你必须将一个对象分解成两个部分。Rumbaugh 称这种类层次结构为“嵌套的普化”(nested generalizations )。
你想在多个对象间共享实现(可能使用引用计数),但同时要求客户并不知道这一点。一个简单的例子便是Coplien 的String 类[ Cop92 ],在这个类中多个对象可以共享同一个字符串表示(StringRep)。
#!/usr/bin/python
#coding:utf8
‘‘‘
Bridge
‘‘‘


# ConcreteImplementor 1/2
class DrawingAPI1(object):
    def draw_circle(self, x, y, radius):
        print(‘API1.circle at {}:{} radius {}‘.format(x, y, radius))


# ConcreteImplementor 2/2
class DrawingAPI2(object):
    def draw_circle(self, x, y, radius):
        print(‘API2.circle at {}:{} radius {}‘.format(x, y, radius))


# Refined Abstraction
class CircleShape(object):
    def __init__(self, x, y, radius, drawing_api):
        self._x = x
        self._y = y
        self._radius = radius
        self._drawing_api = drawing_api

    # low-level i.e. Implementation specific
    def draw(self):
        self._drawing_api.draw_circle(self._x, self._y, self._radius)

    # high-level i.e. Abstraction specific
    def scale(self, pct):
        self._radius *= pct


def main():
    shapes = (
        CircleShape(1, 2, 3, DrawingAPI1()),
        CircleShape(5, 7, 11, DrawingAPI2())
    )

    for shape in shapes:
        shape.scale(2.5)
        shape.draw()


if __name__ == ‘__main__‘: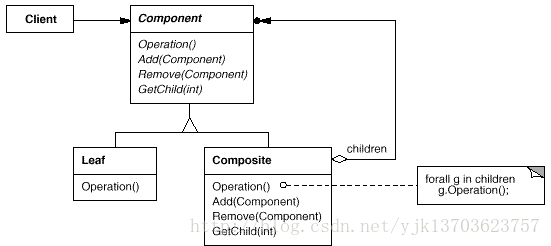
main()意图:将对象组合成树形结构以表示“部分-整体”的层次结构。C o m p o s i t e 使得用户对单个对象和组合对象的使用具有一致性。
适用性:
你想表示对象的部分-整体层次结构。
你希望用户忽略组合对象与单个对象的不同,用户将统一地使用组合结构中的所有对象。
#!/usr/bin/python
#coding:utf8

"""
Composite
"""

class Component:
    def __init__(self,strName):
        self.m_strName = strName
    def Add(self,com):
        pass
    def Display(self,nDepth):
        pass

class Leaf(Component):
    def Add(self,com):
        print "leaf can‘t add"
    def Display(self,nDepth):
        strtemp = "-" * nDepth
        strtemp=strtemp+self.m_strName
        print strtemp

class Composite(Component):
    def __init__(self,strName):
        self.m_strName = strName
        self.c = []
    def Add(self,com):
        self.c.append(com)
    def Display(self,nDepth):
        strtemp = "-"*nDepth
        strtemp=strtemp+self.m_strName
        print strtemp
        for com in self.c:
            com.Display(nDepth+2)

if __name__ == "__main__":
    p = Composite("Wong")
    p.Add(Leaf("Lee"))
    p.Add(Leaf("Zhao"))
    p1 = Composite("Wu")
    p1.Add(Leaf("San"))
    p.Add(p1)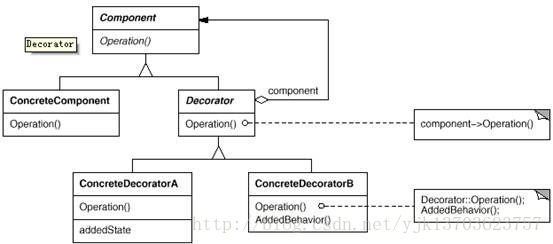
p.Display(1);意图: 动态地给一个对象添加一些额外的职责。就增加功能来说,Decorator 模式相比生成子类更为灵活。
适用性:
在不影响其他对象的情况下,以动态、透明的方式给单个对象添加职责。
处理那些可以撤消的职责。
当不能采用生成子类的方法进行扩充时。一种情况是,可能有大量独立的扩展,为支持每一种组合将产生大量的子类,使得子类数目呈爆炸性增长。另一种情况可能是因为类定义被隐藏,或类定义不能用于生成子类。
#!/usr/bin/python
#coding:utf8
‘‘‘
Decorator
‘‘‘

class foo(object):
    def f1(self):
        print("original f1")

    def f2(self):
        print("original f2")


class foo_decorator(object):
    def __init__(self, decoratee):
        self._decoratee = decoratee

    def f1(self):
        print("decorated f1")
        self._decoratee.f1()

    def __getattr__(self, name):
        return getattr(self._decoratee, name)

u = foo()
v = foo_decorator(u)
v.f1()
v.f2()意图:为子系统中的一组接口提供一个一致的界面,Facade模式定义了一个高层接口,这个接口使得这一子系统更加容易使用。
适用性:
当你要为一个复杂子系统提供一个简单接口时。子系统往往因为不断演化而变得越来越复杂。大多数模式使用时都会产生更多更小的类。这使得子系统更具可重用性,也更容易对子系统进行定制,但这也给那些不需要定制子系统的用户带来一些使用上的困难。Facade 可以提供一个简单的缺省视图,这一视图对大多数用户来说已经足够,而那些需要更多的可定制性的用户可以越过facade层。
客户程序与抽象类的实现部分之间存在着很大的依赖性。引入facade 将这个子系统与客户以及其他的子系统分离,可以提高子系统的独立性和可移植性。
当你需要构建一个层次结构的子系统时,使用facade模式定义子系统中每层的入口点。如果子系统之间是相互依赖的,你可以让它们仅通过facade进行通讯,从而简化了它们之间的依赖关系。
#!/usr/bin/python
#coding:utf8
‘‘‘
Decorator
‘‘‘
import time

SLEEP = 0.5

# Complex Parts
class TC1:
    def run(self):
        print("###### In Test 1 ######")
        time.sleep(SLEEP)
        print("Setting up")
        time.sleep(SLEEP)
        print("Running test")
        time.sleep(SLEEP)
        print("Tearing down")
        time.sleep(SLEEP)
        print("Test Finished\n")


class TC2:
    def run(self):
        print("###### In Test 2 ######")
        time.sleep(SLEEP)
        print("Setting up")
        time.sleep(SLEEP)
        print("Running test")
        time.sleep(SLEEP)
        print("Tearing down")
        time.sleep(SLEEP)
        print("Test Finished\n")


class TC3:
    def run(self):
        print("###### In Test 3 ######")
        time.sleep(SLEEP)
        print("Setting up")
        time.sleep(SLEEP)
        print("Running test")
        time.sleep(SLEEP)
        print("Tearing down")
        time.sleep(SLEEP)
        print("Test Finished\n")


# Facade
class TestRunner:
    def __init__(self):
        self.tc1 = TC1()
        self.tc2 = TC2()
        self.tc3 = TC3()
        self.tests = [i for i in (self.tc1, self.tc2, self.tc3)]

    def runAll(self):
        [i.run() for i in self.tests]


# Client
if __name__ == ‘__main__‘:
    testrunner = TestRunner()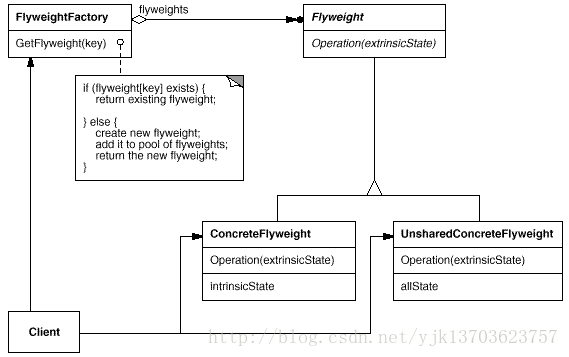
testrunner.runAll()意图:运用共享技术有效地支持大量细粒度的对象。
适用性:
一个应用程序使用了大量的对象。
完全由于使用大量的对象,造成很大的存储开销。
对象的大多数状态都可变为外部状态。
如果删除对象的外部状态,那么可以用相对较少的共享对象取代很多组对象。
应用程序不依赖于对象标识。由于Flyweight 对象可以被共享,对于概念上明显有别的对象,标识测试将返回真值。
#!/usr/bin/python
#coding:utf8
‘‘‘
Flyweight
‘‘‘

import weakref


class Card(object):
    """The object pool. Has builtin reference counting"""
    _CardPool = weakref.WeakValueDictionary()

    """Flyweight implementation. If the object exists in the
    pool just return it (instead of creating a new one)"""
    def __new__(cls, value, suit):
        obj = Card._CardPool.get(value + suit, None)
        if not obj:
            obj = object.__new__(cls)
            Card._CardPool[value + suit] = obj
            obj.value, obj.suit = value, suit
        return obj

    # def __init__(self, value, suit):
    #     self.value, self.suit = value, suit

    def __repr__(self):
        return "<Card: %s%s>" % (self.value, self.suit)


if __name__ == ‘__main__‘:
    # comment __new__ and uncomment __init__ to see the difference
    c1 = Card(‘9‘, ‘h‘)
    c2 = Card(‘9‘, ‘h‘)
    print(c1, c2)
    print(c1 == c2)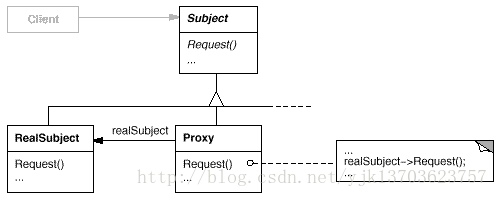
print(id(c1), id(c2))意图:
为其他对象提供一种代理以控制对这个对象的访问。
适用性:
1) 远程代理(Remote Proxy )为一个对象在不同的地址空间提供局部代表。 NEXTSTEP[Add94] 使用NXProxy 类实现了这一目的。Coplien[Cop92] 称这种代理为“大使” (Ambassador )。
2) 虚代理(Virtual Proxy )根据需要创建开销很大的对象。在动机一节描述的ImageProxy 就是这样一种代理的例子。
3) 保护代理(Protection Proxy )控制对原始对象的访问。保护代理用于对象应该有不同 的访问权限的时候。例如,在Choices 操作系统[ CIRM93]中KemelProxies为操作系统对象提供 了访问保护。
4) 智能指引(Smart Reference )取代了简单的指针,它在访问对象时执行一些附加操作。 它的典型用途包括:对指向实际对象的引用计数,这样当该对象没有引用时,可以自动释放它(也称为SmartPointers[Ede92 ] )。
当第一次引用一个持久对象时,将它装入内存。
在访问一个实际对象前,检查是否已经锁定了它,以确保其他对象不能改变它。
#!/usr/bin/python
#coding:utf8
‘‘‘
Proxy
‘‘‘

import time

class SalesManager:
    def work(self):
        print("Sales Manager working...")

    def talk(self):
        print("Sales Manager ready to talk")

class Proxy:
    def __init__(self):
        self.busy = ‘No‘
        self.sales = None

    def work(self):
        print("Proxy checking for Sales Manager availability")
        if self.busy == ‘No‘:
            self.sales = SalesManager()
            time.sleep(2)
            self.sales.talk()
        else:
            time.sleep(2)
            print("Sales Manager is busy")


if __name__ == ‘__main__‘:
    p = Proxy()
    p.work()
    p.busy = ‘Yes‘
p.work()https://www.cnblogs.com/Liqiongyu/p/5916710.html
承接Python设计模式(2):创建型
意图:将一个类的接口转换成客户希望的另外一个接口。Adapter 模式使得原本由于接口不兼容而不能一起工作的那些类可以一起工作。
适用性:
你想使用一个已经存在的类,而它的接口不符合你的需求。
你想创建一个可以复用的类,该类可以与其他不相关的类或不可预见的类(即那些接口可能不一定兼容的类)协同工作。
(仅适用于对象Adapter )你想使用一些已经存在的子类,但是不可能对每一个都进行子类化以匹配它们的接口。对象适配器可以适配它的父类接口。
#!/usr/bin/python
#coding:utf8
‘‘‘
Adapter
‘‘‘

import os


class Dog(object):
    def __init__(self):
        self.name = "Dog"

    def bark(self):
        return "woof!"


class Cat(object):
    def __init__(self):
        self.name = "Cat"

    def meow(self):
        return "meow!"


class Human(object):
    def __init__(self):
        self.name = "Human"

    def speak(self):
        return "‘hello‘"


class Car(object):
    def __init__(self):
        self.name = "Car"

    def make_noise(self, octane_level):
        return "vroom%s" % ("!" * octane_level)


class Adapter(object):
    """
    Adapts an object by replacing methods.
    Usage:
    dog = Dog
    dog = Adapter(dog, dict(make_noise=dog.bark))
    """
    def __init__(self, obj, adapted_methods):
        """We set the adapted methods in the object‘s dict"""
        self.obj = obj
        self.__dict__.update(adapted_methods)

    def __getattr__(self, attr):
        """All non-adapted calls are passed to the object"""
        return getattr(self.obj, attr)


def main():
    objects = []
    dog = Dog()
    objects.append(Adapter(dog, dict(make_noise=dog.bark)))
    cat = Cat()
    objects.append(Adapter(cat, dict(make_noise=cat.meow)))
    human = Human()
    objects.append(Adapter(human, dict(make_noise=human.speak)))
    car = Car()
    car_noise = lambda: car.make_noise(3)
    objects.append(Adapter(car, dict(make_noise=car_noise)))

    for obj in objects:
        print "A", obj.name, "goes", obj.make_noise()


if __name__ == "__main__":
main()意图:将抽象部分与它的实现部分分离,使它们都可以独立地变化。
适用性:
你不希望在抽象和它的实现部分之间有一个固定的绑定关系。例如这种情况可能是因为,在程序运行时刻实现部分应可以被选择或者切换。
类的抽象以及它的实现都应该可以通过生成子类的方法加以扩充。这时Bridge 模式使你可以对不同的抽象接口和实现部分进行组合,并分别对它们进行扩充。
对一个抽象的实现部分的修改应对客户不产生影响,即客户的代码不必重新编译。
(C++)你想对客户完全隐藏抽象的实现部分。在C++中,类的表示在类接口中是可见的。
有许多类要生成。这样一种类层次结构说明你必须将一个对象分解成两个部分。Rumbaugh 称这种类层次结构为“嵌套的普化”(nested generalizations )。
你想在多个对象间共享实现(可能使用引用计数),但同时要求客户并不知道这一点。一个简单的例子便是Coplien 的String 类[ Cop92 ],在这个类中多个对象可以共享同一个字符串表示(StringRep)。
#!/usr/bin/python
#coding:utf8
‘‘‘
Bridge
‘‘‘


# ConcreteImplementor 1/2
class DrawingAPI1(object):
    def draw_circle(self, x, y, radius):
        print(‘API1.circle at {}:{} radius {}‘.format(x, y, radius))


# ConcreteImplementor 2/2
class DrawingAPI2(object):
    def draw_circle(self, x, y, radius):
        print(‘API2.circle at {}:{} radius {}‘.format(x, y, radius))


# Refined Abstraction
class CircleShape(object):
    def __init__(self, x, y, radius, drawing_api):
        self._x = x
        self._y = y
        self._radius = radius
        self._drawing_api = drawing_api

    # low-level i.e. Implementation specific
    def draw(self):
        self._drawing_api.draw_circle(self._x, self._y, self._radius)

    # high-level i.e. Abstraction specific
    def scale(self, pct):
        self._radius *= pct


def main():
    shapes = (
        CircleShape(1, 2, 3, DrawingAPI1()),
        CircleShape(5, 7, 11, DrawingAPI2())
    )

    for shape in shapes:
        shape.scale(2.5)
        shape.draw()


if __name__ == ‘__main__‘:
main()意图:将对象组合成树形结构以表示“部分-整体”的层次结构。C o m p o s i t e 使得用户对单个对象和组合对象的使用具有一致性。
适用性:
你想表示对象的部分-整体层次结构。
你希望用户忽略组合对象与单个对象的不同,用户将统一地使用组合结构中的所有对象。
#!/usr/bin/python
#coding:utf8

"""
Composite
"""

class Component:
    def __init__(self,strName):
        self.m_strName = strName
    def Add(self,com):
        pass
    def Display(self,nDepth):
        pass

class Leaf(Component):
    def Add(self,com):
        print "leaf can‘t add"
    def Display(self,nDepth):
        strtemp = "-" * nDepth
        strtemp=strtemp+self.m_strName
        print strtemp

class Composite(Component):
    def __init__(self,strName):
        self.m_strName = strName
        self.c = []
    def Add(self,com):
        self.c.append(com)
    def Display(self,nDepth):
        strtemp = "-"*nDepth
        strtemp=strtemp+self.m_strName
        print strtemp
        for com in self.c:
            com.Display(nDepth+2)

if __name__ == "__main__":
    p = Composite("Wong")
    p.Add(Leaf("Lee"))
    p.Add(Leaf("Zhao"))
    p1 = Composite("Wu")
    p1.Add(Leaf("San"))
    p.Add(p1)
p.Display(1);意图: 动态地给一个对象添加一些额外的职责。就增加功能来说,Decorator 模式相比生成子类更为灵活。
适用性:
在不影响其他对象的情况下,以动态、透明的方式给单个对象添加职责。
处理那些可以撤消的职责。
当不能采用生成子类的方法进行扩充时。一种情况是,可能有大量独立的扩展,为支持每一种组合将产生大量的子类,使得子类数目呈爆炸性增长。另一种情况可能是因为类定义被隐藏,或类定义不能用于生成子类。
#!/usr/bin/python
#coding:utf8
‘‘‘
Decorator
‘‘‘

class foo(object):
    def f1(self):
        print("original f1")

    def f2(self):
        print("original f2")


class foo_decorator(object):
    def __init__(self, decoratee):
        self._decoratee = decoratee

    def f1(self):
        print("decorated f1")
        self._decoratee.f1()

    def __getattr__(self, name):
        return getattr(self._decoratee, name)

u = foo()
v = foo_decorator(u)
v.f1()
v.f2()意图:为子系统中的一组接口提供一个一致的界面,Facade模式定义了一个高层接口,这个接口使得这一子系统更加容易使用。
适用性:
当你要为一个复杂子系统提供一个简单接口时。子系统往往因为不断演化而变得越来越复杂。大多数模式使用时都会产生更多更小的类。这使得子系统更具可重用性,也更容易对子系统进行定制,但这也给那些不需要定制子系统的用户带来一些使用上的困难。Facade 可以提供一个简单的缺省视图,这一视图对大多数用户来说已经足够,而那些需要更多的可定制性的用户可以越过facade层。
客户程序与抽象类的实现部分之间存在着很大的依赖性。引入facade 将这个子系统与客户以及其他的子系统分离,可以提高子系统的独立性和可移植性。
当你需要构建一个层次结构的子系统时,使用facade模式定义子系统中每层的入口点。如果子系统之间是相互依赖的,你可以让它们仅通过facade进行通讯,从而简化了它们之间的依赖关系。
#!/usr/bin/python
#coding:utf8
‘‘‘
Decorator
‘‘‘
import time

SLEEP = 0.5

# Complex Parts
class TC1:
    def run(self):
        print("###### In Test 1 ######")
        time.sleep(SLEEP)
        print("Setting up")
        time.sleep(SLEEP)
        print("Running test")
        time.sleep(SLEEP)
        print("Tearing down")
        time.sleep(SLEEP)
        print("Test Finished\n")


class TC2:
    def run(self):
        print("###### In Test 2 ######")
        time.sleep(SLEEP)
        print("Setting up")
        time.sleep(SLEEP)
        print("Running test")
        time.sleep(SLEEP)
        print("Tearing down")
        time.sleep(SLEEP)
        print("Test Finished\n")


class TC3:
    def run(self):
        print("###### In Test 3 ######")
        time.sleep(SLEEP)
        print("Setting up")
        time.sleep(SLEEP)
        print("Running test")
        time.sleep(SLEEP)
        print("Tearing down")
        time.sleep(SLEEP)
        print("Test Finished\n")


# Facade
class TestRunner:
    def __init__(self):
        self.tc1 = TC1()
        self.tc2 = TC2()
        self.tc3 = TC3()
        self.tests = [i for i in (self.tc1, self.tc2, self.tc3)]

    def runAll(self):
        [i.run() for i in self.tests]


# Client
if __name__ == ‘__main__‘:
    testrunner = TestRunner()
testrunner.runAll()意图:运用共享技术有效地支持大量细粒度的对象。
适用性:
一个应用程序使用了大量的对象。
完全由于使用大量的对象,造成很大的存储开销。
对象的大多数状态都可变为外部状态。
如果删除对象的外部状态,那么可以用相对较少的共享对象取代很多组对象。
应用程序不依赖于对象标识。由于Flyweight 对象可以被共享,对于概念上明显有别的对象,标识测试将返回真值。
#!/usr/bin/python
#coding:utf8
‘‘‘
Flyweight
‘‘‘

import weakref


class Card(object):
    """The object pool. Has builtin reference counting"""
    _CardPool = weakref.WeakValueDictionary()

    """Flyweight implementation. If the object exists in the
    pool just return it (instead of creating a new one)"""
    def __new__(cls, value, suit):
        obj = Card._CardPool.get(value + suit, None)
        if not obj:
            obj = object.__new__(cls)
            Card._CardPool[value + suit] = obj
            obj.value, obj.suit = value, suit
        return obj

    # def __init__(self, value, suit):
    #     self.value, self.suit = value, suit

    def __repr__(self):
        return "<Card: %s%s>" % (self.value, self.suit)


if __name__ == ‘__main__‘:
    # comment __new__ and uncomment __init__ to see the difference
    c1 = Card(‘9‘, ‘h‘)
    c2 = Card(‘9‘, ‘h‘)
    print(c1, c2)
    print(c1 == c2)
print(id(c1), id(c2))意图:
为其他对象提供一种代理以控制对这个对象的访问。
适用性:
1) 远程代理(Remote Proxy )为一个对象在不同的地址空间提供局部代表。 NEXTSTEP[Add94] 使用NXProxy 类实现了这一目的。Coplien[Cop92] 称这种代理为“大使” (Ambassador )。
2) 虚代理(Virtual Proxy )根据需要创建开销很大的对象。在动机一节描述的ImageProxy 就是这样一种代理的例子。
3) 保护代理(Protection Proxy )控制对原始对象的访问。保护代理用于对象应该有不同 的访问权限的时候。例如,在Choices 操作系统[ CIRM93]中KemelProxies为操作系统对象提供 了访问保护。
4) 智能指引(Smart Reference )取代了简单的指针,它在访问对象时执行一些附加操作。 它的典型用途包括:对指向实际对象的引用计数,这样当该对象没有引用时,可以自动释放它(也称为SmartPointers[Ede92 ] )。
当第一次引用一个持久对象时,将它装入内存。
在访问一个实际对象前,检查是否已经锁定了它,以确保其他对象不能改变它。
#!/usr/bin/python
#coding:utf8
‘‘‘
Proxy
‘‘‘

import time

class SalesManager:
    def work(self):
        print("Sales Manager working...")

    def talk(self):
        print("Sales Manager ready to talk")

class Proxy:
    def __init__(self):
        self.busy = ‘No‘
        self.sales = None

    def work(self):
        print("Proxy checking for Sales Manager availability")
        if self.busy == ‘No‘:
            self.sales = SalesManager()
            time.sleep(2)
            self.sales.talk()
        else:
            time.sleep(2)
            print("Sales Manager is busy")


if __name__ == ‘__main__‘:
    p = Proxy()
    p.work()
    p.busy = ‘Yes‘
p.work()https://www.cnblogs.com/Liqiongyu/p/5916710.html
标签:表示 ack 技术分享 计数 int height ada ram round
原文地址:https://www.cnblogs.com/mac1993/p/9300911.html