标签:ems sts [1] www robots 简单的 art def 进入
什么是scrapy?
Scrapy是一个为了爬取网站数据,提取结构性数据而编写的应用框架,简单的理解它既是一个强大的爬虫框架
为什么要用这个框架?
因为它的功能强大:
- 应用twisted,下载页面,实现并发效果
- HTML解析对象,自带lxml
- 可以设置代理
- 可以设置延迟下载
- 可以自定义去重
- 可以设置深度优先,广度优先
-可以与redis,实现分布式爬虫
安装:
Linux:
pip3 install scrapy
Windows:
下载地址:http://www.lfd.uci.edu/~gohlke/pythonlibs/
下载到文件:Twisted-17.5.0-cp36-cp36m-win_amd64.whl cp是指python解释器版本 后面的64是指64位win系统 下载合适的版本
然后安装:pip install Twisted-17.5.0-cp36-cp36m-win_amd64.whl
接下来还有2个pip
pip install scrapy
pip install pypiwin32
它的框架图如下 :
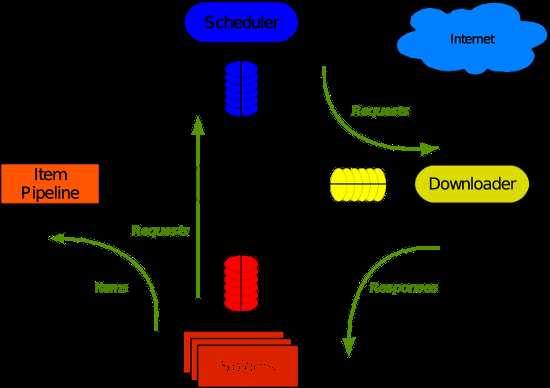
怎么创建一个爬虫?
- 创建爬虫项目
scrapy startproject sp2(sp2是项目名称)
进入项目并创建爬虫
cd sp2
scrapy genspider chouti chouti.com (chouti是爬虫名字,chouti.com是爬虫的爬取限定的域名)
运行爬虫
scrapy crawl chouti(chouti为爬虫名字)
一般我们不看log就用:
scrapy crawl chouti --nolog
项目框架图:
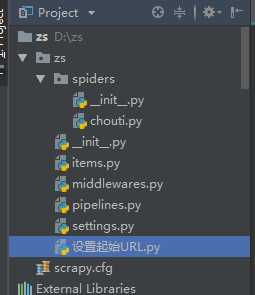
其中‘设置起始URL.py’不是必需的。
scrapy.cfg是个简单的配置文件。
settings是详细的配置文件
item和pipelines是用来做格式化,序列化的
middlewares是用来写中间件的
文件夹spiders中存放的是爬虫文件 ,用于解析数据,写回调函数等,通过2个yield来向调配器与pipelines传数据
以上就是一个最简单的scrapy框架下的爬虫
示例:
以下就是一个爬取校花网上的美女图片的实例,来感受一个简单的scrapy爬虫的运行流程:
1 在spide文件夹中的爬虫文件xiaohuar中的代码

# -*- coding: utf-8 -*-
import scrapy
from scrapy.selector import Selector
from scrapy.http import Request
# import requests
# import urllib.request


class XiaohuarSpider(scrapy.Spider):
    name = ‘xiaohuar‘
    allowed_domains = [‘xiaohuar.com‘]
    start_urls = [‘http://www.xiaohuar.com/hua/‘]

    def parse(self, response):
        pass
        hxs = Selector(response=response)  # 和BeautifulSoup比起来 不用.text就当作参数
        girl_list = hxs.xpath(‘//*[@id="list_img"]/div/div[1]/div‘)  # 从浏览器中copy-copy XPath而来
        # //出现在最前表示从整个html开始找  否则表示从子孙中找
        # / 不能出现在最前 只能出现在中间表示从儿子中找   如果后面是@属性名或text()表示找属性值或文本
        # .// 和*// 出现在最前表示从当前的子孙中找 最前面是./ 或 */或  什么都不写 表示从当前的儿子中找
        # img_list = []
        count = 1
        for girl in girl_list:   # 这里确实取到了25个对象
            print(count)  # 这里打印了从1到 25 证明girl_list里面确实有25个对象 但是只下载了前10个url的图片 为什么?
            count += 1
            text = girl.xpath(‘div[1]/div[2]/span/a/text()‘).extract_first()  # 找到校花的简介
            # self.filename = text
            img = girl.xpath(‘div[1]/div[1]/a/img/@src‘).extract_first()
            # self.url = ‘http://www.xiaohuar.com‘ + img
            url = ‘http://www.xiaohuar.com‘ + img

            img_path = r‘F:\爬虫\%s.jpg‘ % text
            # res = request.get(url).content
            # urllib.request.urlretrieve(url,img_path)

            # img_list.append(url)
            # print(text,img)
            from ..items import Sp1Item
            # # yield Sp1Item(url=img_url, text=self.filename)
            yield Sp1Item(url=url, text=img_path)

        result = hxs.xpath(‘//*[@id="page"]/div/a/@href‘)
        # print(result)
        # print(result.extract_first())
        # print(result.extract())

        # yield Item(xxxx)  # 先去item.py再去piplines.py去进行持久化   这里是伪代码

        # 递归
        result = result.extract()  # 果然 这里要转成字符串组成的列表后面的代码也能正确执行 视频中老师疏忽了 但是怎么执行的搞不清楚 怎么递归的流程不清楚
        for url1 in result:  # 事实证明如果result是个对象不是列表的话  此代码和下行代码无效
            # print(url)
            yield Request(url=url1,callback=self.parse)   # url赋值给第9行的start_urls  再回到parse重新执行
主要分为解析和2个yield
解析用的是模块
from scrapy.selector import Selector
2个yield分别用来做持久化 和 循环爬取起来页的图片
接下来是item和pipelines中的代码
import scrapy


class Sp1Item(scrapy.Item):
    # define the fields for your item here like:
    # name = scrapy.Field()
    # image_urls = scrapy.Field()
    # images = scrapy.Field()
    # image_path = scrapy.Field()
    # pass
    url = scrapy.Field()
    text = scrapy.Field()
    # print(url)
    # print(text)
# import urllib.request
# import requests
class Sp1Pipeline(object):

    def __init__(self):
        self.f = None
        # self.res = None
        pass
    def process_item(self, item, spider):
        import requests
        from scrapy.http import Request
        res = Request(item[‘url‘])
        self.f = open(r‘F:\爬虫\%s.jpg‘ % item[‘text‘],‘wb‘)
        self.f.write(res.body)
        self.f.close()
        print(item)
        # # if spider.name == ‘xiaohuarvideo‘:
        # vname = r‘F:\爬虫\video\%s.mp4‘ % item[‘url‘]
        # # urllib.request.urlretrieve(item[‘url‘],vname)
        # res = requests.get(item[‘url‘])
        # with open(vname,‘wb‘) as f:
        #     f.write(res.content)
        # print(‘%s下载完成‘ % item[‘url‘])
        # pass
        return item

    def open_spider(self,spider):
        """
        爬虫开始执行时,调用
        :param spider:
        :return:
        """
        print(‘爬虫开始‘)
        # self.f = open(‘%s.jpg‘ % name,‘wb‘)

    def close_spider(self, spider):
        """
        爬虫关闭时,被调用
        :param spider:
        :return:
        """
        print(‘爬虫结束‘)
        # self.f.close()
当然 配置文件settings中也要设置一下
# 设置爬取的递归深度
DEPTH_LIMIT = 1
# Crawl responsibly by identifying yourself (and your website) on the user-agent
#USER_AGENT = ‘sp1 (+http://www.yourdomain.com)‘

# 是否遵守爬虫协议
# Obey robots.txt rules
# ROBOTSTXT_OBEY = True
ROBOTSTXT_OBEY = False

# Configure maximum concurrent requests performed by Scrapy (default: 16)
#CONCURRENT_REQUESTS = 32

# Configure a delay for requests for the same website (default: 0)
# See https://doc.scrapy.org/en/latest/topics/settings.html#download-delay
# See also autothrottle settings and docs
# 延迟下载秒数
#DOWNLOAD_DELAY = 3
# The download delay setting will honor only one of:
#CONCURRENT_REQUESTS_PER_DOMAIN = 16
#CONCURRENT_REQUESTS_PER_IP = 16

# Disable cookies (enabled by default)
#COOKIES_ENABLED = False

# Disable Telnet Console (enabled by default)
#TELNETCONSOLE_ENABLED = False

# Override the default request headers:
#DEFAULT_REQUEST_HEADERS = {
#   ‘Accept‘: ‘text/html,application/xhtml+xml,application/xml;q=0.9,*/*;q=0.8‘,
#   ‘Accept-Language‘: ‘en‘,
#}

# Enable or disable spider middlewares
# See https://doc.scrapy.org/en/latest/topics/spider-middleware.html
# SPIDER_MIDDLEWARES = {
#    ‘sp1.middlewares.Sp1SpiderMiddleware‘: 543,
# }

# Enable or disable downloader middlewares
# See https://doc.scrapy.org/en/latest/topics/downloader-middleware.html
#DOWNLOADER_MIDDLEWARES = {
#    ‘sp1.middlewares.Sp1DownloaderMiddleware‘: 543,
#}

# Enable or disable extensions
# See https://doc.scrapy.org/en/latest/topics/extensions.html
#EXTENSIONS = {
#    ‘scrapy.extensions.telnet.TelnetConsole‘: None,
#}

# Configure item pipelines
# See https://doc.scrapy.org/en/latest/topics/item-pipeline.html
# 设置持久化文件路径及其优先级,一般是从0到1000,数字越小越优先
ITEM_PIPELINES = {
‘sp1.pipelines.Sp1Pipeline‘: 300
}
最后 爬下来了1000多个漂亮小姐姐(虽然其实都比我年轻)的图片啦
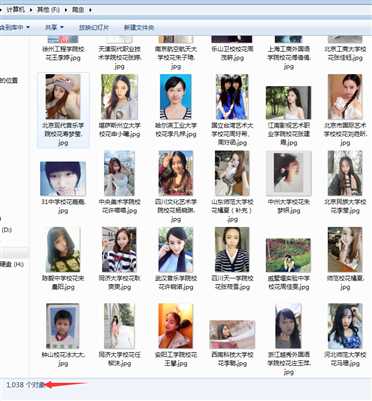
当然,scrapy还有很多高级功能,示例中只是很基础的scrapy爬虫哦
学习心得:
scrapy框架是爬虫中的最主流的框架,通过对这些天的学习 。让我感受到了框架的必要性:
它太强大了 ,让我们尤其是弱鸡编程爱好者也能做出一个看起来效能不错,五脏俱全的小爬虫。
框架的学习与使用让我体验了什么叫做优秀的代码,比如高可扩展性,知道了配置文件的存在必要性。只要在配置文件中根据自己的实际需要小小的修改下,就能达到另外的效果
。当然,中间件和信号等更加强大,这有待我再去学习啊。最后再说一句:人生苦短,我用Python!
标签:ems sts [1] www robots 简单的 art def 进入
原文地址:https://www.cnblogs.com/zhaoshuai5015/p/9302545.html
