标签:content 能力 图片 运行 ase 自身 rest 返回 world

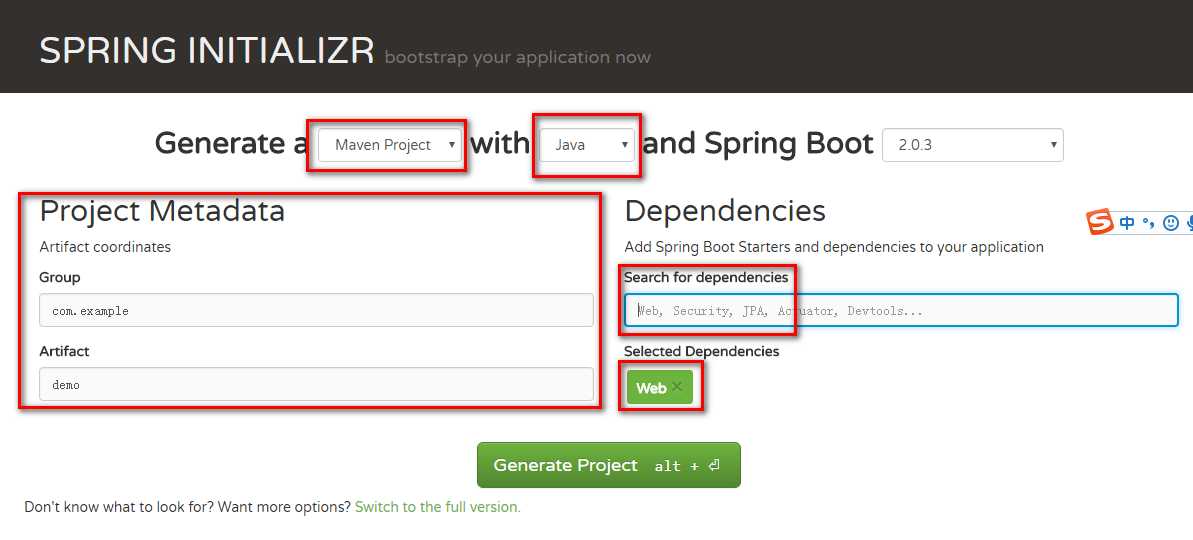
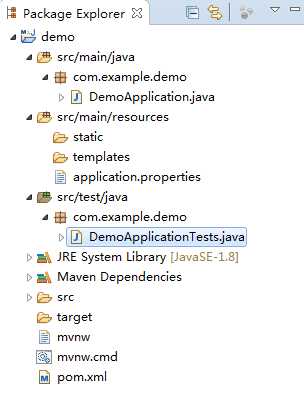
我们要构建一个基于maven、java、web项目的,上述截图选择完后点击Generate Project下载项目(需要对maven有一定基础的)

<?xml version="1.0" encoding="UTF-8"?>
<project xmlns="http://maven.apache.org/POM/4.0.0" xmlns:xsi="http://www.w3.org/2001/XMLSchema-instance"
    xsi:schemaLocation="http://maven.apache.org/POM/4.0.0 http://maven.apache.org/xsd/maven-4.0.0.xsd">
    <modelVersion>4.0.0</modelVersion>

    <groupId>com.example</groupId>
    <artifactId>demo</artifactId>
    <version>0.0.1-SNAPSHOT</version>
    <packaging>jar</packaging>

    <name>demo</name>
    <description>Demo project for Spring Boot</description>

    <parent>
        <groupId>org.springframework.boot</groupId>
        <artifactId>spring-boot-starter-parent</artifactId>
        <version>2.0.3.RELEASE</version>
        <relativePath/> <!-- lookup parent from repository -->
    </parent>

    <properties>
        <project.build.sourceEncoding>UTF-8</project.build.sourceEncoding>
        <project.reporting.outputEncoding>UTF-8</project.reporting.outputEncoding>
        <java.version>1.8</java.version>
    </properties>

    <dependencies>
        <dependency>
            <groupId>org.springframework.boot</groupId>
            <artifactId>spring-boot-starter-web</artifactId>
        </dependency>

        <dependency>
            <groupId>org.springframework.boot</groupId>
            <artifactId>spring-boot-starter-test</artifactId>
            <scope>test</scope>
        </dependency>
    </dependencies>

    <build>
        <plugins>
            <plugin>
                <groupId>org.springframework.boot</groupId>
                <artifactId>spring-boot-maven-plugin</artifactId>
            </plugin>
        </plugins>
    </build>


</project>
分析点:
 )
)package com.example.demo.web; import org.springframework.web.bind.annotation.RequestMapping; import org.springframework.web.bind.annotation.RestController; @RestController public class HelloController { @RequestMapping("/hello") public String index() { return "hello world"; } }
启动该应用,通过浏览器访问http://localhost:8080/hello,我们可以看到返回了预期结果:hello world

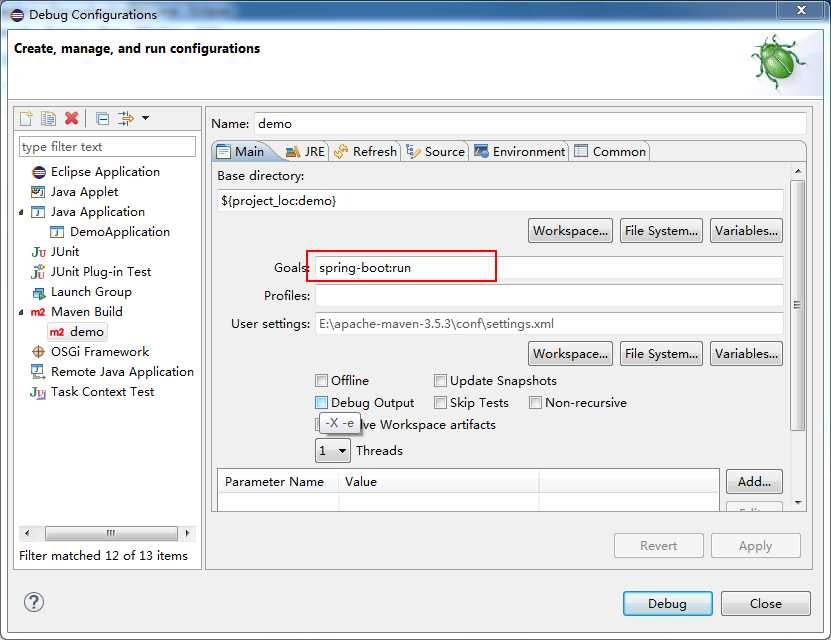
执行mvn spring-boot:run

把install成jar包,通过java -jar xxx.jar 运行
package com.example.demo;

import org.junit.Before;
import org.junit.Test;
import org.junit.runner.RunWith;
import org.springframework.boot.SpringBootConfiguration;
import org.springframework.boot.autoconfigure.SpringBootApplication;
import org.springframework.boot.test.context.SpringBootTest;
import org.springframework.http.MediaType;
import org.springframework.test.context.junit4.SpringJUnit4ClassRunner;
import org.springframework.test.context.junit4.SpringRunner;
import org.springframework.test.context.web.WebAppConfiguration;
import org.springframework.test.web.servlet.MockMvc;
import org.springframework.test.web.servlet.request.MockMvcRequestBuilders;
import org.springframework.test.web.servlet.setup.MockMvcBuilders;

import static org.hamcrest.Matchers.equalTo;
import static org.springframework.test.web.servlet.result.MockMvcResultMatchers.content;
import static org.springframework.test.web.servlet.result.MockMvcResultMatchers.status;

import com.example.demo.web.HelloController;
import com.fasterxml.jackson.databind.Module.SetupContext;

import ch.qos.logback.core.status.Status;

//@RunWith(SpringRunner.class)
//@SpringBootTest

@RunWith(SpringJUnit4ClassRunner.class)
@SpringBootTest(classes = DemoApplication.class)
@WebAppConfiguration
public class DemoApplicationTests {

    private MockMvc mvc;

    @Before
    public void setUp() throws Exception {
        mvc = MockMvcBuilders.standaloneSetup(new HelloController()).build();
    }

    @Test
    public void contextLoads() throws Exception {
        mvc.perform(MockMvcRequestBuilders.get("/hello").accept(MediaType.APPLICATION_JSON)).andExpect(status().isOk())
                .andExpect(content().string(equalTo("hello world")));
    }

}
解析:
import static org.hamcrest.Matchers.equalTo;
import static org.springframework.test.web.servlet.result.MockMvcResultMatchers.content;
import static org.springframework.test.web.servlet.result.MockMvcResultMatchers.status;
ps:学习来自《spring cloud微服务实战》
标签:content 能力 图片 运行 ase 自身 rest 返回 world
原文地址:https://www.cnblogs.com/tiramisuyj/p/9309345.html