标签:base 因此 如何使用 one img 生产者 格式 instance 服务端
好久没有写博客了,主要是最近有些忙,今天忙里偷闲来一篇。
=======我是华丽的分割线==========
微服务架构是一种分布式架构,微服务系统按照业务划分服务单元,一个微服务往往会有很多个服务单元,一个请求往往会有很多个单元参与,一旦请求出现异常,想要去定位问题点真心不容易,因此需要有个东西去跟踪请求链路,记录一个请求都调用了哪些服务单元,调用顺序是怎么样的以及在各个服务单元处理的时间长短。常见的服务链路追踪组件有google的dapper、twitter的zipkin、阿里的鹰眼等,它们都是出众的开源链路追踪组件。
spring cloud 有自己的组件来集成这些开源组件,它就是spring cloud sleuth,它为服务链路追踪提供了一套完整的解决方案。
今天的主题就是如何使用spring cloud sleuth整合zipkin进行服务链路追踪。本博客将围绕下面的线索进行展开:
由上面的线索可以发现,zipkin分服务端和客户端。
客户端就是我们的服务单元,用来发送链路信息到服务端;
服务端用来接收客户端发送来的链路信息,并进行处理,它包括4个部分:
废话不多说,直接上代码。
一、Server端代码实现
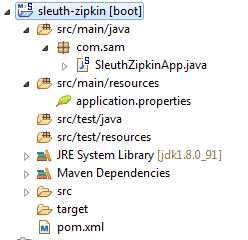
先给出代码结构:

结构比较简单,搭建过程如下:
<project xmlns="http://maven.apache.org/POM/4.0.0"
    xmlns:xsi="http://www.w3.org/2001/XMLSchema-instance"
    xsi:schemaLocation="http://maven.apache.org/POM/4.0.0 http://maven.apache.org/xsd/maven-4.0.0.xsd">
    <modelVersion>4.0.0</modelVersion>
    <groupId>com.sam</groupId>
    <artifactId>sleuth-zipkin</artifactId>
    <version>0.0.1-SNAPSHOT</version>

    <parent>
        <groupId>org.springframework.boot</groupId>
        <artifactId>spring-boot-starter-parent</artifactId>
        <version>1.5.1.RELEASE</version>
    </parent>

    <properties>
        <javaVersion>1.8</javaVersion>
    </properties>
    <!-- 使用dependencyManagement进行版本管理 -->
    <dependencyManagement>
        <dependencies>
            <dependency>
                <groupId>org.springframework.cloud</groupId>
                <artifactId>spring-cloud-dependencies</artifactId>
                <version>Camden.SR6</version>
                <type>pom</type>
                <scope>import</scope>
            </dependency>
        </dependencies>

    </dependencyManagement>

    <dependencies>
        <!-- 引入zipkin-server依赖,提供server端功能 -->
        <dependency>
            <groupId>io.zipkin.java</groupId>
            <artifactId>zipkin-server</artifactId>
        </dependency>
        <!-- 引入zipkin-autoconfigure-ui依赖,用来提供zipkin web ui组件的功能,方便查看相关信息 -->
        <dependency>
            <groupId>io.zipkin.java</groupId>
            <artifactId>zipkin-autoconfigure-ui</artifactId>
        </dependency>

        <!-- 引入eureka依赖 -->
        <dependency>
            <groupId>org.springframework.cloud</groupId>
            <artifactId>spring-cloud-starter-eureka</artifactId>
        </dependency>

    </dependencies>
</project>
/**
 * @EnableZipkinServer
 *
 * 用于开启Zipkin Server功能
 *
 */
@EnableZipkinServer
@SpringBootApplication
@EnableDiscoveryClient
public class SleuthZipkinApp {

    public static void main(String[] args) {
        SpringApplication.run(SleuthZipkinApp.class, args);
    }

}
server.port=9411
spring.application.name=sleuth-zipkin
#需要使用到eureka服务注册中心
eureka.client.serviceUrl.defaultZone=http://localhost:1111/eureka
二、Client端代码实现
这里我们准备使用前面的随笔中已经实现好的微服务(网关服务api-gateway、消费者hello-consumer和生产者hello-server,可以点击链接查看搭建过程,这里就不详细描述了)。在这几个微服务中都做如下修改:
<!-- 引入zipkin 依赖 ,提供zipkin客户端的功能 -->
        <dependency>
            <groupId>org.springframework.cloud</groupId>
            <artifactId>spring-cloud-starter-zipkin</artifactId>
        </dependency>
#指定zipkin服务端的url
spring.zipkin.base-url=http://localhost:9411
#设定样本收集的比率为100%
spring.sleuth.sampler.percentage=1.0
由于分布式系统的请求量一般比较大,不可能把所有的请求链路进行收集整理,因此sleuth采用抽样收集的方式,设定一个抽样百分比。在开发阶段,我们一般设定百分比为100%也就是1。
三、执行测试


查看api-gateway控制台:
2018-07-19 18:02:34.999  INFO [api-gateway,4c384ab23da1ae35,4c384ab23da1ae35,true] 9296 --- [nio-5555-exec-3] com.sam.filter.AccessFilter              : send GET request to http://localhost:5555/hello-consumer/hello-consumer
2018-07-19 18:02:45.088  INFO [api-gateway,,,] 9296 --- [trap-executor-0] c.n.d.s.r.aws.ConfigClusterResolver      : Resolving eureka endpoints via configuration
请看红字部分,有4部分,以逗号分隔。第一部分是服务名;第二部分是TranceId,每次请求都会有唯一的tranceId;第三部分是spanId,每个工作单元发送一次请求就会产生一个spanId,每个请求会产生一个tranceId和多个spanId,根据tranceId和spanId就能分析出一个完整的请求都经历了哪些服务单元;第四部分是boolean型的,用来标记是否需要将该请求链路进行抽样收集发送到zipkin等进行整理。

选择api-gateway,然后点击 "Find Trances"
能看到请求都经历了哪些服务节点。再点相关link,可以查看调用顺序,并且还能看到在各个服务节点的处理的时间长度。
切换到依赖画面,能查看服务节点的依赖关系
spring cloud 入门系列八:使用spring cloud sleuth整合zipkin进行服务链路追踪
标签:base 因此 如何使用 one img 生产者 格式 instance 服务端
原文地址:https://www.cnblogs.com/sam-uncle/p/9334966.html