标签:etc sdk run 管理 scripts build and line 包管理
对.Net Core的学习和实践,已经进行了一年多的世间,截止目前,微软已经发布.Net Core2.1,关于.NetCore的应用部署的文章比比皆是。今天借此,回顾下.net core环境的部署过程。
首先,我这边采用的是CentOS7+上的版本,.net core2.1。在动手前,我们先做这样的思考
如何部署一个正式的.net core2.1项目?
解决方案有:
1、利用.net core runtime及.net core sdk,将编译好的项目,发布至服务器上,然后运行dotnet application.dll命令。
这样程序就运行起来,但是要想让.net core程序进程一直存在,就需要做其它方面的工作了,比如网上介绍的比较多的supervisor守护进程服务,这样可以保证.net core程序,在终端关闭后,仍然可以运行。
2、利用跨平台服务器Jexus。
3、利用docker容器技术,让.net core程序运行在docker容器中。
当然,这里肯定还有其它解决方案,比如Nancy之类的,这里不做进一步的阐述了。
接下来,我们就针对,第一种方式,采用python开发的supervisor服务,来守护.net core进程。
然后,我们再想了,当守护进程安装配置完成后,我们再安装一个web服务器,如nginx作为.net core程序的代理服务器。
于是得出,此次实践中,我们分别需要,安装配置.net core、supervisor、nginx等,那接下来,我们就分别针对这三种环境的配置,进行介绍:
1、.net core的安装
这个可以在官方网站找到进一步的说明https://www.microsoft.com/net/learn/get-started-with-dotnet-tutorial
首先是下载软件包:
sudo rpm -Uvh https://packages.microsoft.com/config/rhel/7/packages-microsoft-prod.rpm
然后,通过yum命令来进行.net core sdk的安装(安装sdk时.net core运行时也一并被安装了)。
sudo yum update
sudo yum install dotnet-sdk-2.1
等待安装完成即可。通过dotnet --info/--version命令可以查看版本信息。
[root@cce9311ee74bc4f27afe8f58e5e0b5021-node2 ~]# dotnet --info
.NET Command Line Tools (2.1.101)

Product Information:
 Version:            2.1.101
 Commit SHA-1 hash:  6c22303bf0

Runtime Environment:
 OS Name:     centos
 OS Version:  7
 OS Platform: Linux
 RID:         centos.7-x64
 Base Path:   /usr/share/dotnet/sdk/2.1.101/

Microsoft .NET Core Shared Framework Host

  Version  : 2.0.6
  Build    : 74b1c703813c8910df5b96f304b0f2b78cdf194d
这样.net core2.1环境就安装好了。
2、supervisor服务的安装。
这个具体参考我的另一篇博客 https://my.oschina.net/lichaoqiang/blog/1861791
3、NGINX的安装
这里,我们是直接通过yum命令来安装的。
首先是下载了软件包管理
rpm -Uvh http://nginx.org/packages/centos/7/noarch/RPMS/nginx-release-centos-7-0.el7.ngx.noarch.rpm
通过yum来安装nginx
yum -y install nginx
启动nginx服务
systemctl start nginx.service
systemctl enable nginx.service
默认,nginx配置文件在/etc/nginx/目录下。命令进入/etc/nginx/conf.d文件夹,为我们的.net core应用程序创建一个配置文件
server {
    listen       80;
    server_name  www.demo.com;

    #charset koi8-r;
    #access_log  /var/log/nginx/host.access.log  main;

    location / {
         proxy_pass http://localhost:5000;
        index  index.html index.htm;
    }

    #error_page  404              /404.html;

    # redirect server error pages to the static page /50x.html
    #
    error_page   500 502 503 504  /50x.html;
    location = /50x.html {
        root   /usr/share/nginx/html;
    }

    # proxy the PHP scripts to Apache listening on 127.0.0.1:80
    #
    #location ~ \.php$ {
    #    proxy_pass   http://127.0.0.1;
    #}

    # pass the PHP scripts to FastCGI server listening on 127.0.0.1:9000
    #
    #location ~ \.php$ {
    #    root           html;
    #    fastcgi_pass   127.0.0.1:9000;
    #    fastcgi_index  index.php;
    #    fastcgi_param  SCRIPT_FILENAME  /scripts$fastcgi_script_name;
    #    include        fastcgi_params;
    #}

    # deny access to .htaccess files, if Apache‘s document root
    # concurs with nginx‘s one
    #
    #location ~ /\.ht {
    #    deny  all;
    #}
}
然后重新加载 配置文件:
/usr/nginx/sbin/nginx/ -s reload
完成以上三步后,我们supervisorctl restart 应用程序.dll即可。
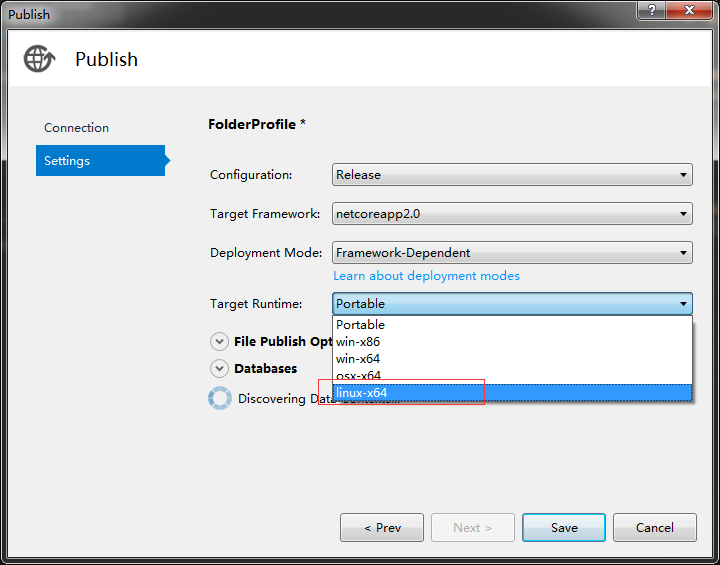
最后,通过vs的发布功能,发布我们的.net core项目,避免nuget引用包导致的问题,这里我们发布的时候,目标运行时选linux-x64。

关于.net core部署正式环境,就介绍到这里。
CentOS+Nginx+Supervisor部署ASP.NET Core项目
标签:etc sdk run 管理 scripts build and line 包管理
原文地址:https://www.cnblogs.com/ibeisha/p/centos-aspnet-supervisor.html