标签:style blog http color io 使用 ar for sp
http://blog.csdn.net/haoel/article/details/3081328
我们简单地复习一下,我们可以通过对象的地址来取得虚函数表的地址,如:
typedef void(*Fun)(void);
Base b;
Fun pFun = NULL;
cout << "虚函数表地址:" << (int*)(&b) << endl;
cout << "虚函数表 — 第一个函数地址:" << (int*)*(int*)(&b) << endl;
// Invoke the first virtual function
pFun = (Fun)*((int*)*(int*)(&b));
pFun();
我们同样可以用这种方式来取得整个对象实例的内存布局
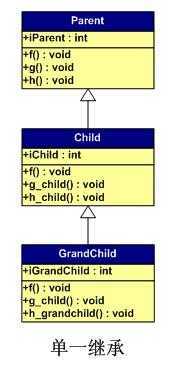
请注意,在这个继承关系中,父类,子类,孙子类都有自己的一个成员变量。而了类覆盖了父类的f()方法,孙子类覆盖了子类的g_child()及其超类的f()。
我们的源程序如下所示:
class Parent {
public:
int iparent;
Parent ():iparent (10) {}
virtual void f() { cout << " Parent::f()" << endl; }
virtual void g() { cout << " Parent::g()" << endl; }
virtual void h() { cout << " Parent::h()" << endl; }
};
class Child : public Parent {
public:
int ichild;
Child():ichild(100) {}
virtual void f() { cout << "Child::f()" << endl; }
virtual void g_child() { cout << "Child::g_child()" << endl; }
virtual void h_child() { cout << "Child::h_child()" << endl; }
};
class GrandChild : public Child{
public:
int igrandchild;
GrandChild():igrandchild(1000) {}
virtual void f() { cout << "GrandChild::f()" << endl; }
virtual void g_child() { cout << "GrandChild::g_child()" << endl; }
virtual void h_grandchild() { cout << "GrandChild::h_grandchild()" << endl; }
};
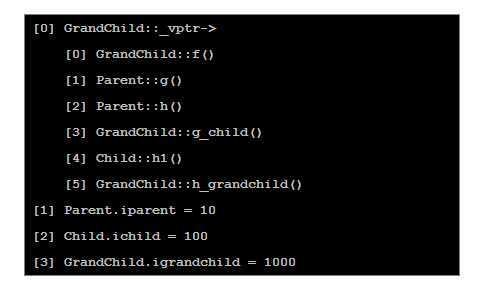
我们使用以下程序作为测试程序:(下面程序中,我使用了一个int** pVtab 来作为遍历对象内存布局的指针,这样,我就可以方便地像使用数组一样来遍历所有的成员包括其虚函数表了,在后面的程序中,我也是用这样的方法的,请不必感到奇怪,)
typedef void(*Fun)(void);
GrandChild gc;
int** pVtab = (int**)&gc;
cout << "[0] GrandChild::_vptr->" << endl;
for (int i=0; (Fun)pVtab[0][i]!=NULL; i++){
pFun = (Fun)pVtab[0][i];
cout << " ["<<i<<"] ";
pFun();
}
cout << "[1] Parent.iparent = " << (int)pVtab[1] << endl;
cout << "[2] Child.ichild = " << (int)pVtab[2] << endl;
cout << "[3] GrandChild.igrandchild = " << (int)pVtab[3] << endl;
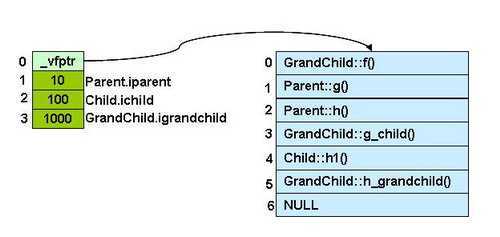
可见以下几个方面:
1)虚函数表在最前面的位置。
2)成员变量根据其继承和声明顺序依次放在后面。
3)在单一的继承中,被overwrite的虚函数在虚函数表中得到了更新。
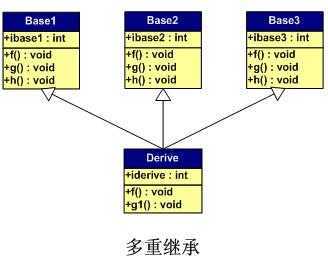
我们的类继承的源代码如下所示:父类的成员初始为10,20,30,子类的为100
class Base1 {
public:
int ibase1;
Base1():ibase1(10) {}
virtual void f() { cout << "Base1::f()" << endl; }
virtual void g() { cout << "Base1::g()" << endl; }
virtual void h() { cout << "Base1::h()" << endl; }
};
class Base2 {
public:
int ibase2;
Base2():ibase2(20) {}
virtual void f() { cout << "Base2::f()" << endl; }
virtual void g() { cout << "Base2::g()" << endl; }
virtual void h() { cout << "Base2::h()" << endl; }
};
class Base3 {
public:
int ibase3;
Base3():ibase3(30) {}
virtual void f() { cout << "Base3::f()" << endl; }
virtual void g() { cout << "Base3::g()" << endl; }
virtual void h() { cout << "Base3::h()" << endl; }
};
class Derive : public Base1, public Base2, public Base3 {
public:
int iderive;
Derive():iderive(100) {}
virtual void f() { cout << "Derive::f()" << endl; }
virtual void g1() { cout << "Derive::g1()" << endl; }
};
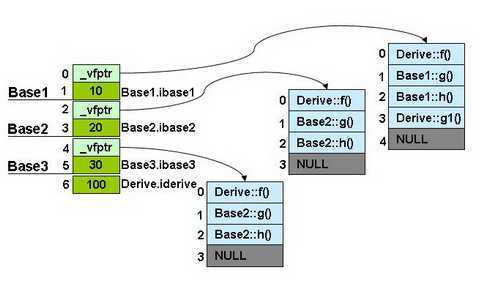
我们可以看到:
1) 每个父类都有自己的虚表。
2) 子类的成员函数被放到了第一个父类的表中。
3) 内存布局中,其父类布局依次按声明顺序排列。
4) 每个父类的虚表中的f()函数都被overwrite成了子类的f()。这样做就是为了解决不同的父类类型的指针指向同一个子类实例,而能够调用到实际的函数。
标签:style blog http color io 使用 ar for sp
原文地址:http://www.cnblogs.com/notlate/p/4004527.html