标签:des style blog http color io os 使用 ar
原文:使用 Visual Studio Team Test 进行单元测试和java中的测试
C#中test测试地
方法一、
1、从NUnit官网(http://www.nunit.org/index.php)下载最新版本NUnit,当前版本为NUnit2.5.8。
2、安装后,在VS2008中新建测试项目StartNUnit
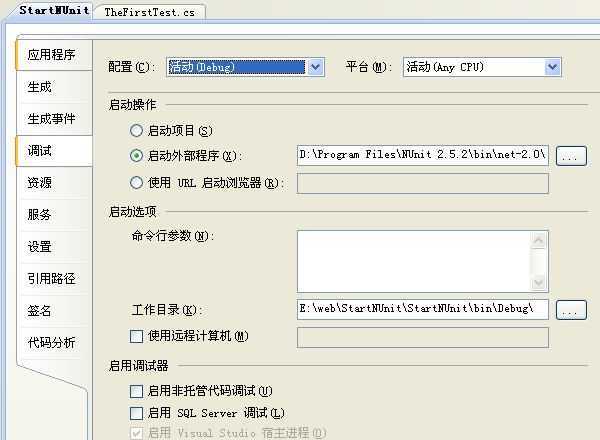
3、右击项目选择属性,在打开的窗口中选择调试。如图:

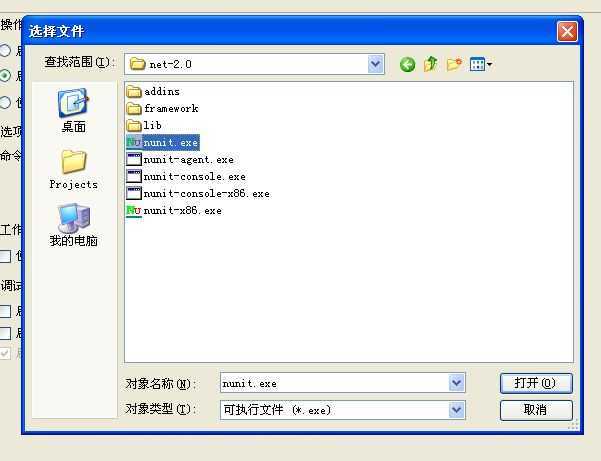
4、选择启动外部程序,并定位到NUnit的启动程序nunit.exe。如图:

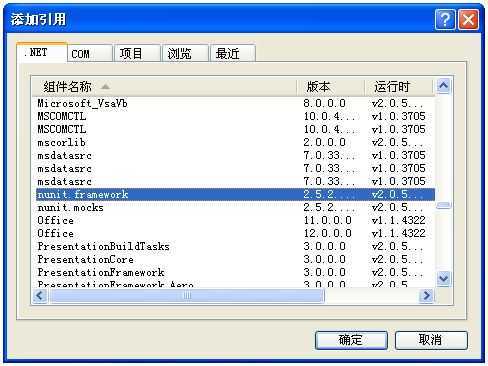
5、在项目中添加NUnit引用,如图:

6、在测试类中引用命名空间NUnit.Framework后就可以开始测试了。如下代码():
using System;
using System.Collections.Generic;
using System.Linq;
using System.Text;
using NUnit.Framework;

namespace StartNUnit
{
    [TestFixture]
    public class TheFirstTest
    {
        [Test]
        public void TestMethod()
        {
             …………
        }
    }
}
址:http://msdn.microsoft.com/zh-cn/library/ms379625(VS.80).aspx
单元测试中 我也碰到a类中调用b类的方法,我想测试a 然后mock b被调用的方法
public class A
    {
        public int MethodA(int i,IB b)
        {
            return b.MethodB(i) - i;
        }

        public int MethodB(int i)
        {
            return new B().MethodB(i) - 1;
        }
    }

    public interface IB
    {
        int MethodB(int i);
    }

    public class B :IB
    {
        public int MethodB(int i)
        {
            throw new Exception();
        }
    }

测试A类中的MethodA方法
        [TestMethod()]

        public void MethodATest()
        {
            A target = new A(); // TODO: 初始化为适当的值
            int i = 11; // TODO: 初始化为适当的值
            var mock = new Mock<IB>();
            mock.Setup(p => p.MethodB(11))
                .Returns(20);
            IB b = mock.Object; // TODO: 初始化为适当的值
            int expected = 9; // TODO: 初始化为适当的值
            int actual;
            actual = target.MethodA(i, b);
            Assert.AreEqual(expected, actual);
        }
在.net中有几种mock框架可供选择,比如NMock,PhinoMocks,FakeItEasy和Moq。尽管Moq相对较新,但是它非常易用。不需要像传统的Record/Replay。并且使用Moq在VS中可以得到智能提示。学习成本也不高。
这篇文章我们介绍下如何使用Moq来mock吧。
假定我们要做一个计算器提供基本的算术运算和不同货币的转换
using System;
using System.Collections.Generic;
using System.Linq;
using System.Text;

namespace CalculatorPkg
{
public interface ICalculator
{
int Add(int param1, int param2);
int Subtract(int param1, int param2);
int Multipy(int param1, int param2);
int Divide(int param1, int param2);
int ConvertUSDtoRMB(int unit);
}
}

假定人民币转美元的接口定义如下:

using System;
using System.Collections.Generic;
using System.Linq;
using System.Text;

namespace MoneyExchangeRatePkg
{
public interface IUSD_RMB_ExchangeRateFeed
{
int GetActualUSDValue();
}
}

using System;
using System.Collections.Generic;
using System.Linq;
using System.Text;

namespace MoneyExchangeRatePkg
{
public interface IUSD_RMB_ExchangeRateFeed
{
int GetActualUSDValue();
}
}

下面是Calculator的实现类,其中人民币转美元的接口实例以构造函数参数的形式传给Calculator类。

using System;
using System.Collections.Generic;
using System.Linq;
using System.Text;
using MoneyExchangeRatePkg;

namespace CalculatorPkg
{
public class Calculator : ICalculator
{
private IUSD_RMB_ExchangeRateFeed _feed;
public Calculator(IUSD_RMB_ExchangeRateFeed feed)
{
this._feed = feed;
}
#region ICalculator Members
public int Add(int param1, int param2)
{
throw new NotImplementedException();
}
public int Subtract(int param1, int param2)
{
throw new NotImplementedException();
}
public int Multipy(int param1, int param2)
{
throw new NotImplementedException();
}
public int Divide(int param1, int param2)
{
return param1 / param2;
}
public int ConvertUSDtoRMB(int unit)
{
return unit * this._feed.GetActualUSDValue();
}
#endregion
}
}

下面我们开始准备Calculator组件的测试环境,我们使用NUnit框架和Moq来做Mock。

您可以到http://www.nunit.org/获得nunit,到http://code.google.com/p/moq/获得moq框架的源码和dll文件。

然后我们就可以创建测试项目,并添加nunit和moq的引用。

我们要mock汇率的接口,下面是mock的方法:

Mock<IUSD_RMB_ExchangeRateFeed> mockObject = new Mock<IUSD_RMB_ExchangeRateFeed>();
mockObject.Setup(m => m.GetActualUSDValue()).Returns(500);
IUSD_RMB_ExchangeRateFeed value = mockObject.Object;

对汇率接口的MOCK只需要三行代码,第一行声明mock接口,第二行设定要mock方法的返回值,第三步通过Object属性获得mock的对象。

下面是完整的测试代码:

using System;
using System.Collections.Generic;
using System.Linq;
using System.Text;
using NUnit.Framework;
using Moq;
using CalculatorPkg;
using MoneyExchangeRatePkg;

namespace CalculatorPkg.Tests
{
// 添加TestFixture标识类是测试类
[TestFixture]
public class CalculatorTester
{
// 定义mock的逻辑
private IUSD_RMB_ExchangeRateFeed prvGetMockExchangeRateFeed()
{
Mock<IUSD_RMB_ExchangeRateFeed> mockObject = new Mock<IUSD_RMB_ExchangeRateFeed>();
mockObject.Setup(m => m.GetActualUSDValue()).Returns(500);
return mockObject.Object;
}
// 测试divide方法
[Test(Description="Divide 9 by 3. Expected result is 3.")]
public void TC1_Divide9By3()
{
IUSD_RMB_ExchangeRateFeed feed = this.prvGetMockExchangeRateFeed();
ICalculator calculator = new Calculator(feed);
int actualResult = calculator.Divide(9,3);
int expectedResult = 3;
Assert.AreEqual(expectedResult, actualResult);
}
[Test(Description = "Divide any number by zero. Should throw an System.DivideByZeroException exception.")]
[ExpectedException(typeof(System.DivideByZeroException))]
public void TC2_DivideByZero()
{
IUSD_RMB_ExchangeRateFeed feed = this.prvGetMockExchangeRateFeed();
ICalculator calculator = new Calculator(feed);
int actualResult = calculator.Divide(9, 0);
}
[Test(Description = "Convert 1 USD to RMB. Expected result is 500.")]
public void TC3_ConvertUSDtoRMBTest()
{
IUSD_RMB_ExchangeRateFeed feed = this.prvGetMockExchangeRateFeed();
ICalculator calculator = new Calculator(feed);
int actualResult = calculator.ConvertUSDtoRMB(1);
int expectedResult = 500;
Assert.AreEqual(expectedResult, actualResult);
}
}
}
我们在做单元测试的时候,常常困扰于数据的持久化疑问 ,很多情况下我们不希望单元测试影响到数据库中的内容,而且受数据库的影响有时我们的单元测试的速度会很慢,所以我们往往希望将持久化部分隔离开,做单元测试的时候不真实 的将数据持久化。这种隔离我们一般运用 抽象的方式,也就是运用 接口或抽象类将持久化层隔离开,然后运用 mock来模拟相应的接口或抽象类来完成相应的持久化类。MoQ就是这种Mock框架之一,MoQ运用 了C#3.0,跟 NMock相比MoQ运用 起来更基本 ,而且是强类型的方式的,源码和dll可以到http://code.Google.com/p/moq/下载。现在MoQ最新的揭晓 版本是3.1版,4.0还处在beta版中,所以我们这里运用 的是3.1版。
  下面我们就来介绍一下MoQ的具体用法:
  一、基础知识
  在运用 MoQ之前我们必须要先在测试程序中引入Moq.dll,运用 MoQ的主要命名空间是Moq,其中最重的类就是Mock<T>,我们可以用这个类来模拟接口。
  1、要领
      public interface ITest
    {
        string Test();
    }
  测试代码:
  基本 测试代码
      [TestMethod()]
      public void TestTest()
      {
         var test = new Mock<ITest>();
         test.Setup(p => p.Test()).Returns("lfm");
         Assert.AreEqual("lfm", test.Object.Test());
      }
  2、匹配参数
         public interface IMatchTest
    {
        string Test(int test);
    }

  匹配测试
var testMatch = new Mock<IMatchTest>();
            testMatch.Setup(p => p.Test(It.Is<int>(i => i % 2 == 0))).Returns("偶数");
            testMatch.Setup(p => p.Test(It.Is<int>(i => i % 2 != 0))).Returns("奇数");
            Assert.AreEqual("偶数", testMatch.Object.Test(4));
            Assert.AreEqual("奇数", testMatch.Object.Test(3));
  上边测试代码模拟实现IMathTest接口实例,其中如果Test要领 的参数是偶数,其返回值为“偶数”。这里的IT用来过滤参数的类,其具体解释可以参见MoQ的文档
  3、属性
         public interface IPropertiesTest
    {
         int Test { get; set; }
    }

            var testProperties = new Mock<IPropertiesTest>();
            testProperties.Setup(p => p.Test).Returns(1);
            Assert.AreEqual(1, testProperties.Object.Test);
或者
                                 var testProperties = new Mock<IPropertiesTest>();
            testProperties.SetupProperty(p => p.Test,1);
            Assert.AreEqual(1, testProperties.Object.Test);
  4、Callback
  当执行某要领 时调用其内部输入的Action委托

int count = 0;
            var testProperties = new Mock<IPropertiesTest>();
            testProperties.Setup(p => p.Test).Returns(1).Callback(()=>count++);
            Assert.AreEqual(1, testProperties.Object.Test);
            Assert.AreEqual(1, count);
  在调用Test要领 是执行了count++
  5、Verification
  判断某要领 或属性能不能 执行过
  如果代码如下:
                                   var testProperties = new Mock<IPropertiesTest>();
             testProperties.Setup(p => p.Test).Returns(1);
             testProperties.Verify(p => p.Test);
             Assert.AreEqual(1, testProperties.Object.Test);
  会抛出异常,因为第3行执行时Test要领 还没有被调用过,改为如下代码可以通过测试
                         var testProperties = new Mock<IPropertiesTest>();
            testProperties.Setup(p => p.Test).Returns(1);
            Assert.AreEqual(1, testProperties.Object.Test);
            testProperties.Verify(p => p.Test);
  其他细节可以查看MoQ文档。
  二、运用
  先建立 一个Account类:


     建立 一个数据库Provider接口:
   public interface ITransferProvider
    {
        void TransferTo(Account accountFrom, Account accountTo);
    }
  然后建立 转账处理类:
             TransferProcess
             public class TransferProcess
      {
          private Account From;
          private Account To;
          private ITransferProvider transfer;
          public TransferProcess(Account from, Account to, ITransferProvider transfer)
          {
              this.From = from;
              this.To = to;
             this.transfer = transfer;
         }
         public void Transfer(decimal money)
         {
             if (money<From.Money)
             {
                 From.Money = From.Money - money;
                 To.Money = To.Money + money;
                 transfer.TransferTo(From, To);
             }
             else
             {
                 throw new Exception("超出余额");
             }
         }
     }

      下边我们来测试这个转账处理类:
   var transfer = new Mock<ITransferProvider>();
            Account accountFrom = new Account() { AccountNum = 1, Money = 1000, Name = "lfm1" };
            Account accountTo = new Account() { AccountNum = 2, Money = 1000, Name = "lfm1" };
            TransferProcess tp = new TransferProcess(accountFrom, accountTo, transfer.Object);
            tp.Transfer(500);
            Assert.AreEqual(500, accountFrom.Money);
            Assert.AreEqual(1500, accountTo.Money);
下面是java
maven3的一个测试项目,由到要用到easyMock
所用到的包:easymock-3.1.jar,cglib-nodep-2.2.2.jar
@Test
    public void testUser(){
        //创建实体对象
        UserBean bean = new UserBean();
        //设定实体对象值,预期值
        bean.setId("1001");
        bean.setUsername("hzg");
        bean.setPassword("123");
        //1、创建mock对象,以接口形式创建
        BaseDao daoMock = EasyMock.createMock(BaseDao.class);
        //2、设定参预期和返回,查询预期值得到所设定的预期结果
        EasyMock.expect(daoMock.queryById("1001")).andReturn(bean);
        //3、结束录制
        EasyMock.replay(daoMock);

        //比较service调用的值是否与设定的值相同
        UserService s = new UserService();
        s.setDao(daoMock);
        UserBean user = s.getUserInfo("1001");
        assertNotNull(user);
        assertEquals("1001",user.getId());
        assertEquals("hzg",user.getUsername());
        assertEquals("123",user.getPassword());
        //4、回放录制
        EasyMock.verify(daoMock);

    }
import org.junit.After;
import org.junit.AfterClass;
import org.junit.Assert;
import org.junit.Before;
import org.junit.BeforeClass;
import org.junit.Ignore;
import org.junit.Test;

public class Junit4TestCase {

    @BeforeClass
    public static void setUpBeforeClass() {
        System.out.println("Set up before class");
    }

    @Before
    public void setUp() throws Exception {
        System.out.println("Set up");
    }

    @Test
    public void testMathPow() {
        System.out.println("Test Math.pow");
        Assert.assertEquals(4.0, Math.pow(2.0, 2.0), 0.0);
    }

    @Test
    public void testMathMin() {
        System.out.println("Test Math.min");
        Assert.assertEquals(2.0, Math.min(2.0, 4.0), 0.0);
    }

        // 期望此方法抛出NullPointerException异常
    @Test(expected = NullPointerException.class)
    public void testException() {
        System.out.println("Test exception");
        Object obj = null;
        obj.toString();
    }

        // 忽略此测试方法
    @Ignore
    @Test
    public void testMathMax() {
          Assert.fail("没有实现");
    }
        // 使用“假设”来忽略测试方法
    @Test
    public void testAssume(){
        System.out.println("Test assume");
                // 当假设失败时,则会停止运行,但这并不会意味测试方法失败。
        Assume.assumeTrue(false);
        Assert.fail("没有实现");
    }

    @After
    public void tearDown() throws Exception {
        System.out.println("Tear down");
    }

    @AfterClass
    public static void tearDownAfterClass() {
        System.out.println("Tear down After class");
    }

}
http://www.blogjava.net/rongxh7/archive/2009/06/28/284438.html
http://thihy.iteye.com/blog/1771826
使用 Visual Studio Team Test 进行单元测试和java中的测试
标签:des style blog http color io os 使用 ar
原文地址:http://www.cnblogs.com/lonelyxmas/p/4005177.html